Visual Effects in Core
Overview
A huge benefit to Core is the vast amount of visual effects that are built-in and easily editable. You get to start with high quality effects that already exist, and truly make them your own.
Our team at Manticore has built a huge level map that you can explore at any time to see just some of the ways that all of our different visual effects (often shorted to VFX) could be used.
To get a tour of what is possible with visual effects in Core, run around this map and then come back to this tutorial to learn how to make a couple of the effects found on this map.
While the map explains many useful things about how to use all the visual effects, this page includes tutorials on how to make wicked cool VFX in Core using Lua.
Dozens of Built-In Effects
Core comes with all sorts of visual effects built-in, all with different parameters for altering how they look and move.
To find all these visual effect objects, navigate to the Core Content tab and click on the "Effects" section.
This window can also be accessed via the dropdown menu "Window -> Core Content".

Currently, there are 7 different sections that contain effects you can use right away:
- Character
- These vfx are specifically human or character-focused.
- Environment
- Elemental effects, and effects that are more nature-oriented.
- Explosions
- Definitely things that blow up.
- Magic
- More ethereal and sparkly effects.
- Misc
- Things that don't fit into the other categories--weird stuff.
- Vehicles
- Effects designed to enhance movement and show physical power.
- Weapons
- These effects were designed specifically with the weapon system, and to go along with attacks.
Tip
Don't be afraid to use any effect for any purpose--don't let categories restrict your creativity.
These larger categories can be found by clicking the little drop down arrow on the left side of the Effects button label. Each of these categories also have subcategories, that can be opened the same way:

To check out what any of these VFX objects do, drag one into your viewport or Hierarchy. In most cases it will start playing immediately, but for one-off animations, you'll probably want to reactivate them multiple times to see what they do.
All VFX have a Play button at the top of their Properties window, so to check out what an explosion looks like, drag it into your scene and hit the Properties' Play button.
Special Effect Materials
Besides all of the more literal visual effects that Core includes, there is also a category of Materials that lend themselves nicely to VFX, the SpecialEffects materials:

Use these in combination with the Effects objects to get even more variety out of what you can make.
Post Processing Effects
Another category of effects that can make huge changes to your map are post process effects. As their name implies, these are applied on top of everything else in your game at the end, so they can be used to change everything visually about the game at once.


To find all our Post Process Effects, check out the Post Processing section of Core Content.

You'll probably want to always use some combination of these--the amount they can level-up a map visually is huge.
Tutorial Videos
Tutorials
While you can use the video above if that is your preference, we'll next go over different effects in a written tutorial.
Post Processing Effects
Just like in the video, let's start with the most dramatic and easy of the visual effects you can use in Core: Post Process Effects.
Post process effects can make very dramatic changes to a map with very little work. You can use as many of them as you want in combination, but this can eventually get tricky when you've got dozens. There are two main ways to use a post process effect: as an unbounded effect, or a bounded effect.
- Unbounded post process volumes are limitless in size, and encompass the entire map.
- Bounded post process volumes use a cube volume to determine what space that post processing effects in the world.
Several post processing effects have both a regular version and an advanced version. Use whichever suits your needs, but in this tutorial we'll go over the advanced versions of these effects.
Time to complete: 10 minutes
Skills you will gain:
- how to edit post process effects in Core
- how to layer post process effects together

Advanced Bloom Post Process
Bloom is, basically, a glow effect. It gives everything that emits light in your scene a sort of magical halo, as though the atmosphere has thickened.
The best way to test post process effects is on an already decorated map with some variety in it. For this tutorial, I grabbed some templates from Community Content. Almost all (if not truly all) of these templates were made by students at Cogswell College during Global Game Jam 2020.
!!! info Those creator usernames are: JaineRoss, mjcortes782, trimun, and TSMVayne.

-
Start by dragging the Advanced Bloom Post Process effect into the project Hierarchy. With default settings, it'll just make a subtle change.

The overall scene is darker and the contrast is higher. Even though it is called bloom, by default it seems to have decreased the bloom from our first scene.
-
Click on the Advanced Bloom Post Process effect in the Hierarchy, and check out the Properties window. We can mess with all sorts of values in here.
To expose all the options we want to change, check the Advanced Settings box to make sure it is on.

Wiggle all those settings around to see what happens. Trying yourself can be the best way to understand what is happening.
-
Here are the settings being used for the Advanced Bloom Post Process effect.

With those settings, the map will look like this:

As you can see, you can go pretty intense with this effect. I went super dramatic to showcase just how much can change, but feel free to find the right balance for your project.
-
Each of the properties you can change has a tooltip to explain what it does. Hover over the name of the property to see the tooltip.
In general though, Blend Weight is the strength of the entire effect on the scene. It is essentially a slider from off to on.
That is different from Intensity, which controls the strength of the bloom itself. This has a cap on the slider, but you can type in any number you want to increase the intensity even more. The slider can be dragged to 15, but for a higher value,
100is typed in to make things ridiculous and blown out. And it's fun--who knows, maybe you'll think of a cool place to use something like this.
Tip
There are a lot of properties in Core that can be overdriven. This means you can manually type in a number higher than what the slider allows. This usually works for properties that act as a multiplier, like the Intensity in this case.
The other fun properties to change on this post process effect are the different colors. This can really change the mood of the entire scene, and is a fun way to affect temperature.
Have fun experimenting with different settings. If you don't see a change immediately, try changing the number very dramatically to get an idea of what is happening.
Ambient Occlusion Post Process
Ambient Occlusion (often abbreviated to AO) can be generally referred to as contact shadows. In the real world, when two objects are close together, less light is able to reach the cracks between them. So, to simulate this virtually, we use ambient occlusion.
Remove the previous post processing effect to go back to the first image.
-
Drag the Ambient Occlusion Post Process into the project Hierarchy from Core Content to get started. The default settings give a subtle effect, but it still makes a difference.

The main noticeable part of the change in this image is underneath the roof close to the camera. It becomes darker, and the shadows of the beams on the ceiling are more dramatic.
-
In the Properties window, make sure to turn on the Advanced Settings button to have access to everything.
-
In this case, you want to make the AO dramatic for the scene, try increasing the setting value. This creates really obvious contact shadows, which grounds everything together. It creates a feeling that things were built intentionally this way, which can help eliminate the feeling of kitbashing one might have in their scene.
Notice the dark shadows under the roof beams, and the darker shadows on the rubble pile on the left.

For this particular dramatic AO effect, the following settings were used:

Adjust the settings to whatever feel best for your scene and mood.
Ambient Occlusion Recolor Post Process
Something particularly fun and weird you can do with the Ambient Occlusion we made is recolor it. This can create some really wacky effects, or in general set a specific color palette for a project.
We're going to continue with the end result of the Ambient Occlusion section, so that we have existing ambient occlusion to recolor. The Ambient Occlusion Recolor Post Process only works in combination with the Ambient Occlusion Post Process.

-
Drag the Ambient Occlusion Recolor Post Process into the Hierarchy. This should result in something like the second image above.
By default it starts with the color brown, which gives a warm darkness to the whole scene. You can alter this to suit whatever helps your scene--perhaps a dark blue would help instead to balance an already warm scene.
These other two images below are a general explanation, and you don't need to do them for the tutorial. Knowing how to achieve these weird effects is good though.

Turning on the Use Two Colors option will give you a second color option, and using the Color Balance slider you can choose which color is more prominent in the scene. This gives you really strong control over the color palette, and lets you do particularly odd and unique things. Such as making weird radioactive shadows, if that's what makes you happy.

The other particularly interesting setting on the recolor post process is modifying Blend Weight. The lower this number is, the more intense this glow effect is. This could be used to showcase damage increasing on the player, or maybe a world on fire or whatever you can imagine.
Lensflare Post Process

In real life, a lens flare is a streak of light glare and sometimes a light shape floating in an image. This happens when light hits a camera lens and scatters around within all the parts that make up the lens. For some photographers, it can be annoying, but in general it is an unavoidable aspect of filming light.
In the virtual world, adding it in can make a scene feel more realistic and grand.
We'll start this section using two of the effects that we made earlier: the Advanced Bloom Post Process and the Ambient Occlusion Post Process both turned on.

-
Drag the Lensflare Post Process into your Hierarchy, and you should get something like the second photo above.
For the scene at this particular angle, the lens flares were not very visible, so the intensity was set to 5. This made the shapes much more visible.

-
Try turning up different settings. The Intensity, Bokeh Size, and Threshold can all be overdriven to create the look you are going for.
-
The Shape property can be the most fun to change for theming of your game. In particular, hearts are fun:

The above image also had increases to Intensity and the Bokeh Size.
Now you know how to control several different post process effects. Each one in Core Content has slightly different base settings and options, but now you have enough knowledge to understand how the others work too. Have fun experimenting.
Visual Effects
The next section of this tutorial focuses exclusively on VFX. Just like the video above, we will be making an interactable treasure chest and using the Core built-in resource system.
Core includes the benefit of having an ever-expanding list of visual effect objects to work with, and thanks to the template system, we can combine these in even more unique ways to achieve whatever your vision may be.
We'll be making a treasure chest that requires an item to open.
Time to complete: 20 minutes
Knowledge Level: No knowledge required, but this tutorial will use some simple Lua scripting. If you've never programmed before, you might want to check out the Lua tutorial first.
Skills you will gain:
- how to play a visual effect on a trigger (at a specific moment)
- how to play a sound effect on a trigger
- how to use community content
- how to give the player resources
- how to combine visual effect objects with sound effects

To start, open up a new project or whatever project you'd like to make this treasure chest in.
Setting up the Treasure Chest
-
Navigate to the Core Content window.
Info
If it is not already open in your Editor's UI, you can open it up by clicking Window > Core Content in the top menu bar.
-
Type "chest" into the search bar within that window.

-
Click on and drag the Chest Small Closed into your project viewport.
-
Right click that chest in your project Hierarchy, and click "New Group Containing This". Name this group "Treasure Chest".
The transform data on the Small Chest Closed (seen in the Properties window while the object is selected) should now be all at default of 0,0,0. All the position data should now be on the parent group that we just created.

-
Next, drag a Small Chest Opened from Core Content into that group we created.
This will place the opened chest in the exact same spot as the closed chest.
-
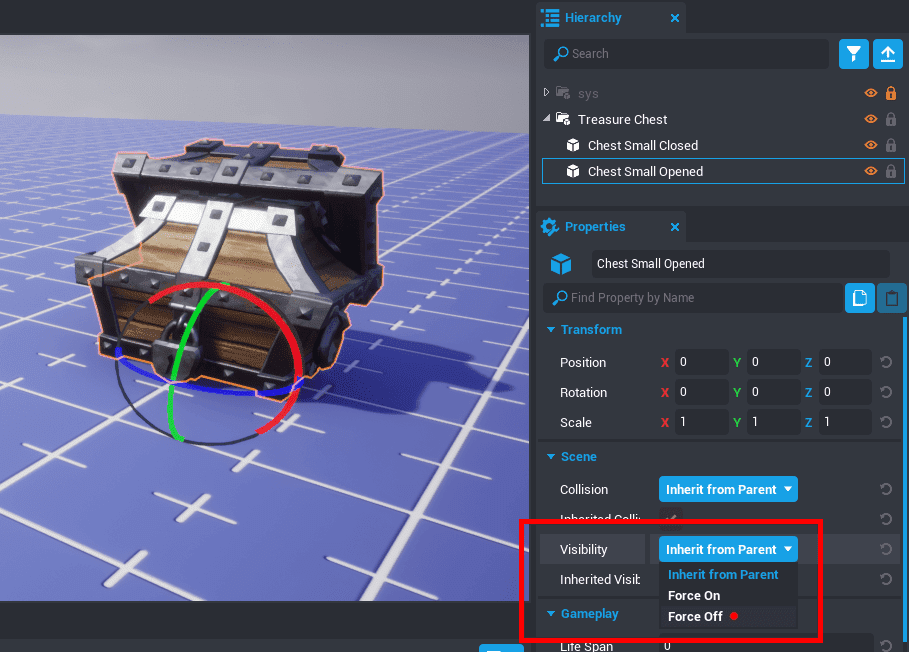
With the Chest Small Opened selected in the project Hierarchy, navigate to the Properties window.
Scroll down to the section called Scene. In here, change the setting for Visibility from Inherit from Parent to Force Off. We're going to hide this chest and unhide it later when we want the chest to be opened.
-
Click the button at the top left of the Core Editor to create a new script; let's call it
TreasureChest.
Drag this script into your TreasureChest group in the Hierarchy.
-
In the Core Content window, search for "trigger". Click and drag the object that shows up into the TreasureChest group in your project Hierarchy.
Note
Overall in your group structure, it's typically best practice to keep your scripts at the top. You're most likely to want to click on them again later, so keeping them at the top helps them be easier to find.
-
With the Trigger selected in the Hierarchy, check out the Properties window. Scroll down to the Gameplay section.
-
Find the Interactable property. Turn this on.
Tip
A trigger can operate in two distinct ways. If Interactable is on, it will turn into a player-confirmed switch. This means the player will have to walk up to it and press F to cause the trigger to active its functions. This works perfectly for things like switches or dialog.
If Interactable is off, the functions connected to the trigger will happen instantly whenever a player simply walks into a trigger. This case is more useful for things like traps, or in general things you don't want the player to know about or have to think about activating.
-
In the Interaction Label property, type "Open."
At this stage, if you press play to try it out, you'll notice that walking up to the treasure chest prompts you to press F to open the chest, but when you press it nothing happens.
That's where the cool stuff we're going to make comes in.
Tip
Make sure your spawn point and treasure chest are not overlapping. Otherwise, when you press play, you might be stuck inside the chest.
Press V to toggle gizmos on and off to see both the spawn point and the trigger we created.
-
-
First, in order to use that trigger in our script, we need to access it. Select your
TreasureChestscript in the Hierarchy. While it is selected, click and drag the trigger onto the Properties window for the script.This adds the trigger as a custom property on the
TreasureChestscript. Custom properties are wonderfully simple ways to use any part of the project or hierarchy that you need to in your code.Do this same action--dragging the objects from the Hierarchy into the script Properties window--for the Chest Small Opened and the Chest Small Closed.

-
We need two other custom properties on our script. At the bottom of the Properties window, click the "Add Custom Property" button. Choose the type AssetReference, as we'll be adding something here that we haven't created yet. Name this one OpeningVFX, and the second one (also an AssetReference type) LockedVFX.
-
Now that we've got everything we need, double click the
TreasureChestscript to open it up.
Writing the Interaction Script
-
We'll want all those custom properties we created. To use the code for accessing them, copy it from the Properties window of the script.
-
A handy prepared snippet of code for everything you need is listed beneath the custom properties of the script. Right click in this black box of text, and click select all, then again and click copy.
-
Now in your script, right click to paste everything in there.
-
With all these variables pasted in, your script should look like this:
local propTrigger = script:GetCustomProperty("Trigger"):WaitForObject()
local propChestSmallOpened = script:GetCustomProperty("ChestSmallOpened"):WaitForObject()
local propChestSmallClosed = script:GetCustomProperty("ChestSmallClosed"):WaitForObject()
local propOpeningVFX = script:GetCustomProperty("OpeningVFX")
local propLockedVFX = script:GetCustomProperty("LockedVFX")
-
-
Next we need to create a function for the moment the player interacts with the treasure chest. This is what happens when the player presses F when prompted by the trigger we placed.
In your script, beneath all those variables we just pasted in, add this code:
local function OnSwitchInteraction(theTrigger, player)
    UI.PrintToScreen("Hi! You've triggered an event.")
end
Right now all this does is print directly on our screen the message we type in. Super simple to get it going.
-
So now we have the function, but in order for it to work when we press play, it needs to be connected to the event called interactedEvent of the trigger.
Copy this code into the end of your script to do this:
propTrigger.interactedEvent:Connect(OnSwitchInteraction)Info
Events are built-into many objects in Core. To read more about different events on various objects, check out the API Overview.
-
Now try pressing Play.
When you walk up to the treasure chest and interact with it by pressing F, our message appears on the screen.
Now it'd be real cool if this treasure chest required an item to open it. So, let's create that item.
Creating a Pickup to Unlock the Chest
-
Community Content is an insanely valuable resource for making your life easier. Other users (and even you too if you want!) post creations that they have made for anyone to use. This helps people who prefer to program still have quality and varied art models to use in their games, and art people who need coding help the types of resources to do that.
In our case, we want an item the player can pick up. Luckily, there is something like that already on Community Content.
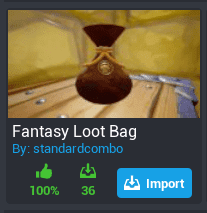
Navigate to the Community Content tab. Type "loot" into the search bar, and import the Fantasy Loot Bag by standardcombo. We're going to repurpose this.
-
Click over to the Core Content tab. You'll see an Imported Content section, and within it, the Fantasy Loot Bag. Click this to drag the green Loot Bag object into your viewport or project Hierarchy.
Move it around so that it's somewhere you can see it and get to it.
-
Press play to check out how it works by default. When you walk up to it, it'll prompt you with "Press F to pick up" and if you do, there is a sound effect and flash of light that happens while your character does an animation to grab it.
Depending on where the Loot Bag is in relation to the player, a different animation will play.
The varied animations of the Fantasy Loot Bag There's several things we're going to change about the Loot Bag to suit our needs here with the Treasure Chest.
-
Click the Loot Bag in the Hierarchy, and drop down the folder structure to see the contents. We're looking for the Trigger right now. Click this, and check out the Properties tab. Scroll down to the Gameplay section, and uncheck the box for Interactable.
Now when a player walks over it, they will instantly grab it, rather than have to press F first.
-
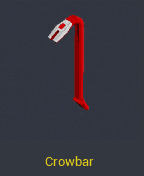
We can use whatever art we want in this object, so instead of a coin pouch let's try a crowbar. For prying that chest open with.
Beneath that trigger, there is a ClientContext folder. Within this folder are all the objects that make up the visual component of the Loot Bag. Don't delete the whole folder, but delete all of these contents so that we can start fresh.
-
Click over to the Core Content tab, and type "crowbar" into the search box.
Drag the red object that shows up into the ClientContext folder that we just emptied. Now our Loot Bag is a crowbar.
Check that all the transforms on the Client Context folder are at 0,0,0 to be sure the crowbar is at the right size and location.
-
The only other important thing we'll want to change is on the root folder of the Loot Bag object.
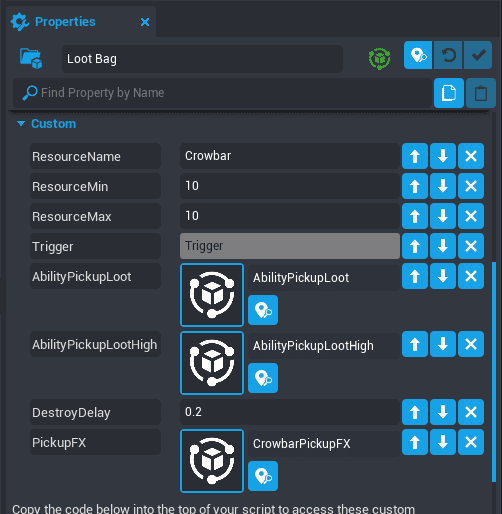
One of the custom properties is called "ResourceName". Be default it is "Gold" and therefore that's what resource is given to the player when they pick it up. We want this to be a crowbar, so let's just call it
Crowbar!Tip
Make sure to pay attention to your casing of a resource. The resource "Crowbar" is completely different from "crowbar".
Now when walking up the crowbar, the player will automatically pick it up. But, it still has the coin sound effect by default, and that feels pretty weird with this object. So, let's create a new effect to play.
Creating a Pickup Effect Template
-
To start creating an effects template, let's create a folder. Right click in the empty space of the Hierarchy to create a New Folder. Name it "CrowbarPickupFX".
-
In Core Content, search "step metal hollow" and drag the
Footstep Metal Hollow 01 SFXonto that new folder we made. -
Next look up "gear movement shuffle light" in Core Content and drag
Gear Movement Shuffle Light 01 SFXinto the folder as well. -
Right click the CrowbarPickupFX folder, and select "Enable Networking" to enable this and all children to be networked. This means the state of it is known by the server, and all game clients.
-
Select both of those sound effects we added at once, and in the Properties window, turn the Auto Play box on. We want these sounds to play the moment they are created.
Tip
 The top right of the Properties window includes a play button for testing a sound. If you turn Apply Effects on, it will take into account whatever you change about the Properties.
 -
Scroll up a bit in the Properties window, and set the Life Span to 2.
-
Now we've got it all set. To use it in other places, we're going to make it into a template. Right click the root folder, and select "Create New Template from This". Now we have a custom sound effect template to use anywhere.
-
Since all templates in the Hierarchy are only instances of a template saved into Project Content, we can delete this one. We want our script to spawn the sound effect at the right moment.
-
-
Click back onto the Loot Bag object. In the Properties window, notice the custom property "PickupFX".
In the Project Content tab, find your new CrowbarPickupFX template. Drag this into that custom property on the Loot Bag.
-
Now when you press play to test, it should play your new sound effect when picking up the crowbar.
-
Now we come back to scripting. We need to make sure the player has the crowbar when trying to open the treasure chest in our interaction code we wrote earlier.
Replace all the code of your
OnSwitchInteractionfunction with this:local function OnSwitchInteraction(theTrigger, player) if player:GetResource("Crowbar") > 0 then player:RemoveResource("Crowbar", 1) propChestSmallClosed.visibility = Visibility.FORCE_OFF propChestSmallOpened.visibility = Visibility.INHERIT else UI.PrintToScreen("No crowbar") end endThis adds an if statement inside our trigger. If the player has a crowbar, then it will take that crowbar away from the player and swap which chest is visible, effectively switching to the open treasure chest form.
If the player has zero or less crowbars (if it were physically possible to have negative crowbars), it prints that out onto the screen.
-
Now we just want to make sure that our TreasureChest root group has networking enabled. Right click it do enable this.
It works--but it looks basic.
Now if we test it, everything works correctly. But it sure looks plain and that feels bad. Let's add more effects to improve this.
Creating the Opening and Locked Effects
-
Create two new folders in the project Hierarchy by right clicking in the open space. Name one
OpenedFXand the otherLockedFX. -
We'll start with the opening effect. In Core Content, search for "health spiral". Drag what shows up into the
OpenedFXgroup--We're gonna modify some properties on it to use.All of these settings will be found in the Properties window with the Health Spiral VFX selected in the project Hierarchy.
- Scroll down to the section called "Smart" and change the Radius to 7.5 to be wider.
- Increase the Spiral Speed to 8.
- Set the Ring Life to 1. So we've got a neat visual effect now.
- Now we need some sound effects: search for
Meta Fantasy Treasure 01 SFXin Core Content and theObject Fantasy Treasure Chest Open 01 SFXand drag each one into theOpenedFXfolder. - Select both of these effects in the Hierarchy, and turn Autoplay on for both in the Properties window.
- Give each one a Life Span of 2.
-
Now that we've got all the contents of our new effect set up, we need to enable networking on its root folder via the right-click menu.
-
Right click this group and create a template from it. After making it into a template, delete it from the project Hierarchy.
-
Click back onto the
TreasureChestscript from earlier. Drag your new effect into the custom property for the OpeningVFX on theTreasureChestscript.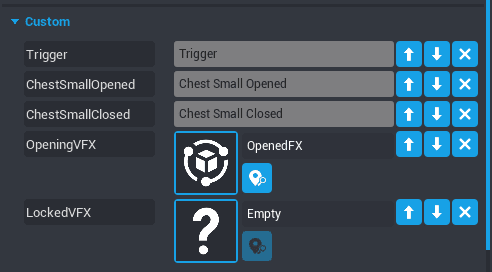
-
Now we need to spawn this effect in our code.
By adding this new code to spawn our effect and destroy the trigger, your function should look like this:
local function OnSwitchInteraction(theTrigger, player)
    if player:GetResource("Crowbar") > 0 then
        player:RemoveResource("Crowbar", 1)
        propChestSmallClosed.visibility = Visibility.FORCE_OFF
        propChestSmallOpened.visibility = Visibility.INHERIT
        World.SpawnAsset(propOpeningVFX, {position = theTrigger:GetWorldPosition()})
        theTrigger:Destroy()
    else
        UI.PrintToScreen("No crowbar")
    end
end
Notice that we are destroying the trigger at this step so we don't need to worry about reinteracting with it or being prompted on-screen with "Open" still.
Now the opening effect that we made should play when opening the chest. This helps the action to feel more intentional and rewarding as a player.
Now we've got a sparkly little opening effect! -
Next let's create the
LockedFXfor when a player tries to open the chest without having the crowbar first.- In Core Content, search for "impact lines" and drag the result into your
LockedFXfolder. This gives us a visual component. - Next search Core Content for a "Mechanical Gear Lock 01" to be the audio part of this effect. Drag it into the
LockedFXfolder. - Change this audio object Auto Play property to be on.
- In Core Content, search for "impact lines" and drag the result into your
-
Now we've got all the parts, but we need to enable networking on the root folder first via the right-click menu.
-
Right click to turn this
LockedFXobject into a new template. -
Just like before, delete this first instance from your project Hierarchy. Click that
TreasureChestscript and drag our newLockedFXtemplate into the custom property we created calledLockedVFX. -
We want this
LockedFXtemplate to spawn when the player doesn't have a crowbar, so let's replace theUI.PrintToScreen()line with lines to spawn the template.This will make your whole
OnSwitchInteraction()function look like this:local function OnSwitchInteraction(theTrigger, player) if player:GetResource("Crowbar") > 0 then player:RemoveResource("Crowbar", 1) propChestSmallClosed.visibility = Visibility.FORCE_OFF propChestSmallOpened.visibility = Visibility.INHERIT World.SpawnAsset(propOpeningVFX, {position = theTrigger:GetWorldPosition()}) theTrigger:Destroy() else World.SpawnAsset(propLockedVFX, {position = theTrigger:GetWorldPosition()}) end endThis makes it easier to tell that the player is indeed interacting with the chest--just not in the right way.
Now you've got some basic effects set up for your treasure chest. You have learned how to create effect templates by combining various visual effects with sound effects, and how to spawn them at specific times. Go forth, and make more awesome stuff.
More Tips & Info
In most cases you won't need to code to use the visual effects in Core. Often times templates will have a custom property for more effect templates, so you can make your own effects as templates and just drag and drop them into other content--just like the Fantasy Loot Bag we used.
There are so many ways that you can make effects unique. By combining several of them, changing their properties dramatically, and using them connected through code you can change the timing and positions of effects in whatever ways you can dream up.