Templates in Core
Overview
Templates are a way to create convenient, reusable packages in Core. They can be modified 3D objects, complex models, scripts, completely scripted objects, or collections of all of these.
Templates can be identified in the Project Content window by this icon: 
This document will explain how to create templates, publish them to Community Content, republish
When to Use Templates
- Saving templates locally allows you to make changes across every copy of the template across a project. When one template is updated, it updates every instance of the template.
- Publishing a template privately allows you to import the template into other projects, re-using assets across games.
- Publicly publishing templates adds them to Community Content for others to use and modify for their own projects. This allows multiple creators to work on a template, adding different variations, or more functionality.
Creating Templates
To learn how to create groups and folders, see the Complex Objects reference.
Create a Template from a Group
- Right click the group and select Create New Template from This.
- Name your template and click the New Template button.
Create a Template from Separate Objects
- If the assets are not in the Hierarchy, drag them from Project Content onto the Hierarchy or Main Viewport.
- Select the assets to be added to the template in the Hierarchy window using Ctrl + left click.
- Right click on one of the objects and select Group and Create New Template from These.
- Name your template and click the New Template button.

Once a group becomes a template, it will be blue in the Hierarchy. New templates can be found in the Project Content window in the section called My Templates. From there you can drag out as many copies of the template as needed.
Publishing Templates
Once your template is created, you may use it for just this project alone, or you can now further publish the template to Community Content for sharing with others and between different projects.
Open the Publishing Dialog
- Find the template in the Project Content window.
- Click the Publish Content button in the Properties menu.

Note
You can also right click the template and select Publish to Community Content
Name and Describe the Template

- Give the template a name. This does not need to match the template name in the project, and can be more descriptive or specific help creators understand the template.
- Write a description for your template. This section can include list of the individual objects in the template, possible uses, and attributions to other creators who helped with the template.
- Add tags. These are important so your content shows up properly in search and the browse sections.
Add a Screenshot
Screenshots are the most effective way to showcase a template, and help others understand what it is.
Upload a Screenshot
Uploading a screen shot allows you to use an external image editing software to improve your screenshot. This can be most useful when you need to convey for abstract information, like what a script does.
- Use the Print button on your keyboard to copy a screenshot to your clipboard.
- Paste the captured image into an image editor, and save the file when you have finished editing it.
- Select the Screenshots button to upload a screenshot from your computer.
Publish to Community Content
- Mark your permissions as either public or private.
- Private templates can only be seen in Community Content by the creator who published them.
- Public templates can be seen and used by everyone in Community Content.
- Click Review & Publish and review your settings. Don't worry about it being perfect, as this may all be edited after publishing.
- Click Publish.
In Project Content, the template's name should turn from white to green.

You can search for the published template in the Community Content window. Templates are displayed chronologically, so it will most likely be at the top of the list.

Publishing Template Packs
For Community Content, it often makes sense to publish more than one template together as a pack. This works exactly the same as publishing a single template, except that you use Ctrl to select multiple templates. Once all the templates for the pack are selected, you can use the Publish Content button or right click and select Publish to Community Content to publish the templates together as a single package on Community Content.
Exporting Templates
Templates can also be shared as files, which is particular useful when creating a template to be used by another creator that you do not want to share generally in Community Content. All templates exist as .pbt files in your the project folder (Map). However, to share a template with all of its custom materials packaged with it, you will need to use the Core Export.
Note
The template files that you export in Core are not model files, like a .blend file, but rather assembly instructions to create your template using Core assets, so it will not be possible to import them into a program besides Core.
Export a Template
- In the Project Content window, open the My Templates section, and locate the template that you want to share.
- Right click the template and select Export. This exports the file and opens up a folder called Templates in from your Project Folder
- Select the file that has the name of your template, followed by the .pbt file type. This can be e-mailed, sent via chat programs or uploaded to a cloud drive like any file.
Add a Template File to your Project
- Open your project directory from the Core Editor by going to File > Show Project in Explorer.
- Open the Data folder, and then the Templates folder.
- Close the project in the Core Editor by going to File > Back to Main Menu.
- Move your template .pbt file into the Templates folder.
- Open the project again in the Editor, and find your added template in the Project Content window under My Templates.
Note
If you add a template while the project is open, it will not appear in the My Templates folder, and then will be deleted by the next save, so always close the project before adding a .pbt file.
Updating Templates in a Project
Once a 3D model is made into a template, it will resist changes besides positioning and resizing all of its dimensions together to preserve its basic shape. To make changes to the materials, dimensions, or individual pieces of a template, it will need to be deinstanced.
What is an instance?
A template can be understood as a recipe. Each time the recipe is made, that product is an instance of the template. Deinstancing would be making a change in the final product of the recipe, so that it is now different from the exact copies of the recipe. Changing the recipe itself -- updating the template -- should change every single instance of the recipe.
Deinstance a Template
To make changes to a template, you will need to first deinstance it. This can be done automatically by making a change to a the template.
- Make a change to a component or property of an object in the template.
- Click Yes when the prompt appears asking if you want to deinstance the template.
A deinstanced template will change color from blue to teal. Changes made to a deinstanced template will not affect other copies of the template.
Update All Template Copies
To change all of the instances of a template, you will need to deinstance and modify an instance of the template, and then update the others to match it.
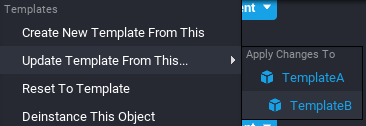
- Right click on a deinstanced template with the latest changes.
- Click Update Template From This to update all the instances of the template to match it.
Republishing a Template
Republish a Shared Template
Updating templates with change all the instances in your game, but to update the version that has been published to Community Content, we will need to re-publish the template.
- In your Project Content window.
- Find the My Shared Content folder on the right side.
- Right click the template in the left-side navigation, and select Republish.
- In the publishing prompt, add a description of the most recent changes to the Summary section, so that creators know what to expect.

Creators will be able to get updates to the template by right-clicking the template and selecting Download Latest.
Reset a Deinstanced Template
Another benefit of templates is creating a saved version of an model that can be restored.
To revert the template back to the original design, right click the template within the Hierarchy and select Reset to Template.
Using Templates from Other Creators
Templates made by other creators can be imported from Community Content and used in a project or modified and published as a new template.
To learn more about importing and using Community Content templates, see the Community Content reference.

Nested Templates
Nested Templates allow creators to include template instances inside other templates. Nested templates keep a link to their own template asset, while being part of another template asset. This allows for modular workflow when making a system that has many different subcomponents. This also allows teams of creators to use asynchronous collaboration when changing one aspect of a big and complex design.
One example of using nested templates is for a racing game that has different car templates. If the creator wanted to add a dirt decal to the tires of all the car templates, then it would require updating each car template one by one. Using nested templates can shorten this to just one action by using a tire template nested within the car template. Updating the tire template would change all instances of the tire even across the different parent car templates.
Templates can only be nested up to 16 levels deep.
Creating Nested Templates
A nested template can be created by dragging one template into another in the Hierarchy window. The parent template needs to be deinstanced in order for the child template to be added.
Updating Nested Templates
When updating a child template inside another template, there is an option of which template to update. This can be useful to change the child template in all instances or to change an individual child template property (for example, only the front right tires are yellow for all taxi cars).
If the child template is deinstanced when the parent template is updated, then the child template is abandoned.
Learn More
Community Content | Modeling Complex Objects | Intro to the Editor | Scripting Basics