Creating a Cosmetic System
Overview
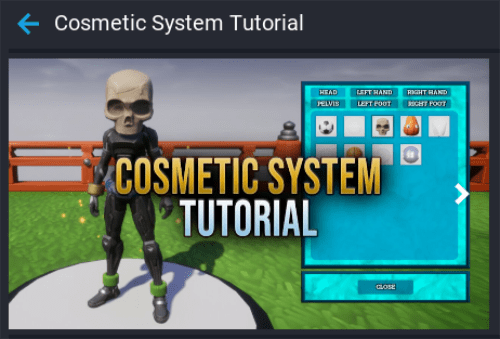
In this tutorial you are going to create a cosmetic system for players so they can attach different cosmetics to parts of the player's character.
- Completion Time: ~2 hours
- Knowledge Level: It's recommended to have completed the Scripting Beginner and Scripting Intermediate tutorials.
- Skills you will learn:
- Overriding the default camera.
- Attaching objects to the character.
- Camera capturing for UI.
- Persistent storage.
- Toggling UI panels.
Import Asset from Community Content
You will be importing an asset from Community Content that will contain various components you will drop into the Hierarchy while you follow the tutorial.
- Open the Community Content window.
- Search for
Cosmetic System Tutorialby CoreAcademy. - Click Import.
Add Cosmetic Template to Hierarchy
The content imported from Community Content contains some cosmetics and UI already set up ready to be used.
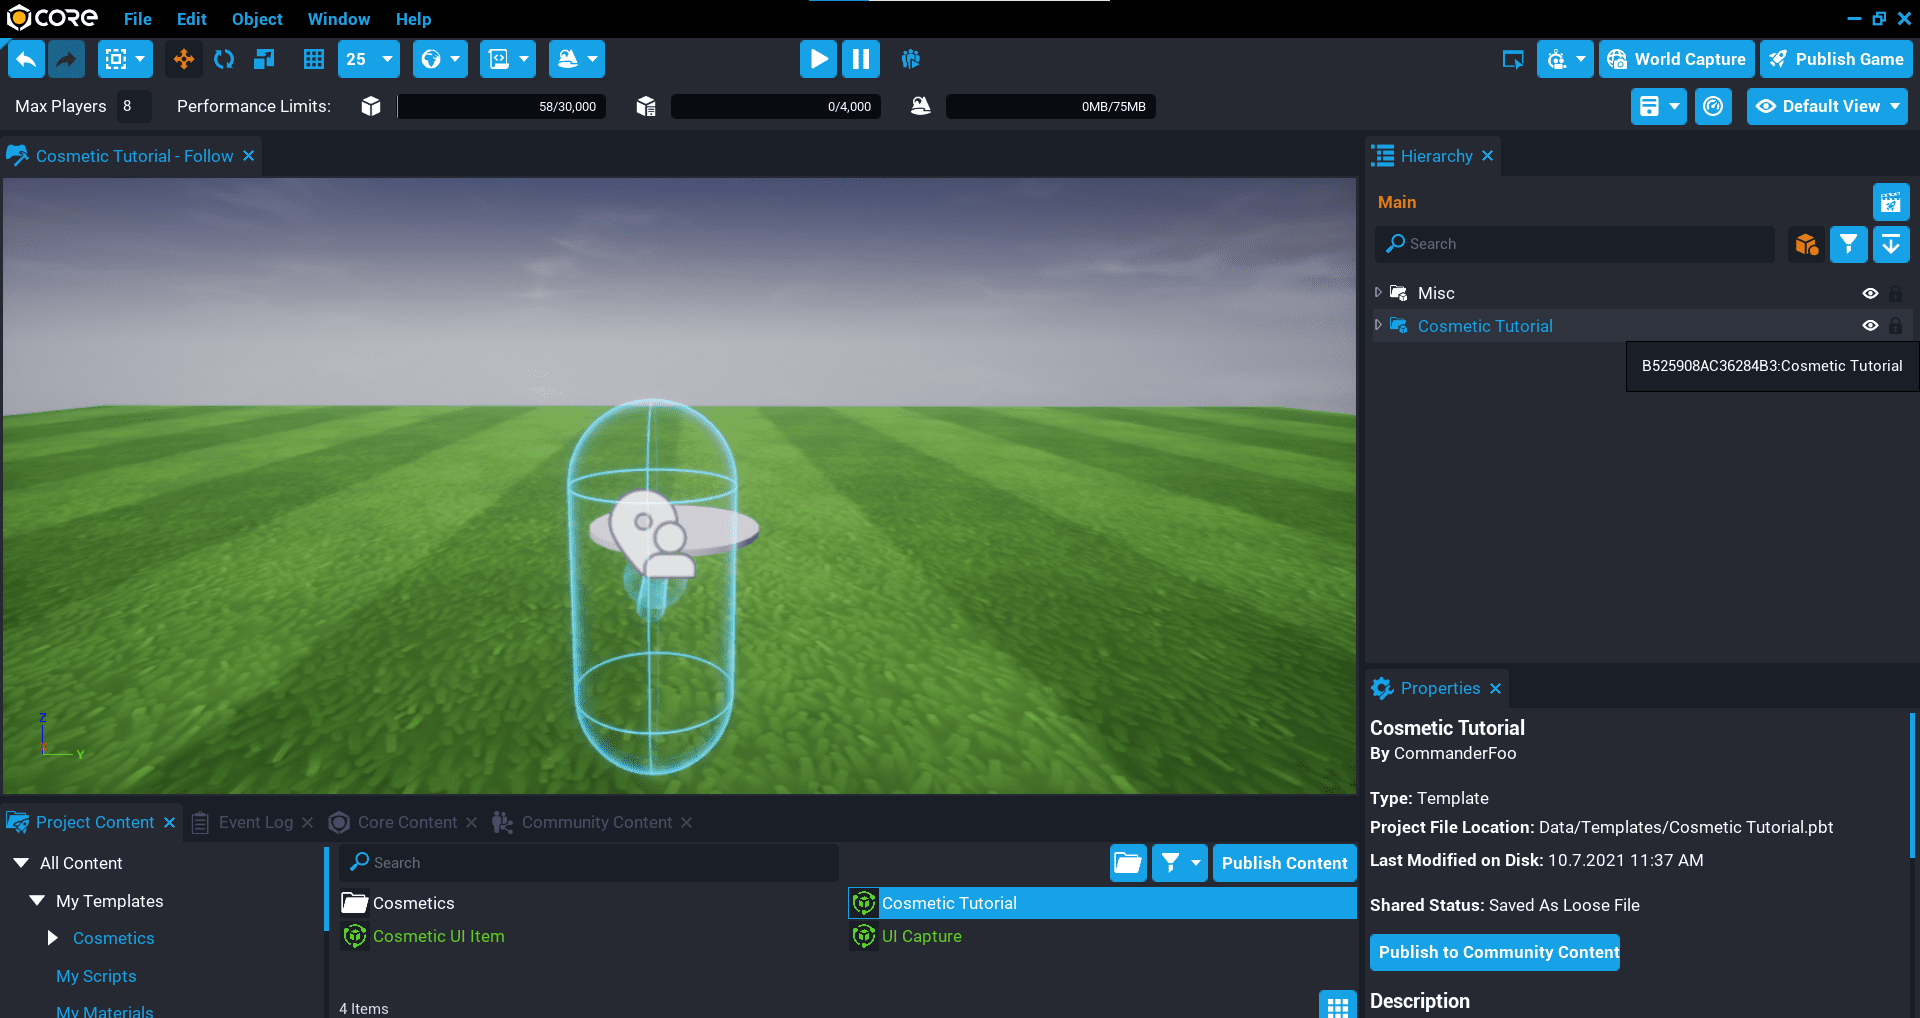
- Click the Project Content tab.
- Click My Templates under All Content.
- Add the template Cosmetic Tutorial into the Hierarchy.
- Deinstance the Cosmetic Tutorial template in the Hierarchy.
Create Cosmetic Trigger
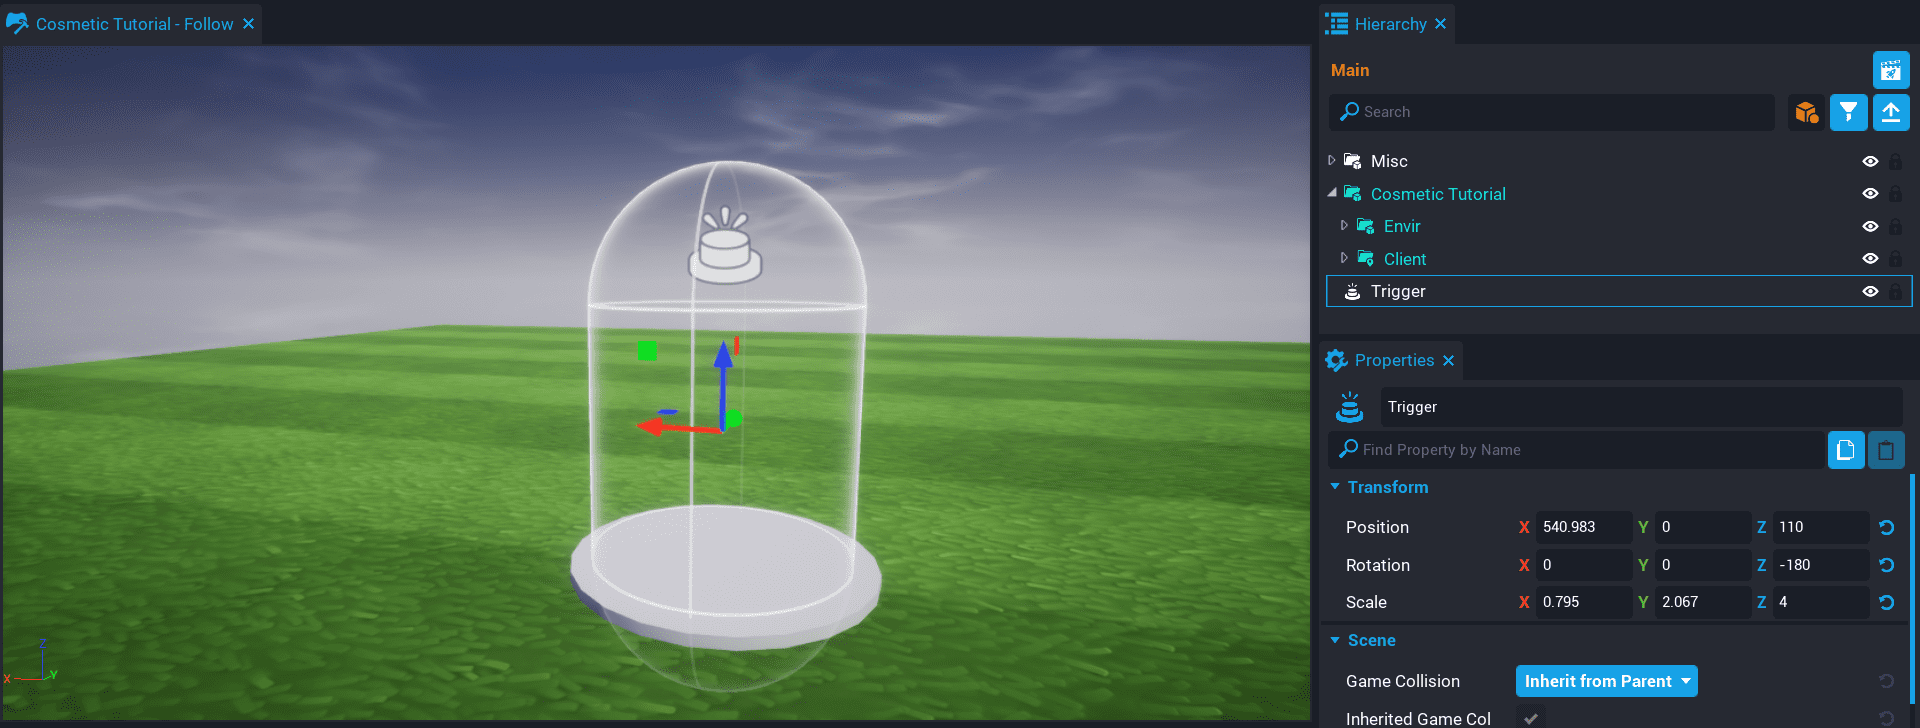
A trigger needs to be added where the platform is to detect the player so you can override the camera and show the cosmetic UI.
When positioning the trigger, make sure it is high enough up, otherwise, the player's character will be in the ground.
- Create new Trigger object.
- Move the trigger so it is on the platform object (found in the Envir group).
- Change the trigger Shape to Capsule in the Properties panel.
- Scale the trigger to cover the platform.
Create Cosmetic Camera
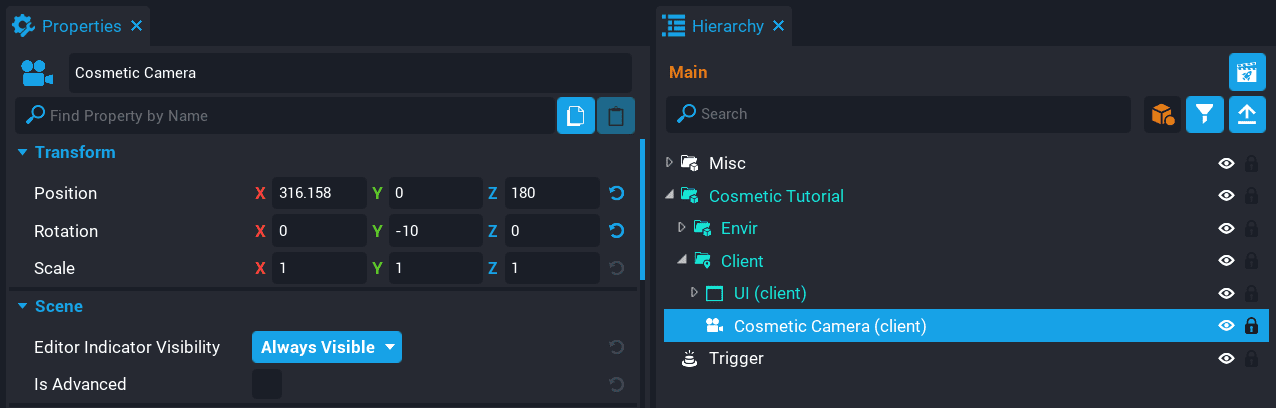
When the player enters the trigger, a camera will override the default camera so players can see their character while changing cosmetic items.
- Create a new camera and name it
Cosmetic Camera. - Place the camera inside the Client group.
- Disable Use as Default.
- Disable Attach to Local Player.
- Set Base Rotation Mode to Camera.
Create CosmeticServer Script
The CosmeticServer script will handle detecting when the player enters the trigger. This is done on the server so you can position and rotate the player's character to face the cosmetic camera.
Create a new script called CosmeticServer and place that script into the Hierarchy.
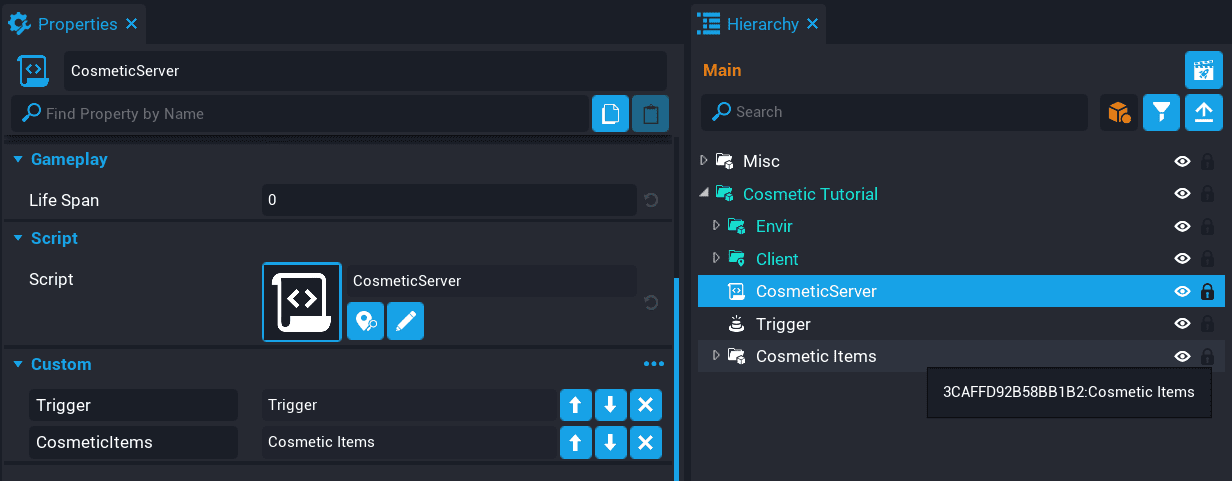
Add Trigger Custom Property
Drag the trigger you created earlier, onto the CosmeticServer script as a new custom property. Name the custom property Trigger.

Edit CosmeticServer Script
Open up the CosmeticServer script.
Add Trigger Variable
local TRIGGER = script:GetCustomProperty("Trigger"):WaitForObject()
You need a reference to the trigger for later when connecting up the beginOverlapEvent.
Create DisablePlayer Function
local function DisablePlayer(player)
    player.isMovementEnabled = false
    player.desiredFacingMode = FacingMode.FACE_MOVEMENT
    player.canMount = false
end
Create the DisablePlayer function. This will stop the player from being able to move their character, or use their mount while the cosmetic UI is open. The desiredFacingMode property for the player is set to FACE_MOVEMENT, otherwise, the player's character can end up facing away from the camera.
Create EnablePlayer Function
local function EnablePlayer(player)
    player.isMovementEnabled = true
    player.desiredFacingMode = FacingMode.FACE_AIM_WHEN_ACTIVE
    player.canMount = true
end
Create the EnablePlayer function. This will give back control to the player's character so they can move around and use their mount when the cosmetic UI has been closed.
Create OnTriggerOverlap Function
local function OnTriggerOverlap(trigger, obj)
    if Object.IsValid(obj) and obj:IsA("Player") then
        DisablePlayer(obj)

        local triggerPos = trigger:GetWorldPosition()
        local triggerRot = trigger:GetWorldRotation()

        obj:SetWorldPosition(Vector3.New(triggerPos.x, triggerPos.y, triggerPos.z))
        obj:SetWorldRotation(Rotation.New(0, 0, triggerRot.z))

        Events.BroadcastToPlayer(obj, "EnableCosmeticChanger")
    end
end
Create the OnTriggerOverlap function. This function will check the object that entered the bounds of the trigger is a Player type. If it is a player that entered the trigger, then DisablePlayer is called to disable the player's control of their character.
obj:SetWorldPosition(Vector3.New(triggerPos.x, triggerPos.y, triggerPos.z))
obj:SetWorldRotation(Rotation.New(0, 0, triggerRot.z))
The position and rotation of the player need to be set. The position of the player can be set using the position of the trigger. The z rotation of the trigger is used for the player so the player's character faces the direction of the trigger. This will make the player's character face the cosmetic camera.
The position and rotation of the player need to be set. You can use the position and rotation of the trigger. Using the rotation gives you more flexibility in the direction a player is facing.
Events.BroadcastToPlayer(obj, "EnableCosmeticChanger")
A broadcast to the player that overlapped the trigger is done. A client script will listen for the event and handle overriding the camera and showing the cosmetic UI to the player.
Connect Events
TRIGGER.beginOverlapEvent:Connect(OnTriggerOverlap)
Add the above line so the beginOverlapEvent for the trigger is connected.
Events.ConnectForPlayer("EnablePlayer", EnablePlayer)
Add the above line. The EnablePlayer broadcast event will be called from the client, but you can set this up now.
The CosmeticServer Script
CosmeticServer
local TRIGGER = script:GetCustomProperty("Trigger"):WaitForObject()

local function DisablePlayer(player)
    player.isMovementEnabled = false
    player.desiredFacingMode = FacingMode.FACE_MOVEMENT
    player.canMount = false
end

local function EnablePlayer(player)
    player.isMovementEnabled = true
    player.desiredFacingMode = FacingMode.FACE_AIM_WHEN_ACTIVE
    player.canMount = true
end

local function OnTriggerOverlap(trigger, obj)
    if Object.IsValid(obj) and obj:IsA("Player") then
        DisablePlayer(obj)

        local triggerPos = trigger:GetWorldPosition()
        local triggerRot = trigger:GetWorldRotation()

        obj:SetWorldPosition(Vector3.New(triggerPos.x, triggerPos.y, triggerPos.z))
        obj:SetWorldRotation(Rotation.New(0, 0, triggerRot.z))

        Events.BroadcastToPlayer(obj, "EnableCosmeticChanger")
    end
end

TRIGGER.beginOverlapEvent:Connect(OnTriggerOverlap)

Events.ConnectForPlayer("EnablePlayer", EnablePlayer)
Test the Game
Test the game and make sure the following work.
- Player is positioned when entering the trigger.
- Player is rotated to face the camera when entering the trigger.
- Movement controls are disabled, so movement inputs do not move the player.
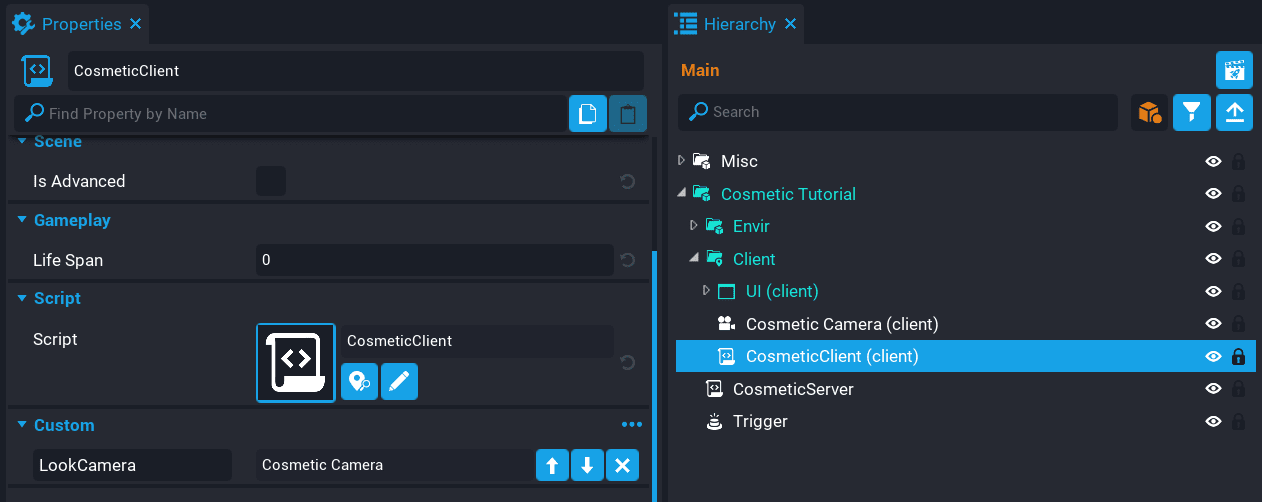
Create CosmeticClient Script
Create a new script called CosmeticClient and place it into the Client folder. This script will handle the camera overriding.
Add LookCamera Custom Property
Drag the Cosmetic Camera you created earlier, onto the CosmeticClient script as a new custom property. Name the custom property LookCamera. The Cosmetic Camera will be overriding the default camera so it is looking at the player.
Edit CosmeticClient Script
Open up the CosmeticClient script and add the following variables.
local LOOK_CAMERA = script:GetCustomProperty("LookCamera"):WaitForObject()
local localPlayer = Game.GetLocalPlayer()
Create EnableCosmeticChanger Function
local function EnableCosmeticChanger()
    UI.SetCursorVisible(true)
    UI.SetCanCursorInteractWithUI(true)

    localPlayer:SetOverrideCamera(LOOK_CAMERA, .2)
    Events.Broadcast("ShowCosmeticUI")
end
The EnableCosmeticChanger function will be called when the EnableCosmeticChanger event is fired. This function will enable the cursor and allow the player to interact with the UI.
localPlayer:SetOverrideCamera(LOOK_CAMERA, .2)
When the player enters the trigger on the platform, you need to override the player's camera. This can be done by using SetOverrideCamera for the local player by passing in the LOOK_CAMERA and a lerp time of .2 for the arguments. The lerp time is the time it takes to smoothly go from the current active camera to the camera set as the override.
Events.Broadcast("ShowCosmeticUI")
The event broadcast ShowCosmeticUI is set up now. This will be broadcast to another client script that will show the cosmetic UI to the player. This will be done in a later section.
Create ClearCamera Function
local function ClearCamera()
    UI.SetCursorVisible(false)
    UI.SetCanCursorInteractWithUI(false)

    localPlayer:ClearOverrideCamera(.2)
end
When the player closes the cosmetic UI, the camera needs to be cleared so it reverts back to the default camera for the player.
localPlayer:ClearOverrideCamera(.2)
Clearing the override camera can be done using ClearOverrideCamera for the local player. Passing in a lerp time will smoothly transition back to the default camera for the player.
Connect Broadcast Events
Events.Connect("EnableCosmeticChanger", EnableCosmeticChanger)
Events.Connect("ClearCamera", ClearCamera)
Add the above lines to connect the events. The ClearCamera function will be called when the ClearCamera broadcast event is fired, and the EnableCosmeticChange is fired from the server when the player enters the cosmetic trigger on the platform.
The CosmeticClient Script
CosmeticClient
local LOOK_CAMERA = script:GetCustomProperty("LookCamera"):WaitForObject()

local localPlayer = Game.GetLocalPlayer()

local function EnableCosmeticChanger()
    UI.SetCursorVisible(true)
    UI.SetCanCursorInteractWithUI(true)

    localPlayer:SetOverrideCamera(LOOK_CAMERA, .2)
    Events.Broadcast("ShowCosmeticUI")
end

local function ClearCamera()
    UI.SetCursorVisible(false)
    UI.SetCanCursorInteractWithUI(false)

    localPlayer:ClearOverrideCamera(.2)
end

Events.Connect("EnableCosmeticChanger", EnableCosmeticChanger)
Events.Connect("ClearCamera", ClearCamera)
Test the Game
Test the game and make sure the following work.
- Cursor is visible.
- Override camera is looking at the player.
Open Cosmetic UI for the Player
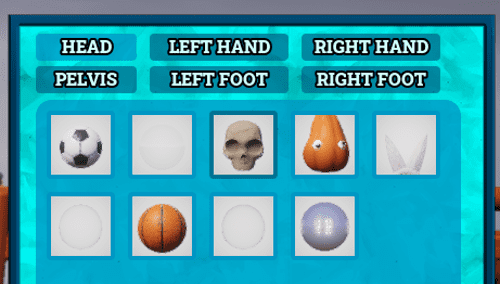
When the player enters the trigger on the platform, the cosmetic UI needs to open so the player can select cosmetic items to attach on the player's character.
The cosmetic UI has already been created for you. The Cosmetic Panel (found in the UI group) will be opened automatically for the player.
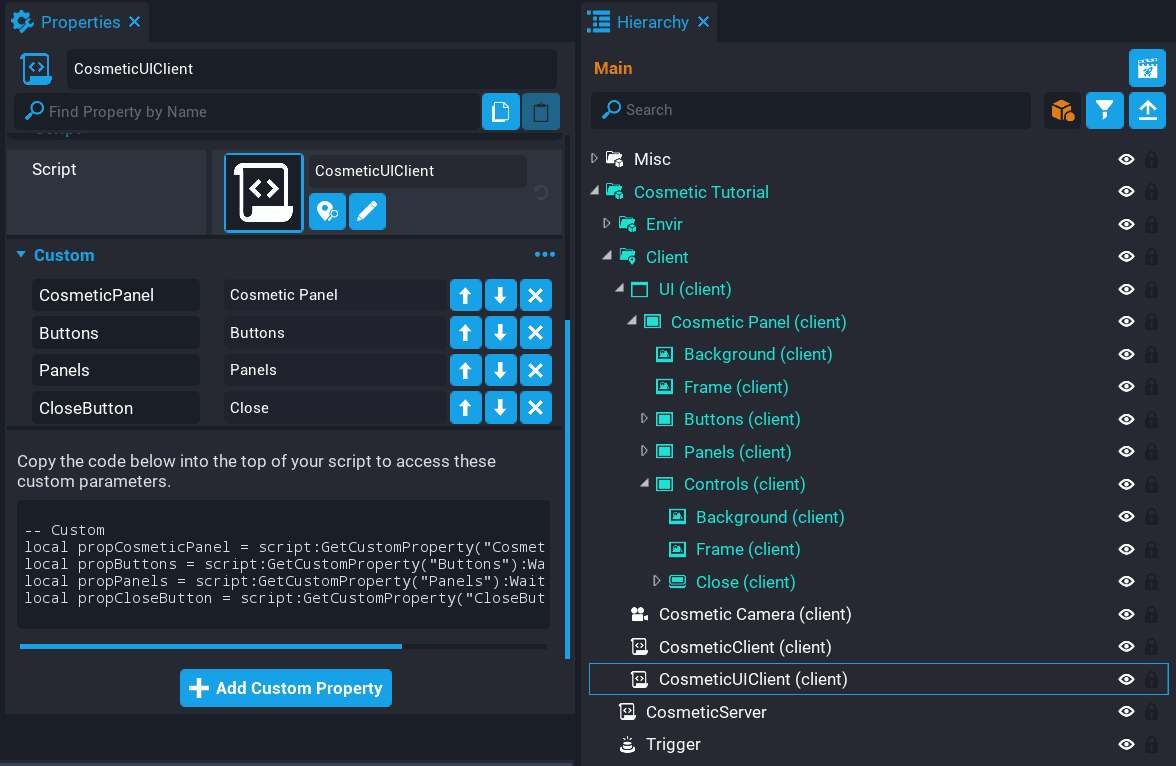
Create CosmeticUIClient Script
Create a new script called CosmeticUIClient and place it into the Client group. This script will handle anything UI related.
Add Custom Properties
The CosmeticUIClient script needs references to a few of the UI components.
- Add Cosmetic Panel as a new custom property. Set the name to
CosmeticPanel. - Add Buttons as a new custom property. Set the name to
Buttons. - Add Panels as a new custom property. Set the name to
Panels. - Add Close as a new custom property. Set the name to
CloseButton.
Edit CosmeticUIClient Script
Open up the CosmeticUIClient script and add the below code.
Add Variables
local COSMETIC_PANEL = script:GetCustomProperty("CosmeticPanel"):WaitForObject()
local BUTTONS = script:GetCustomProperty("Buttons"):WaitForObject()
local PANELS = script:GetCustomProperty("Panels"):WaitForObject()
local CLOSE_BUTTON = script:GetCustomProperty("CloseButton"):WaitForObject()

local activeButton = BUTTONS:FindChildByName("Head")
local activePanel = PANELS:FindChildByName("Head")

local activePanelItemButton = {}
Add the above variables to the script.
local activeButton = BUTTONS:FindChildByName("Head")
local activePanel = PANELS:FindChildByName("Head")
When the cosmetic panel is opened up for the first time, a default active button and panel need to be set up. So you need to find the Head button and panel, and store a reference to them for later use. This is to help with switching the state of the button and panel to show the player which cosmetic category they are currently looking at.
local activePanelItemButton = {}
Each cosmetic panel can have an item selected by the player. The activePanelItemButton table will get updated with the category and which button was clicked on by the player. This is so that each category can remember the state of the buttons just in that category. This is useful when you handle the save data for the player in a later section.
Create SwitchPanel Function
local function SwitchPanel(button)
    if activeButton ~= button then
        activeButton:SetButtonColor(activeButton:GetDisabledColor())
        button:SetButtonColor(button:GetHoveredColor())
        activeButton = button

        activePanel.visibility = Visibility.FORCE_OFF
        activePanel = PANELS:FindChildByName(button.name)
        activePanel.visibility = Visibility.FORCE_ON
    end
end
Create the SwitchPanel function. This function will handle switching the panels in the UI and updating the category button to show which is currently active. A color is stored in the Disabled Color property that will be used for the button color when it is the active button.
Create CreateCosmeticItemsUI Function
local function CreateCosmeticItemsUI()
    for index, button in ipairs(BUTTONS:GetChildren()) do
        button.clickedEvent:Connect(SwitchPanel)
    end
end
This function will loop through all the cosmetic buttons and connect a clickedEvent that will call the SwitchPanel to handle the button and panel states.
CreateCosmeticItemsUI()
You need to call CreateCosmeticItemsUI right away so that the UI can be set up. Add the above line to the end of your script.
Create ShowUI Function
local function ShowUI()
    COSMETIC_PANEL.visibility = Visibility.FORCE_ON
end
The ShowUI function will make the COSMETIC_PANEL visible to the player.
Create HideUI Function
local function HideUI()
    COSMETIC_PANEL.visibility = Visibility.FORCE_OFF
end
The HideUI function will make the COSMETIC_PANEL invisible to the player.
Create Close Function
local function Close()
    HideUI()

    Events.BroadcastToServer("EnablePlayer")
    Events.Broadcast("ClearCamera")
end
The Close function will hide the cosmetic UI, broadcast to the server to enable the player, and broadcast to clear the override camera.
Connect Events
Events.Connect("ShowCosmeticUI", ShowUI)
Events.Connect("HideCosmeticUI", HideUI)

CLOSE_BUTTON.clickedEvent:Connect(Close)
Add the above code to the end of the script.
The CosmeticUIClient Script
CosmeticUIClient
local COSMETIC_PANEL = script:GetCustomProperty("CosmeticPanel"):WaitForObject()
local BUTTONS = script:GetCustomProperty("Buttons"):WaitForObject()
local PANELS = script:GetCustomProperty("Panels"):WaitForObject()
local CLOSE_BUTTON = script:GetCustomProperty("CloseButton"):WaitForObject()

local activeButton = BUTTONS:FindChildByName("Head")
local activePanel = PANELS:FindChildByName("Head")

local activePanelItemButton = {}

local function SwitchPanel(button)
    if activeButton ~= button then
        activeButton:SetButtonColor(activeButton:GetDisabledColor())
        button:SetButtonColor(button:GetHoveredColor())
        activeButton = button

        activePanel.visibility = Visibility.FORCE_OFF
        activePanel = PANELS:FindChildByName(button.name)
        activePanel.visibility = Visibility.FORCE_ON
    end
end

local function CreateCosmeticItemsUI()
    for index, button in ipairs(BUTTONS:GetChildren()) do
        button.clickedEvent:Connect(SwitchPanel)
    end
end

local function ShowUI()
    COSMETIC_PANEL.visibility = Visibility.FORCE_ON
end

local function HideUI()
    COSMETIC_PANEL.visibility = Visibility.FORCE_OFF
end

local function Close()
    HideUI()

    Events.BroadcastToServer("EnablePlayer")
    Events.Broadcast("ClearCamera")
end

Events.Connect("ShowCosmeticUI", ShowUI)
Events.Connect("HideCosmeticUI", HideUI)

CLOSE_BUTTON.clickedEvent:Connect(Close)

CreateCosmeticItemsUI()
Test the Game
Test the game and make sure the following work.
- Cosmetic UI panel shows when the player enters the trigger.
- Buttons and panels update when clicking on them.
- Clicking the Close button closes the UI.
- Camera override is cleared and transitions back to the default camera.
Create Item Lookup Data
The cosmetic system needs to know what items are available for the player to use and also what to display in the UI panels for each category. To do this, you will be creating scripts that are placed into the Hierarchy that holds data in the custom properties.
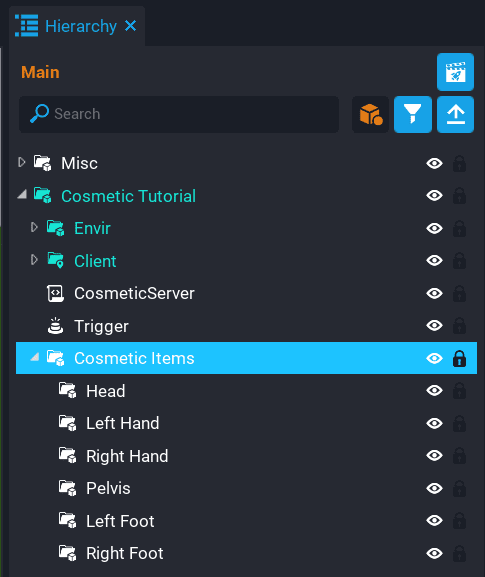
Create Cosmetic Items Group
In the Hierarchy create a new group called Cosmetic Items. This group will hold all the categories and data scripts for the cosmetic system.
Create Cosmetic Categories
Inside the Cosmetic Items group, create the following groups that will act as categories for the cosmetic system.
- Head
- Left Hand
- Right Hand
- Pelvis
- Left Foot
- Right Foot
Create Socket Custom Property
The cosmetic system will need to know what socket on the player's character the item should be attached to. One way to do this is to add a custom property to each category with the socket name.
For each category, add a String custom property called socket, and set the value for each one.
| Category | Socket Name |
|---|---|
| Head | head |
| Left Hand | left_wrist |
| Right Hand | right_wrist |
| Pelvis | pelvis |
| Left Foot | left_ankle |
| Right Foot | right_ankle |
For more information on sockets, see the Player Animations & Sockets API.
Create CosmeticItem Script
Create a new script called CosmeticItem. This script will not contain any Lua code, it will be a script that holds data about the cosmetic item.
When adding the custom properties, make sure to select the CosmeticItem script in Project Content. This is so the script asset will have default properties already set up. So when you add the script into the Hierarchy, the custom properties will already be on the script and just need to be filled out.
Add ID Custom Property
Add an Int custom property to the CosmeticItem script, and name it id. This property will contain a unique ID for each cosmetic item in a category.
Add Template Custom Property
Add an Asset Reference custom property to the CosmeticItem script, and name it template. This property will contain the cosmetic item template that will be spawned in and attached to a socket on the player's character.
Create Cosmetic Items
You now need to create the cosmetic items using the CosmeticItem script created previously. Start with the Head category, add the CosmeticItem script, and set the ID and template for that cosmetic item.
For example. Set the id to 1, and drag a cosmetic item from the Head folder from My Templates in Project Content. Do this for all the cosmetic items, and repeat for the other categories.
The first item in each cosmetic category can start at id 1.
See the video below where some items are added to the Head category, and then some are added to the Left Hand category. Do this for all categories so the player can pick a cosmetic from each category.
Add Cosmetic Items to UI Panels
Now that you have some cosmetic items, you need to display them in the UI panel so the player can use them. In this section, the items will be added to the panels. For the moment, those items will be just white squares in the category panels, in a later section you will be capturing the images for the UI with a camera.
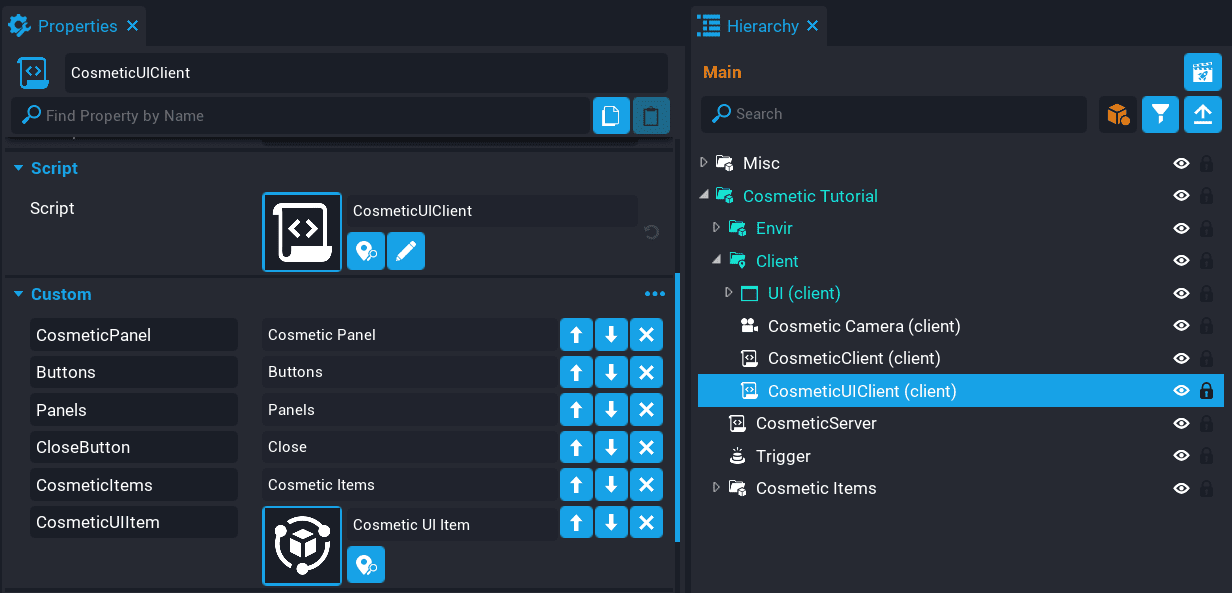
Add CosmeticItems Custom Property
The CosmeticUIClient script needs to know about all the cosmetic items so they can be displayed in the UI panels.
Drag the Cosmetic Items group onto the CosmeticUIClient script as a new custom property. Name the custom property CosmeticItems.
Add Cosmetic UI Item Template
The CosmeticUIClient script will loop through all the cosmetic items in the Cosmetic Items group, and spawn a UI item to represent the cosmetic in the panels.
Drag the Cosmetic UI Item template from My Templates in Project Content, onto the CosmeticUIClient script as a custom property. Name the custom property CosmeticUIItem.
Edit CosmeticUIClient Script
Open up the CosmeticUIClient script.
local COSMETIC_ITEMS = script:GetCustomProperty("CosmeticItems"):WaitForObject()
local COSMETIC_UI_ITEM = script:GetCustomProperty("CosmeticUIItem")

local local_player = Game.GetLocalPlayer()
local cosmetic_data = {}
Add the above lines to the top of the script. The cosmetic_data table will be used to store the player's data so that when they open up the cosmetic UI, it will have the items selected that were saved.
Create EquipCosmetic Function
local function EquipCosmetic(id, category)
    Events.BroadcastToServer("EquipCosmetic", id, category)
end
The EquipCosmetic function will be called when the player clicks on a cosmetic item in a panel. This function will then broadcast to the server and pass the id and category of the item. These will be used on the server to find the item from the Cosmetic Items group.
Create CreatePanelItemsUI Function
local function CreatePanelItemsUI(category, selected)
    local items = COSMETIC_ITEMS:FindChildByName(category)
    local panel = PANELS:FindChildByName(category)
    local list = panel:FindChildByName("List")

    local counter = 1
    local xOffset = 0
    local yOffset = 0

    for index, item in ipairs(items:GetChildren()) do
        local ui_item = World.SpawnAsset(COSMETIC_UI_ITEM, { parent = list })
        local id = item:GetCustomProperty("id")

        ui_item.name = tostring(id)

        ui_item.x = xOffset
        ui_item.y = yOffset

        if counter == 5 then
            xOffset = 0
            yOffset = yOffset + 75
            counter = 0
        else
            xOffset = xOffset + 75
        end

        counter = counter + 1

        if selected ~= nil and tostring(id) == selected then
            activePanelItemButton[category] = {

                item = ui_item,
                active = true

            }

            ui_item:SetButtonColor(ui_item:GetHoveredColor())
        end

        ui_item.clickedEvent:Connect(function()
            local has_item = false

            if activePanelItemButton[category] ~= nil then
                activePanelItemButton[category].item:SetButtonColor(ui_item:GetDisabledColor())
                has_item = true
            end

            if has_item then
                if activePanelItemButton[category].item == ui_item then
                    if activePanelItemButton[category].active then
                        ui_item:SetButtonColor(ui_item:GetDisabledColor())
                        activePanelItemButton[category].active = false
                    else
                        ui_item:SetButtonColor(ui_item:GetHoveredColor())
                        activePanelItemButton[category].active = true
                    end
                else
                    ui_item:SetButtonColor(ui_item:GetHoveredColor())
                    activePanelItemButton[category].item = ui_item
                    activePanelItemButton[category].active = true
                end
            end

            if not has_item then
                ui_item:SetButtonColor(ui_item:GetHoveredColor())

                activePanelItemButton[category] = {

                    item = ui_item,
                    active = true

                }
            end

            EquipCosmetic(id, category)
        end)
    end
end
The CreatePanelItemsUI function will set up each UI category by spawning a UI item and positioning it in the panel.
ui_item.x = xOffset
ui_item.y = yOffset

if counter == 5 then
    xOffset = 0
    yOffset = yOffset + 75
    counter = 0
else
    xOffset = xOffset + 75
end

counter = counter + 1
On each iteration of the loop, it checks to see if the counter is 5. It if is 5, then it resets the xOffset to 0, which will place the next UI item to the left of the panel. yOffset gets incremented by 75, which will place the next UI item on the next row. So think of this as columns and rows, the UI item for each cosmetic is being placed in rows of 5.
if selected ~= nil and tostring(id) == selected then
    activePanelItemButton[category] = ui_item
    ui_item:SetButtonColor(ui_item:GetHoveredColor())
end
If the player has saved data, then you need to compare the id of the cosmetic item against the id value in selected to see if there is a match. If there is a match, then the item for that category is set to the hovered color to indicate to the player that the item is the current item attached to the character.
ui_item.clickedEvent:Connect(function()
    local has_item = false

    if activePanelItemButton[category] ~= nil then
        activePanelItemButton[category].item:SetButtonColor(ui_item:GetDisabledColor())
        has_item = true
    end

    if has_item then
        if activePanelItemButton[category].item == ui_item then
            if activePanelItemButton[category].active then
                ui_item:SetButtonColor(ui_item:GetDisabledColor())
                activePanelItemButton[category].active = false
            else
                ui_item:SetButtonColor(ui_item:GetHoveredColor())
                activePanelItemButton[category].active = true
            end
        else
            ui_item:SetButtonColor(ui_item:GetHoveredColor())
            activePanelItemButton[category].item = ui_item
            activePanelItemButton[category].active = true
        end
    end

    if not has_item then
        ui_item:SetButtonColor(ui_item:GetHoveredColor())

        activePanelItemButton[category] = {

            item = ui_item,
            active = true

        }
    end

    EquipCosmetic(id, category)
end)
Each item in the panel that is clicked on will be set as the active cosmetic item unless it is the same item previously selected. If it was the same item previously selected, then it is removed from the player's character. The state of the current active item for a category is tracked to handle the visual side of it in the UI.
Update CreateCosmeticItemsUI Function
local function CreateCosmeticItemsUI()
    CreatePanelItemsUI("Head", cosmetic_data[1])
    CreatePanelItemsUI("Left Hand", cosmetic_data[2])
    CreatePanelItemsUI("Right Hand", cosmetic_data[3])
    CreatePanelItemsUI("Pelvis", cosmetic_data[4])
    CreatePanelItemsUI("Left Foot", cosmetic_data[5])
    CreatePanelItemsUI("Right Foot", cosmetic_data[6])

    for index, button in ipairs(BUTTONS:GetChildren()) do
        button.clickedEvent:Connect(SwitchPanel)
    end

    cosmetic_data = {}
end
The CreateCosmeticItemsUI function needs to be updated so that it creates all the items for each category.
CreatePanelItemsUI("Head", cosmetic_data[1])
You need to pass in the cosmetic category that matches the name in the Cosmetic Items group in the Hierarchy. This way makes it less tedious, as the script will automatically position all the UI items in each category.
The second argument will be the saved data for the player. This will be discussed in a later section.
The CosmeticUIClient Script
CosmeticUIClient
local COSMETIC_PANEL = script:GetCustomProperty("CosmeticPanel"):WaitForObject()
local BUTTONS = script:GetCustomProperty("Buttons"):WaitForObject()
local PANELS = script:GetCustomProperty("Panels"):WaitForObject()
local CLOSE_BUTTON = script:GetCustomProperty("CloseButton"):WaitForObject()
local COSMETIC_ITEMS = script:GetCustomProperty("CosmeticItems"):WaitForObject()
local COSMETIC_UI_ITEM = script:GetCustomProperty("CosmeticUIItem")

local activeButton = BUTTONS:FindChildByName("Head")
local activePanel = PANELS:FindChildByName("Head")

local activePanelItemButton = {}

local local_player = Game.GetLocalPlayer()
local cosmetic_data = {}

local function EquipCosmetic(id, category)
    Events.BroadcastToServer("EquipCosmetic", id, category)
end

local function CreatePanelItemsUI(category, selected)
    local items = COSMETIC_ITEMS:FindChildByName(category)
    local panel = PANELS:FindChildByName(category)
    local list = panel:FindChildByName("List")

    local counter = 1
    local xOffset = 0
    local yOffset = 0

    for index, item in ipairs(items:GetChildren()) do
        local ui_item = World.SpawnAsset(COSMETIC_UI_ITEM, { parent = list })
        local id = item:GetCustomProperty("id")

        ui_item.name = tostring(id)

        ui_item.x = xOffset
        ui_item.y = yOffset

        if counter == 5 then
            xOffset = 0
            yOffset = yOffset + 75
            counter = 0
        else
            xOffset = xOffset + 75
        end

        counter = counter + 1

        if selected ~= nil and tostring(id) == selected then
            activePanelItemButton[category] = {

                item = ui_item,
                active = true

            }

            ui_item:SetButtonColor(ui_item:GetHoveredColor())
        end

        ui_item.clickedEvent:Connect(function()
            local has_item = false

            if activePanelItemButton[category] ~= nil then
                activePanelItemButton[category].item:SetButtonColor(ui_item:GetDisabledColor())
                has_item = true
            end

            if has_item then
                if activePanelItemButton[category].item == ui_item then
                    if activePanelItemButton[category].active then
                        ui_item:SetButtonColor(ui_item:GetDisabledColor())
                        activePanelItemButton[category].active = false
                    else
                        ui_item:SetButtonColor(ui_item:GetHoveredColor())
                        activePanelItemButton[category].active = true
                    end
                else
                    ui_item:SetButtonColor(ui_item:GetHoveredColor())
                    activePanelItemButton[category].item = ui_item
                    activePanelItemButton[category].active = true
                end
            end

            if not has_item then
                ui_item:SetButtonColor(ui_item:GetHoveredColor())

                activePanelItemButton[category] = {

                    item = ui_item,
                    active = true

                }
            end

            EquipCosmetic(id, category)
        end)
    end
end

local function SwitchPanel(button)
    if activeButton ~= button then
        activeButton:SetButtonColor(activeButton:GetDisabledColor())
        button:SetButtonColor(button:GetHoveredColor())
        activeButton = button

        activePanel.visibility = Visibility.FORCE_OFF
        activePanel = PANELS:FindChildByName(button.name)
        activePanel.visibility = Visibility.FORCE_ON
    end
end

local function CreateCosmeticItemsUI()
    CreatePanelItemsUI("Head", cosmetic_data[1])
    CreatePanelItemsUI("Left Hand", cosmetic_data[2])
    CreatePanelItemsUI("Right Hand", cosmetic_data[3])
    CreatePanelItemsUI("Pelvis", cosmetic_data[4])
    CreatePanelItemsUI("Left Foot", cosmetic_data[5])
    CreatePanelItemsUI("Right Foot", cosmetic_data[6])

    for index, button in ipairs(BUTTONS:GetChildren()) do
        button.clickedEvent:Connect(SwitchPanel)
    end

    cosmetic_data = {}
end

local function ShowUI()
    COSMETIC_PANEL.visibility = Visibility.FORCE_ON
end

local function HideUI()
    COSMETIC_PANEL.visibility = Visibility.FORCE_OFF
end

local function Close()
    HideUI()

    Events.BroadcastToServer("EnablePlayer")
    Events.Broadcast("ClearCamera")
end

Events.Connect("ShowCosmeticUI", ShowUI)
Events.Connect("HideCosmeticUI", HideUI)

CLOSE_BUTTON.clickedEvent:Connect(Close)

CreateCosmeticItemsUI()
Test the Game
Test the game and make sure the following work.
- UI items are added to each cosmetic category.
- UI items can be clicked on.
- UI item clicked on remembers the state when changing category.
The UI items in the panels will be white, this will be solved in the next section.
Setup UI Camera Capturing
In this section, you will set up the camera capturing template and modify the CosmeticUIClient script so that the cosmetic items show in the UI panels for each category.
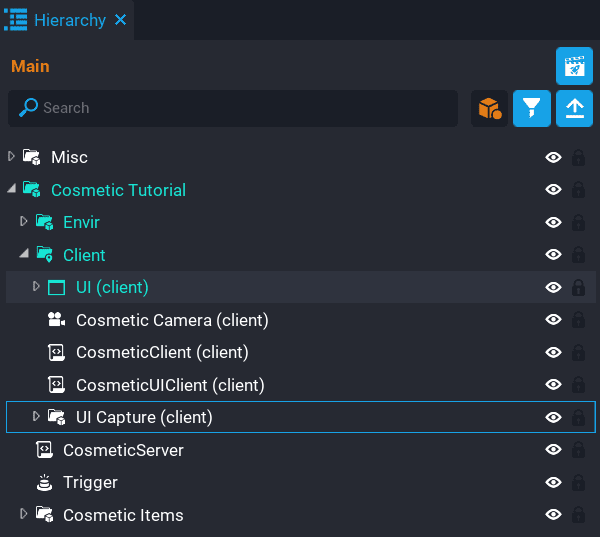
Add UI Capture Template
A template has been created for you that contains a camera that will grab an image of what is in front of it, and use that in the cosmetic UI for each item.
Add the UI Capture template into the Client group in the Hierarchy.
Expand the UI Capture group to see how it is set up. In the Items group, you will see all the cosmetics. These items are client-side objects that have been set up to display nicely in the UI. When the cosmetic items are dynamically positioned in the cosmetic panels, a camera capture will be done for each item and used in the UI.
Position the UI Capture object anywhere you like. Generally, this object will be hidden from view for the player. For example, this could be placed under the map.
Add Custom Properties
The CosmeticUIClient script needs references to the Capture Camera and Items to be able to capture images.
Drag Capture Camera that is in the UI Capture group, onto the CosmeticUIClient script as a custom property. Name the custom property CaptureCamera.
Drag Items that is in the Capture Camera group, onto the CosmeticUIClient script as a custom property. Name the custom property CaptureItemsList.
Edit CosmeticUIClient Script
Open up the CosmeticUIClient script and add the following variables to the top.
local CAPTURE_CAMERA = script:GetCustomProperty("CaptureCamera"):WaitForObject()
local CAPTURE_ITEMS_LIST = script:GetCustomProperty("CaptureItemsList"):WaitForObject()
Create FindCaptureItem Function
local function FindCaptureItem(tpl, category)
    local container = CAPTURE_ITEMS_LIST:FindChildByName(category)

    if container == nil then
        return
    end

    for i, child in ipairs(container:GetChildren()) do
        local id, name = CoreString.Split(tpl, ":")

        if name == child.name then
            return child
        end
    end
end
Create the FindCaptureItem function just above the CreatePanelItemsUI function. This function will search for the item in CAPTURE_ITEMS_LIST based on the category passed in for a cosmetic that matches the template passed in. The name of the item must match the name of the template.
local id, name = CoreString.Split(tpl, ":")
You need to get the name of the template to compare it against the name of the item in the loop. You can do this by splitting the tpl string up.
For example. If the template name is ED9709B6FF869235:Cosmetic - Head - Soccer Ball, then the name part of it you need would be Cosmetic - Head - Soccer Ball.
Template Renaming
Something to be aware of when you rename templates in Project Content, is that the name of the template that is accessible via Lua, and the name of the spawned asset (that is using World.SpawnAsset), will not match the name of the template in Project Content. If you do come across this issue because you renamed a template, drop it into the Hierarchy and update the template.
Create CreateCameraCapture Function
local function CreateCameraCapture(tpl, category)
    local item = FindCaptureItem(tpl, category)
    local capture = nil

    if Object.IsValid(item) then
        item.visibility = Visibility.FORCE_ON
        capture = CAPTURE_CAMERA:Capture(CameraCaptureResolution.SMALL)
        item.visibility = Visibility.FORCE_OFF
    end

    return capture
end
Create the CreateCameraCapture just above the CreatePanelItemsUI function. This function will handle creating a capture of the cosmetic, and return it.
local item = FindCaptureItem(tpl, category)
The FindCaptureItem function will find the matching item from within the category passed in as the arguments. These items being matched against are inside the Items group in the UI Capture group.
item.visibility = Visibility.FORCE_ON
capture = CAPTURE_CAMERA:Capture(CameraCaptureResolution.SMALL)
item.visibility = Visibility.FORCE_OFF
The item visibility is turned on, then a camera capture is done, then the item visibility is turned off.
The capture resolution is set to small so that far more captures can be done.
See the CameraCapture API for more information.
Update CreatePanelItemsUI Function
for index, item in ipairs(items:GetChildren()) do
    local ui_item = World.SpawnAsset(COSMETIC_UI_ITEM, { parent = list })
    local id = item:GetCustomProperty("id")
Look for the above code in the CreatePanelItemsUI function. Just under the id variable, add the following.
local capture = CreateCameraCapture(item:GetCustomProperty("template"), category)

if capture ~= nil then
    ui_item:FindChildByName("Image"):SetCameraCapture(capture)
end
This will set the image for the UI item to the camera capture for that specific cosmetic item.
The CosmeticUIClient Script
CosmeticUIClient
local COSMETIC_PANEL = script:GetCustomProperty("CosmeticPanel"):WaitForObject()
local BUTTONS = script:GetCustomProperty("Buttons"):WaitForObject()
local PANELS = script:GetCustomProperty("Panels"):WaitForObject()
local CLOSE_BUTTON = script:GetCustomProperty("CloseButton"):WaitForObject()
local COSMETIC_ITEMS = script:GetCustomProperty("CosmeticItems"):WaitForObject()
local COSMETIC_UI_ITEM = script:GetCustomProperty("CosmeticUIItem")
local CAPTURE_CAMERA = script:GetCustomProperty("CaptureCamera"):WaitForObject()
local CAPTURE_ITEMS_LIST = script:GetCustomProperty("CaptureItemsList"):WaitForObject()

local activeButton = BUTTONS:FindChildByName("Head")
local activePanel = PANELS:FindChildByName("Head")

local activePanelItemButton = {}

local local_player = Game.GetLocalPlayer()
local cosmetic_data = {}

local function EquipCosmetic(id, category)
    Events.BroadcastToServer("EquipCosmetic", id, category)
end

local function FindCaptureItem(tpl, category)
    local container = CAPTURE_ITEMS_LIST:FindChildByName(category)

    if container == nil then
        return
    end

    for i, child in ipairs(container:GetChildren()) do
        local id, name = CoreString.Split(tpl, ":")

        if name == child.name then
            return child
        end
    end
end

local function CreateCameraCapture(tpl, category)
    local item = FindCaptureItem(tpl, category)
    local capture = nil

    if Object.IsValid(item) then
        item.visibility = Visibility.FORCE_ON
        capture = CAPTURE_CAMERA:Capture(CameraCaptureResolution.SMALL)
        item.visibility = Visibility.FORCE_OFF
    end

    return capture
end

local function CreatePanelItemsUI(category, selected)
    local items = COSMETIC_ITEMS:FindChildByName(category)
    local panel = PANELS:FindChildByName(category)
    local list = panel:FindChildByName("List")

    local counter = 1
    local xOffset = 0
    local yOffset = 0

    for index, item in ipairs(items:GetChildren()) do
        local ui_item = World.SpawnAsset(COSMETIC_UI_ITEM, { parent = list })
        local id = item:GetCustomProperty("id")
        local capture = CreateCameraCapture(item:GetCustomProperty("template"), category)

        if capture ~= nil then
            ui_item:FindChildByName("Image"):SetCameraCapture(capture)
        end

        ui_item.name = tostring(id)

        ui_item.x = xOffset
        ui_item.y = yOffset

        if counter == 5 then
            xOffset = 0
            yOffset = yOffset + 75
            counter = 0
        else
            xOffset = xOffset + 75
        end

        counter = counter + 1

        if selected ~= nil and tostring(id) == selected then
            activePanelItemButton[category] = {

                item = ui_item,
                active = true

            }

            ui_item:SetButtonColor(ui_item:GetHoveredColor())
        end

        ui_item.clickedEvent:Connect(function()
            local has_item = false

            if activePanelItemButton[category] ~= nil then
                activePanelItemButton[category].item:SetButtonColor(ui_item:GetDisabledColor())
                has_item = true
            end

            if has_item then
                if activePanelItemButton[category].item == ui_item then
                    if activePanelItemButton[category].active then
                        ui_item:SetButtonColor(ui_item:GetDisabledColor())
                        activePanelItemButton[category].active = false
                    else
                        ui_item:SetButtonColor(ui_item:GetHoveredColor())
                        activePanelItemButton[category].active = true
                    end
                else
                    ui_item:SetButtonColor(ui_item:GetHoveredColor())
                    activePanelItemButton[category].item = ui_item
                    activePanelItemButton[category].active = true
                end
            end

            if not has_item then
                ui_item:SetButtonColor(ui_item:GetHoveredColor())

                activePanelItemButton[category] = {

                    item = ui_item,
                    active = true

                }
            end

            EquipCosmetic(id, category)
        end)
    end
end

local function SwitchPanel(button)
    if activeButton ~= button then
        activeButton:SetButtonColor(activeButton:GetDisabledColor())
        button:SetButtonColor(button:GetHoveredColor())
        activeButton = button

        activePanel.visibility = Visibility.FORCE_OFF
        activePanel = PANELS:FindChildByName(button.name)
        activePanel.visibility = Visibility.FORCE_ON
    end
end

local function CreateCosmeticItemsUI()
    CreatePanelItemsUI("Head", cosmetic_data[1])
    CreatePanelItemsUI("Left Hand", cosmetic_data[2])
    CreatePanelItemsUI("Right Hand", cosmetic_data[3])
    CreatePanelItemsUI("Pelvis", cosmetic_data[4])
    CreatePanelItemsUI("Left Foot", cosmetic_data[5])
    CreatePanelItemsUI("Right Foot", cosmetic_data[6])

    for index, button in ipairs(BUTTONS:GetChildren()) do
        button.clickedEvent:Connect(SwitchPanel)
    end

    cosmetic_data = {}
end

local function ShowUI()
    COSMETIC_PANEL.visibility = Visibility.FORCE_ON
end

local function HideUI()
    COSMETIC_PANEL.visibility = Visibility.FORCE_OFF
end

local function Close()
    HideUI()

    Events.BroadcastToServer("EnablePlayer")
    Events.Broadcast("ClearCamera")
end

Events.Connect("ShowCosmeticUI", ShowUI)
Events.Connect("HideCosmeticUI", HideUI)

CLOSE_BUTTON.clickedEvent:Connect(Close)

CreateCosmeticItemsUI()
Test the Game
Test the game and make sure the cosmetic items show up in the UI.
Attaching Cosmetic Items
In this section, you will be adding the code to handle attaching cosmetic items to the player's character.
Add Cosmetic Items Custom Property
The CosmeticServer script needs to know about the list of cosmetic items to know which template to spawn for the player.
Drag the Cosmetic Items group onto the CosmeticServer script as a custom property. Name the custom property CosmeticItems.
Edit CosmeticServer Script
Open up the CosmeticServer script and add the following lines to the top.
local COSMETIC_ITEMS = script:GetCustomProperty("CosmeticItems"):WaitForObject()

local players = {}
The players variable will keep track of what items have been attached to each player. This is so that the items can be destroyed when the player changes or removes a cosmetic item, and help with cleaning up objects when the player leaves the game.
Create GetSocket Function
local function GetSocket(category)
    local theCategory = COSMETIC_ITEMS:FindChildByName(category)

    return theCategory:GetCustomProperty("socket")
end
Create the GetSocket function just above the DisablePlayer function.
Each cosmetic category in the Cosmetic Items group in the Hierarchy has a custom property you added for the socket that will be used for the cosmetic the player selected.
Create GetItem Function
local function GetItem(id, category)
    local items = COSMETIC_ITEMS:FindChildByName(category)

    for _, item in ipairs(items:GetChildren()) do
        if item:GetCustomProperty("id") == tonumber(id) then
            return item
        end
    end

    return nil
end
Create the GetItem function just above the DisablePlayer function. This function will look for the cosmetic item by comparing the id parameter with the id custom property of each cosmetic item in the category group.
Create SpawnCosmetic Function
local function SpawnCosmetic(player, id, category)
    id = tonumber(id) or 0

    if id == 0 then
        return
    end

    local item = GetItem(id, category)

    if item == nil then
        return
    end

    local thePlayer = players[player.id]

    if not thePlayer[category] then
        thePlayer[category] = {}
    end

    thePlayer[category].obj = World.SpawnAsset(item:GetCustomProperty("template"))
    thePlayer[category].id = tostring(id)
    thePlayer[category].obj:AttachToPlayer(player, GetSocket(category))
end
Create the SpawnCosmetic function just above the DisablePlayer function. This function will handle spawning in the cosmetic item and attach it to a specific socket on the player's character.
id = tonumber(id) or 0

if id == 0 then
    return
end
You need to make sure the id is valid. In this case the id is casted to a number, but this can still return nil if the id is empty, and if that is the case it will become 0. If the id is 0, then return and do nothing.
local item = GetItem(id, category)

if item == nil then
    return
end
Check to make sure the item is valid, if it isn't, return, and do nothing.
if not thePlayer[category] then
    thePlayer[category] = {}
end
If the players table doesn't have the category key, then add it. This is used later to handle cleaning up or replacing cosmetics.
thePlayer[category].obj = World.SpawnAsset(item:GetCustomProperty("template"))
thePlayer[category].id = tostring(id)
thePlayer[category].obj:AttachToPlayer(player, GetSocket(category))
The cosmetic is spawned in and attached to the playing using AttachToPlayer. The second argument is the socket for that specific cosmetic category. So for example, if the cosmetic was the Soccer Ball, then the category would be Head, and the socket would be head.
Create PlayerJoined Function
local function PlayerJoined(player)
    players[player.id] = {}
end
Create the PlayerJoined function just above the DisablePlayer function. This function will add the player to the players table. Later on, this will be modified to support player storage.
Create PlayerLeft Function
local function PlayerLeft(player)
    if players[player.id] ~= nil then
        for key, value in pairs(players[player.id]) do
            if Object.IsValid(value.obj) then
                value.obj:Destroy()
            end
        end

        players[player.id] = nil
    end
end
Create the PlayerLeft function just above the DisablePlayer function. This function will handle cleaning up all the cosmetic items attached to the player when they leave the game. It will loop over the cosmetic categories, check whether the object is valid, and destroy them. If you don't do this, then when the player leaves, the cosmetic items will be left in the world.
Create EquipCosmetic Function
local function EquipCosmetic(player, id, category)
    if players[player.id] == nil then
        return
    end

    local thePlayer = players[player.id]

    if not thePlayer[category] then
        thePlayer[category] = {}
    end

    local lastID = 0

    if thePlayer[category].obj ~= nil and Object.IsValid(thePlayer[category].obj) then
        lastID = tonumber(thePlayer[category].id)

        thePlayer[category].obj:Destroy()
        thePlayer[category] = {}
    end

    if lastID == 0 or id ~= lastID then
        SpawnCosmetic(player, id, category)
    end
end
Create the EquipCosmetic function just after the OnTriggerOverlap function. This function is a listener that will fire when the CosmeticClient script broadcasts to the server. This function will handle removing an existing cosmetic that the player may have already attached to the character.
local lastID = 0

if thePlayer[category].obj ~= nil and Object.IsValid(thePlayer[category].obj) then
    lastID = tonumber(thePlayer[category].id)

    thePlayer[category].obj:Destroy()
    thePlayer[category] = {}
end

if lastID == 0 or id ~= lastID then
    SpawnCosmetic(player, id, category)
end
The lastID is used to check if the last cosmetic the player attached is the same. If it is, then you can just remove the cosmetic from the player by destroying it. For example, if the player clicks on the soccer ball cosmetic, and then clicks on it again, it will be removed instead of just adding it again.
Connect Events
Events.ConnectForPlayer("EquipCosmetic", EquipCosmetic)

Game.playerJoinedEvent:Connect(PlayerJoined)
Game.playerLeftEvent:Connect(PlayerLeft)
Add the above code to the end of the script to connect up the events.
The CosmeticServer Script
CosmeticServer
local TRIGGER = script:GetCustomProperty("Trigger"):WaitForObject()
local COSMETIC_ITEMS = script:GetCustomProperty("CosmeticItems"):WaitForObject()

local players = {}

local function GetSocket(category)
    local theCategory = COSMETIC_ITEMS:FindChildByName(category)

    return theCategory:GetCustomProperty("socket")
end

local function GetItem(id, category)
    local items = COSMETIC_ITEMS:FindChildByName(category)

    for _, item in ipairs(items:GetChildren()) do
        if item:GetCustomProperty("id") == tonumber(id) then
            return item
        end
    end

    return nil
end

local function SpawnCosmetic(player, id, category)
    id = tonumber(id) or 0

    if id == 0 then
        return
    end

    local item = GetItem(id, category)

    if item == nil then
        return
    end

    local thePlayer = players[player.id]

    if not thePlayer[category] then
        thePlayer[category] = {}
    end

    thePlayer[category].obj = World.SpawnAsset(item:GetCustomProperty("template"))
    thePlayer[category].id = tostring(id)
    thePlayer[category].obj:AttachToPlayer(player, GetSocket(category))
end

local function PlayerJoined(player)
    players[player.id] = {}
end

local function PlayerLeft(player)
    if players[player.id] ~= nil then
        for key, value in pairs(players[player.id]) do
            if Object.IsValid(value.obj) then
                value.obj:Destroy()
            end
        end

        players[player.id] = nil
    end
end

local function DisablePlayer(player)
    player.isMovementEnabled = false
    player.desiredFacingMode = FacingMode.FACE_MOVEMENT
    player.canMount = false
end

local function EnablePlayer(player)
    player.isMovementEnabled = true
    player.desiredFacingMode = FacingMode.FACE_AIM_WHEN_ACTIVE
    player.canMount = true
end

local function OnTriggerOverlap(trigger, obj)
    if Object.IsValid(obj) and obj:IsA("Player") then
        DisablePlayer(obj)

        local triggerPos = trigger:GetWorldPosition()
        local triggerRot = trigger:GetWorldRotation()

        obj:SetWorldPosition(Vector3.New(triggerPos.x, triggerPos.y, triggerPos.z))
        obj:SetWorldRotation(Rotation.New(0, 0, triggerRot.z))

        Events.BroadcastToPlayer(obj, "EnableCosmeticChanger")
    end
end

local function EquipCosmetic(player, id, category)
    if players[player.id] == nil then
        return
    end

    local thePlayer = players[player.id]

    if not thePlayer[category] then
        thePlayer[category] = {}
    end

    local lastID = 0

    if thePlayer[category].obj ~= nil and Object.IsValid(thePlayer[category].obj) then
        lastID = tonumber(thePlayer[category].id)

        thePlayer[category].obj:Destroy()
        thePlayer[category] = {}
    end

    if lastID == 0 or id ~= lastID then
        SpawnCosmetic(player, id, category)
    end
end

TRIGGER.beginOverlapEvent:Connect(OnTriggerOverlap)

Events.ConnectForPlayer("EnablePlayer", EnablePlayer)
Events.ConnectForPlayer("EquipCosmetic", EquipCosmetic)

Game.playerJoinedEvent:Connect(PlayerJoined)
Game.playerLeftEvent:Connect(PlayerLeft)
Test the Game
Test the game and make sure the following work.
- Cosmetic is attached when selecting an item.
- Cosmetic is destroyed when selecting the same item.
- Each player in multiplayer preview can see each others cosmetics.
- When a player leaves, the cosmetics are removed from the world.
Saving Player Cosmetics
In this section, you will be modifying the code to add support for saving to player storage all the cosmetic items the player has selected.
Make sure Enable Player Storage is enabled on the Game Settings object in the Hierarchy.
Open the CosmeticServer script to add the following changes.
Modify PlayerJoined Function
local function PlayerJoined(player)
    local data = Storage.GetPlayerData(player)

    players[player.id] = {}

    local cosmetic_data = data.c

    if cosmetic_data ~= nil then
        local items = { CoreString.Split(cosmetic_data, "|") }

        if #items > 0 then
            SpawnCosmetic(player, items[1], "Head")
            SpawnCosmetic(player, items[2], "Left Hand")
            SpawnCosmetic(player, items[3], "Right Hand")
            SpawnCosmetic(player, items[4], "Pelvis")
            SpawnCosmetic(player, items[5], "Left Foot")
            SpawnCosmetic(player, items[6], "Right Foot")

            player:SetPrivateNetworkedData("cosmetic_data", cosmetic_data)
        end
    end
end
Modify the PlayerJoined function with the above code. You will be using SetPrivateNetworkedData to send the cosmetic data to the player.
local items = { CoreString.Split(cosmetic_data, "|") }
The cosmetic_data is a string made up of the id of each cosmetic in a specific order and separated by the | character. Wrapping curly braces around the returned value from Split will give you back a table with all the cosmetic items.
SpawnCosmetic(player, items[1], "Head")
SpawnCosmetic(player, items[2], "Left Hand")
SpawnCosmetic(player, items[3], "Right Hand")
SpawnCosmetic(player, items[4], "Pelvis")
SpawnCosmetic(player, items[5], "Left Foot")
SpawnCosmetic(player, items[6], "Right Foot")
Since the order of the data is known, you can pass the id of each cosmetic item stored for the player into the SpawnCosmetic function. The second argument of SpawnCosmetic is the cosmetic category that will be used to lookup the cosmetic item.
player:SetPrivateNetworkedData("cosmetic_data", cosmetic_data)
The reason you need to send the cosmetic_data to the player is so that the cosmetic UI can be updated with which cosmetic items they already have attached to the player's character. So for example, if the player has the umbrella cosmetic for the left hand, then in the Left-Hand panel, it will be the active item in the UI.
Create GetSelectedCosmeticID Function
local function GetSelectedCosmeticID(player, key)
    local id = 0

    if player[key] ~= nil and player[key].id ~= nil then
        id = player[key].id
    end

    return id
end
Create the above function just above the PlayerLeft function. This function will get the cosmetic ID from the players table.
Create GetCosmeticString Function
local function GetCosmeticString(player)
    local str = {}
    local thePlayer = players[player.id]

    table.insert(str, GetSelectedCosmeticID(thePlayer, "Head"))
    table.insert(str, GetSelectedCosmeticID(thePlayer, "Left Hand"))
    table.insert(str, GetSelectedCosmeticID(thePlayer, "Right Hand"))
    table.insert(str, GetSelectedCosmeticID(thePlayer, "Pelvis"))
    table.insert(str, GetSelectedCosmeticID(thePlayer, "Left Foot"))
    table.insert(str, GetSelectedCosmeticID(thePlayer, "Right Foot"))

    return table.concat(str, "|")
end
Create the above function just above the PlayerLeft function. This function will return the cosmetic data string that will be stored for the player.
table.insert(str, GetSelectedCosmeticID(thePlayer, "Head"))
For each cosmetic category, the id of the cosmetic item is inserted into the str table.
return table.concat(str, "|")
The GetCosmeticString function will return a string by concatenating all the entries in the str table, but separate them with the | character.
Because you know the order of the data, you can compress it down to quite a small string without needing to store which id is for which category.
For example. A string for the player would look like this.
-- head|lefthand|righthand|pelvis|leftfoot|rightfoot

1|8|15|3|2|4
Modify PlayerLeft Function
local function PlayerLeft(player)
    if players[player.id] ~= nil then
        local data = Storage.GetPlayerData(player)

        data.c = GetCosmeticString(player)
        Storage.SetPlayerData(player, data)

        for key, value in pairs(players[player.id]) do
            if Object.IsValid(value.obj) then
                value.obj:Destroy()
            end
        end

        players[player.id] = nil
    end
end
When the player leaves the game, the cosmetic data string is built and stored in player storage.
data.c = GetCosmeticString(player)
The cosmetic string is stored in the data table in property c. It's a good idea to keep property names short to save on storage space.
When using lots of short property names, write a comment above the property, as it can be easy to lose track of what the property is for.
The CosmeticServer Script
CosmeticServer
local TRIGGER = script:GetCustomProperty("Trigger"):WaitForObject()
local COSMETIC_ITEMS = script:GetCustomProperty("CosmeticItems"):WaitForObject()

local players = {}

local function GetSocket(category)
    local theCategory = COSMETIC_ITEMS:FindChildByName(category)

    return theCategory:GetCustomProperty("socket")
end

local function GetItem(id, category)
    local items = COSMETIC_ITEMS:FindChildByName(category)

    for _, item in ipairs(items:GetChildren()) do
        if item:GetCustomProperty("id") == tonumber(id) then
            return item
        end
    end

    return nil
end

local function SpawnCosmetic(player, id, category)
    id = tonumber(id) or 0

    if id == 0 then
        return
    end

    local item = GetItem(id, category)

    if item == nil then
        return
    end

    local thePlayer = players[player.id]

    if not thePlayer[category] then
        thePlayer[category] = {}
    end

    thePlayer[category].obj = World.SpawnAsset(item:GetCustomProperty("template"))
    thePlayer[category].id = tostring(id)
    thePlayer[category].obj:AttachToPlayer(player, GetSocket(category))
end

local function PlayerJoined(player)
    local data = Storage.GetPlayerData(player)

    players[player.id] = {}

    local cosmetic_data = data.c

    if cosmetic_data ~= nil then
        local items = { CoreString.Split(cosmetic_data, "|") }

        if #items > 0 then
            SpawnCosmetic(player, items[1], "Head")
            SpawnCosmetic(player, items[2], "Left Hand")
            SpawnCosmetic(player, items[3], "Right Hand")
            SpawnCosmetic(player, items[4], "Pelvis")
            SpawnCosmetic(player, items[5], "Left Foot")
            SpawnCosmetic(player, items[6], "Right Foot")

            player:SetPrivateNetworkedData("cosmetic_data", cosmetic_data)
        end
    end
end

local function GetSelectedCosmeticID(player, key)
    local id = 0

    if player[key] ~= nil and player[key].id ~= nil then
        id = player[key].id
    end

    return id
end

-- head|lefthand|righthand|pelvis|leftfoot|rightfoot

local function GetCosmeticString(player)
    local str = {}
    local thePlayer = players[player.id]

    table.insert(str, GetSelectedCosmeticID(thePlayer, "Head"))
    table.insert(str, GetSelectedCosmeticID(thePlayer, "Left Hand"))
    table.insert(str, GetSelectedCosmeticID(thePlayer, "Right Hand"))
    table.insert(str, GetSelectedCosmeticID(thePlayer, "Pelvis"))
    table.insert(str, GetSelectedCosmeticID(thePlayer, "Left Foot"))
    table.insert(str, GetSelectedCosmeticID(thePlayer, "Right Foot"))

    return table.concat(str, "|")
end

local function PlayerLeft(player)
    if players[player.id] ~= nil then
        local data = Storage.GetPlayerData(player)

        data.c = GetCosmeticString(player)
        Storage.SetPlayerData(player, data)

        for key, value in pairs(players[player.id]) do
            if Object.IsValid(value.obj) then
                value.obj:Destroy()
            end
        end

        players[player.id] = nil
    end
end

local function DisablePlayer(player)
    player.isMovementEnabled = false
    player.desiredFacingMode = FacingMode.FACE_MOVEMENT
    player.canMount = false
end

local function EnablePlayer(player)
    player.isMovementEnabled = true
    player.desiredFacingMode = FacingMode.FACE_AIM_WHEN_ACTIVE
    player.canMount = true
end

local function OnTriggerOverlap(trigger, obj)
    if Object.IsValid(obj) and obj:IsA("Player") then
        DisablePlayer(obj)

        local triggerPos = trigger:GetWorldPosition()
        local triggerRot = trigger:GetWorldRotation()

        obj:SetWorldPosition(Vector3.New(triggerPos.x, triggerPos.y, triggerPos.z))
        obj:SetWorldRotation(Rotation.New(0, 0, triggerRot.z))

        Events.BroadcastToPlayer(obj, "EnableCosmeticChanger")
    end
end

local function EquipCosmetic(player, id, category)
    if players[player.id] == nil then
        return
    end

    local thePlayer = players[player.id]

    if not thePlayer[category] then
        thePlayer[category] = {}
    end

    local lastID = 0

    if thePlayer[category].obj ~= nil and Object.IsValid(thePlayer[category].obj) then
        lastID = tonumber(thePlayer[category].id)

        thePlayer[category].obj:Destroy()
        thePlayer[category] = {}
    end

    if lastID == 0 or id ~= lastID then
        SpawnCosmetic(player, id, category)
    end
end

TRIGGER.beginOverlapEvent:Connect(OnTriggerOverlap)

Events.ConnectForPlayer("EnablePlayer", EnablePlayer)
Events.ConnectForPlayer("EquipCosmetic", EquipCosmetic)

Game.playerJoinedEvent:Connect(PlayerJoined)
Game.playerLeftEvent:Connect(PlayerLeft)
Test the Game
Test the game and make sure the following work.
- Selected cosmetics are saved.
- Selected cosmetics are loaded.
- Test in multiplayer preview.
Modify CosmeticUIClient Script
The last step is to update the cosmetic UI so that if a player has saved cosmetic data, then the UI will show which cosmetic items were selected last.
Open up the CosmeticUIClient script.
Create SetActiveCosmetic Function
local function SetActiveCosmetic(id, category)
    local panel = PANELS:FindChildByName(category)
    local list = panel:FindChildByName("List")

    for index, item in ipairs(list:GetChildren()) do
        if item.name == tostring(id) then
            activePanelItemButton[category] = {

                item = item,
                active = true

            }

            item:SetButtonColor(item:GetHoveredColor())

            break
        end
    end
end
Create the function SetActiveCosmetic, and place it just above the ShowUI function. This function is a helper function to reduce duplicate code. It will look for the cosmetic item in a specific category where the id matches the item.name value.
activePanelItemButton[category] = {

    item = item,
    active = true

}

item:SetButtonColor(item:GetHoveredColor())

break
The activePanelItemButton table for the category is updated with the found item, and active is marked as true. This is done to keep track of which cosmetic item in a specific category has been selected so the button color can be changed correctly. The last line can break out of the loop since the function has found the matching item.
Create SetSelectedCosmetics Function
local function SetSelectedCosmetics(player, key)
    if key == "cosmetic_data" then
        local data = player:GetPrivateNetworkedData("cosmetic_data")

        if data ~= nil then
            cosmetic_data = { CoreString.Split(data, "|") }

            if #cosmetic_data > 0 then
                SetActiveCosmetic(cosmetic_data[1], "Head")
                SetActiveCosmetic(cosmetic_data[2], "Left Hand")
                SetActiveCosmetic(cosmetic_data[3], "Right Hand")
                SetActiveCosmetic(cosmetic_data[4], "Pelvis")
                SetActiveCosmetic(cosmetic_data[5], "Left Foot")
                SetActiveCosmetic(cosmetic_data[6], "Right Foot")
            end
        end
    end
end
Create the SetSelectedCosmetics function just above the ShowUI function. This function will do a similar thing to what is done in the CosmeticServer script, by looking at the player's cosmetic data string and setting each item in a category as the active item.
if key == "cosmetic_data" then
    local data = player:GetPrivateNetworkedData("cosmetic_data")
The key is a string that is set in the CosmeticServer script when sending the cosmetic data to the client using SetPrivateNetworkedData.
Connect privateNetworkedDataChangedEvent
for i, key in ipairs(local_player:GetPrivateNetworkedDataKeys()) do
    SetSelectedCosmetics(local_player, key)
end

local_player.privateNetworkedDataChangedEvent:Connect(SetSelectedCosmetics)
Add the above code to the end of the CosmeticUIClient script.
The player needs to listen for when their private networked data has changed, but it is possible that the CosmeticServer script will set the player's private networked data before the event privateNetworkedDataChangedEvent has been connected. So you need to loop over all the keys to get the data from the cosmetic key.
The CosmeticUIClient Script
CosmeticUIClient
local COSMETIC_PANEL = script:GetCustomProperty("CosmeticPanel"):WaitForObject()
local BUTTONS = script:GetCustomProperty("Buttons"):WaitForObject()
local PANELS = script:GetCustomProperty("Panels"):WaitForObject()
local CLOSE_BUTTON = script:GetCustomProperty("CloseButton"):WaitForObject()
local COSMETIC_ITEMS = script:GetCustomProperty("CosmeticItems"):WaitForObject()
local COSMETIC_UI_ITEM = script:GetCustomProperty("CosmeticUIItem")
local CAPTURE_CAMERA = script:GetCustomProperty("CaptureCamera"):WaitForObject()
local CAPTURE_ITEMS_LIST = script:GetCustomProperty("CaptureItemsList"):WaitForObject()

local activeButton = BUTTONS:FindChildByName("Head")
local activePanel = PANELS:FindChildByName("Head")

local activePanelItemButton = {}

local local_player = Game.GetLocalPlayer()
local cosmetic_data = {}

local function EquipCosmetic(id, category)
    Events.BroadcastToServer("EquipCosmetic", id, category)
end

local function FindCaptureItem(tpl, category)
    local container = CAPTURE_ITEMS_LIST:FindChildByName(category)

    if container == nil then
        return
    end

    for i, child in ipairs(container:GetChildren()) do
        local id, name = CoreString.Split(tpl, ":")

        if name == child.name then
            return child
        end
    end
end

local function CreateCameraCapture(tpl, category)
    local item = FindCaptureItem(tpl, category)
    local capture = nil

    if Object.IsValid(item) then
        item.visibility = Visibility.FORCE_ON
        capture = CAPTURE_CAMERA:Capture(CameraCaptureResolution.SMALL)
        item.visibility = Visibility.FORCE_OFF
    end

    return capture
end

local function CreatePanelItemsUI(category, selected)
    local items = COSMETIC_ITEMS:FindChildByName(category)
    local panel = PANELS:FindChildByName(category)
    local list = panel:FindChildByName("List")

    local counter = 1
    local xOffset = 0
    local yOffset = 0

    for index, item in ipairs(items:GetChildren()) do
        local ui_item = World.SpawnAsset(COSMETIC_UI_ITEM, { parent = list })
        local id = item:GetCustomProperty("id")
        local capture = CreateCameraCapture(item:GetCustomProperty("template"), category)

        if capture ~= nil then
            ui_item:FindChildByName("Image"):SetCameraCapture(capture)
        end

        ui_item.name = tostring(id)

        ui_item.x = xOffset
        ui_item.y = yOffset

        if counter == 5 then
            xOffset = 0
            yOffset = yOffset + 75
            counter = 0
        else
            xOffset = xOffset + 75
        end

        counter = counter + 1

        if selected ~= nil and tostring(id) == selected then
            activePanelItemButton[category] = {

                item = ui_item,
                active = true

            }

            ui_item:SetButtonColor(ui_item:GetHoveredColor())
        end

        ui_item.clickedEvent:Connect(function()
            local has_item = false

            if activePanelItemButton[category] ~= nil then
                activePanelItemButton[category].item:SetButtonColor(ui_item:GetDisabledColor())
                has_item = true
            end

            if has_item then
                if activePanelItemButton[category].item == ui_item then
                    if activePanelItemButton[category].active then
                        ui_item:SetButtonColor(ui_item:GetDisabledColor())
                        activePanelItemButton[category].active = false
                    else
                        ui_item:SetButtonColor(ui_item:GetHoveredColor())
                        activePanelItemButton[category].active = true
                    end
                else
                    ui_item:SetButtonColor(ui_item:GetHoveredColor())
                    activePanelItemButton[category].item = ui_item
                    activePanelItemButton[category].active = true
                end
            end

            if not has_item then
                ui_item:SetButtonColor(ui_item:GetHoveredColor())

                activePanelItemButton[category] = {

                    item = ui_item,
                    active = true

                }
            end

            EquipCosmetic(id, category)
        end)
    end
end

local function SwitchPanel(button)
    if activeButton ~= button then
        activeButton:SetButtonColor(activeButton:GetDisabledColor())
        button:SetButtonColor(button:GetHoveredColor())
        activeButton = button

        activePanel.visibility = Visibility.FORCE_OFF
        activePanel = PANELS:FindChildByName(button.name)
        activePanel.visibility = Visibility.FORCE_ON
    end
end

local function CreateCosmeticItemsUI()
    CreatePanelItemsUI("Head", cosmetic_data[1])
    CreatePanelItemsUI("Left Hand", cosmetic_data[2])
    CreatePanelItemsUI("Right Hand", cosmetic_data[3])
    CreatePanelItemsUI("Pelvis", cosmetic_data[4])
    CreatePanelItemsUI("Left Foot", cosmetic_data[5])
    CreatePanelItemsUI("Right Foot", cosmetic_data[6])

    for index, button in ipairs(BUTTONS:GetChildren()) do
        button.clickedEvent:Connect(SwitchPanel)
    end

    cosmetic_data = {}
end

local function SetActiveCosmetic(id, category)
    local panel = PANELS:FindChildByName(category)
    local list = panel:FindChildByName("List")

    for index, item in ipairs(list:GetChildren()) do
        if item.name == tostring(id) then
            activePanelItemButton[category] = {

                item = item,
                active = true

            }

            item:SetButtonColor(item:GetHoveredColor())

            break
        end
    end
end

local function SetSelectedCosmetics(player, key)
    if key == "cosmetic_data" then
        local data = player:GetPrivateNetworkedData("cosmetic_data")

        if data ~= nil then
            cosmetic_data = { CoreString.Split(data, "|") }

            if #cosmetic_data > 0 then
                SetActiveCosmetic(cosmetic_data[1], "Head")
                SetActiveCosmetic(cosmetic_data[2], "Left Hand")
                SetActiveCosmetic(cosmetic_data[3], "Right Hand")
                SetActiveCosmetic(cosmetic_data[4], "Pelvis")
                SetActiveCosmetic(cosmetic_data[5], "Left Foot")
                SetActiveCosmetic(cosmetic_data[6], "Right Foot")
            end
        end
    end
end

local function ShowUI()
    COSMETIC_PANEL.visibility = Visibility.FORCE_ON
end

local function HideUI()
    COSMETIC_PANEL.visibility = Visibility.FORCE_OFF
end

local function Close()
    HideUI()

    Events.BroadcastToServer("EnablePlayer")
    Events.Broadcast("ClearCamera")
end

Events.Connect("ShowCosmeticUI", ShowUI)
Events.Connect("HideCosmeticUI", HideUI)

CLOSE_BUTTON.clickedEvent:Connect(Close)

CreateCosmeticItemsUI()

for i, key in ipairs(local_player:GetPrivateNetworkedDataKeys()) do
    SetSelectedCosmetics(local_player, key)
end

local_player.privateNetworkedDataChangedEvent:Connect(SetSelectedCosmetics)
Test the Game
Test the game and make sure the following work.
- Cosmetic UI panels update based on selected cosmetics.
- Clicking on an active cosmetic in the UI becomes inactive.
Networked Cosmetic Items
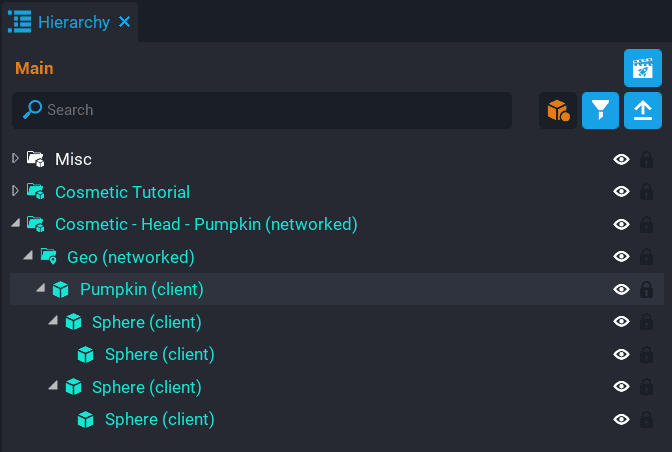
When creating cosmetic items, the parent of the cosmetic will need to be networked so that it is replicated to all other players in the game, otherwise, they won't see it. To save on the number of networked objects used, make sure to place all the child objects inside a Client Context, this will reduce the number of networked objects for your game.
For example. Take a look at the Pumpkin cosmetic. You will see that most of the objects are inside a Client Context group. The only networked object is the parent group.
There are other solutions that can be used if networked objects are a concern for you. One way would be to spawn and attach the cosmetics to the client. However, you would then need to replicate this to other players in the game by broadcasting to the server, then back to all the other clients. This solution is a bit more work but can work well if done correctly.
Another way would be to use dormant networked objects. This gives you more control on when a networked object should be updated, which will make the game more performant, and you can utilize more networked behavior.
Finished Project
The finished project for this tutorial is available to play and edit.
For feedback and questions, please reach out to us on this tutorial's forum thread.
Summary
Cosmetics in games are very popular. They can be a good way to allow players to add more customization to their character, and show off to other players. Some games have cosmetics as premium items where the player will need to purchase them with real money.
There is more that you can do with a cosmetic system to make it more interesting, and have more depth to it. Here are some ideas to consider.
- Make some cosmetic items become unlocked at a certain player level.
- Add more categories/sockets.
- Add full player outfit cosmetics.
- Support multiple cosmetic booths to prevent players from overlapping and using the same one.
- Add support for coloring different cosmetic items (that is colors and materials).
- Allow players to trade cosmetics (that is unique cosmetics found in the world and not in the shop).
Learn More
Persistent Storage | UI | Cameras and Settings