Photo Booth
Overview
In this tutorial you will be creating a Photo Booth where players can stand in front of a Camera to take pictures of themselves and other players in the shot. These Camera Captures will be shared with the rest of the players in the game so they can see your picture. You will be using your camera capture knowledge from previous tutorials to create a multiplayer experience for your players.
- Completion Time: ~2 hours
- Knowledge Level: It is recommended to have completed the Scripting Beginner and Camera Captures tutorials.
- Skills you will learn:
- Creating an override camera.
- Creating camera captures.
- Creating trigger areas.
- Showing camera captures in the UI.
- Randomly changing UI background images using
RandomStream. - Showing camera captures in the world.
- Attaching an object to the player.
- Creating a multiplayer experience by sharing camera captures.
Import Asset from Community Content
You will be importing an asset from Community Content that will contain the assets needed to build the Photo Booth.
- Open the Community Content window.
- Search for
Photo Boothby CoreAcademy. - Click Import.
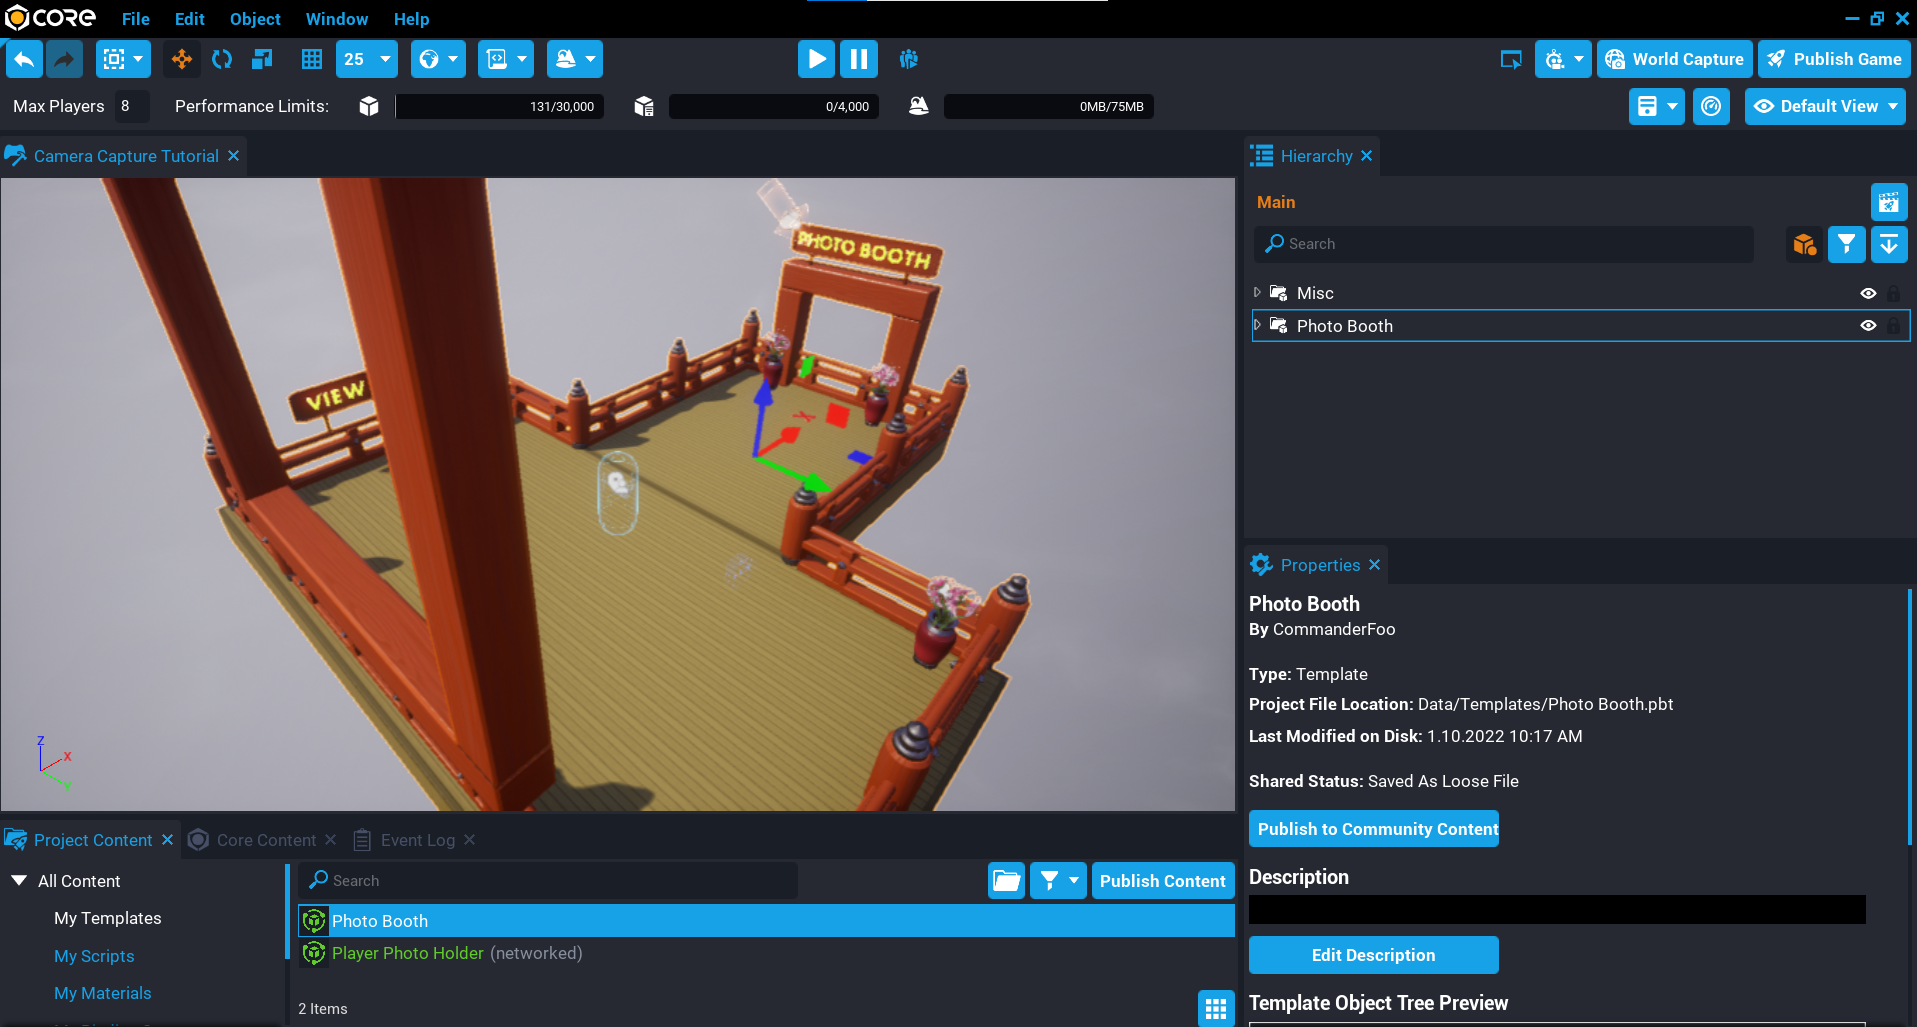
Add Asset Template to Hierarchy
- Click the Project Content tab.
- Click My Templates under All Content.
- Add the template Photo Booth into the Hierarchy.
- Deinstance the Photo Booth template in the Hierarchy.
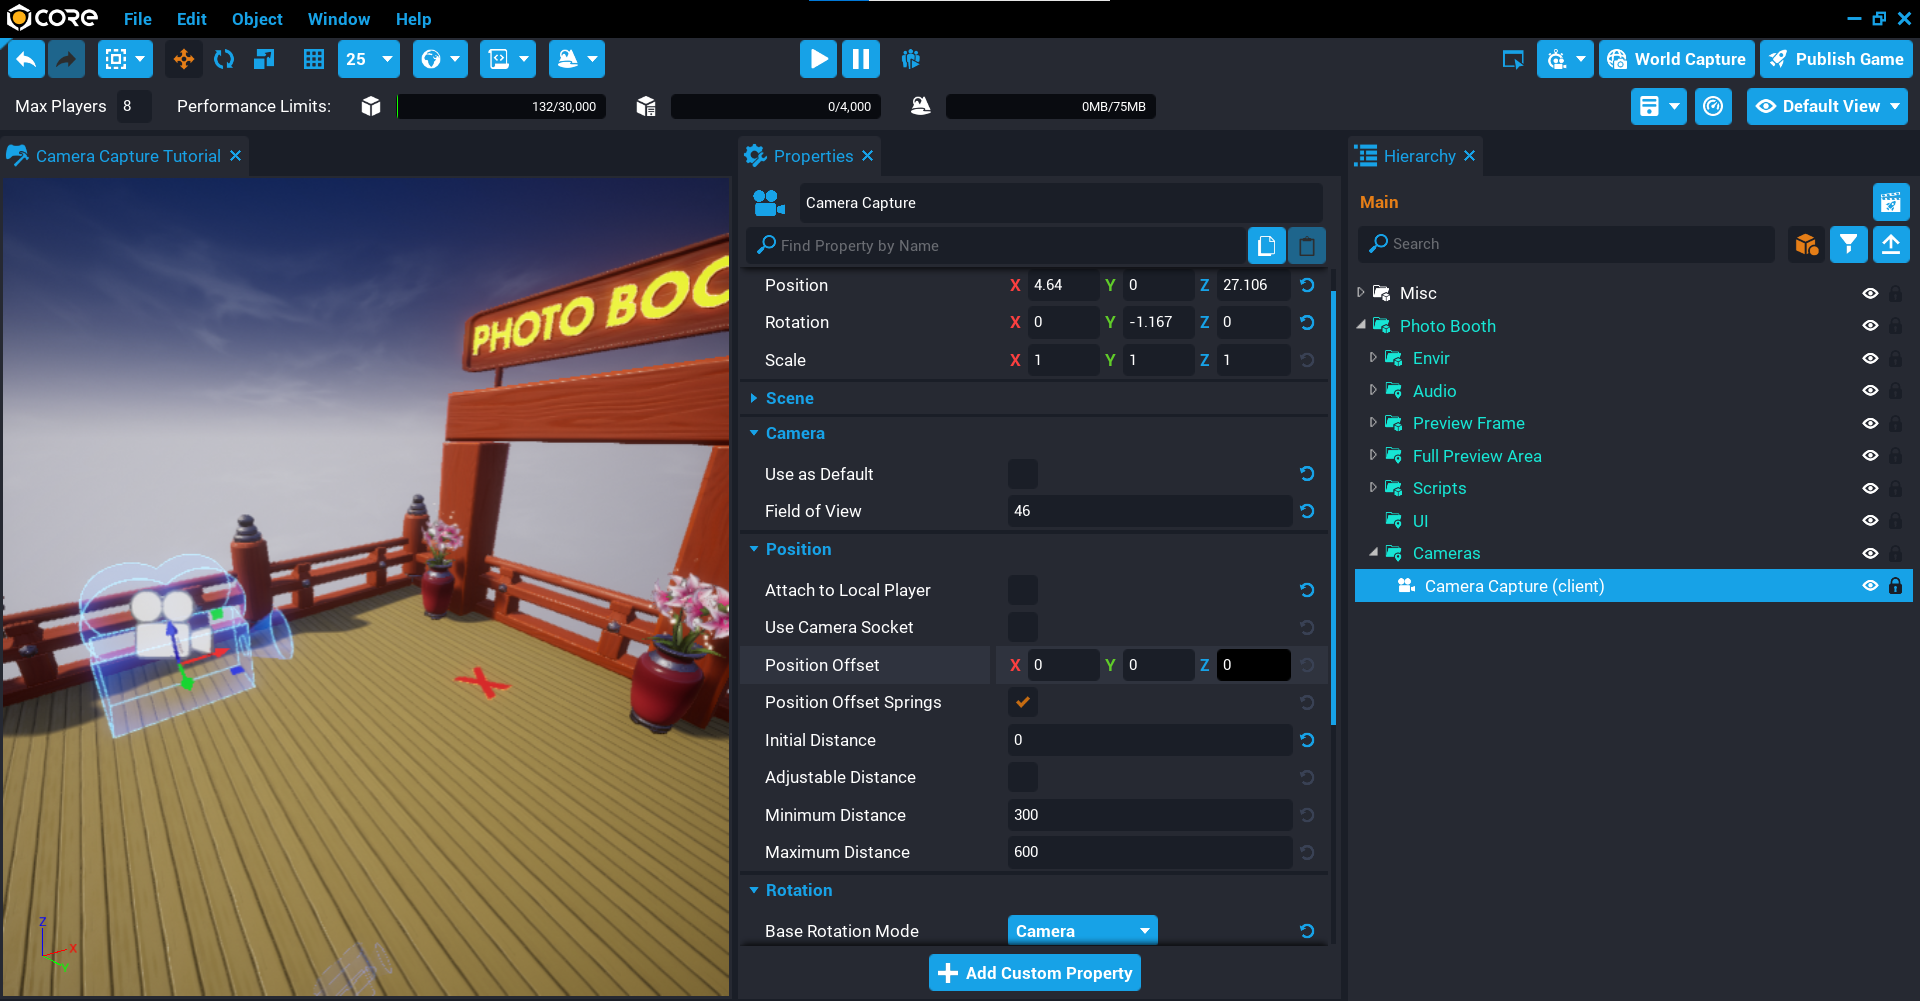
Create Capture Camera
You will need to create a camera that will be responsible for doing all the camera capture work. The settings below are what was found to work best for the desired look. Feel free to adjust these.
- Create a Camera object and place it into the Cameras folder in the Hierarchy.
- Rename the camera to
Camera Capture. - Set the Position to X
4.64, Y0, Z27.106. - Set the Rotation to X
0, Y-1.167, Z0. - Set the Field of View to
46. - Uncheck Use as Default.
- Uncheck Attach to Local Player.
- Set Initial Distance to
0. - Set Base Rotation Mode to Camera.
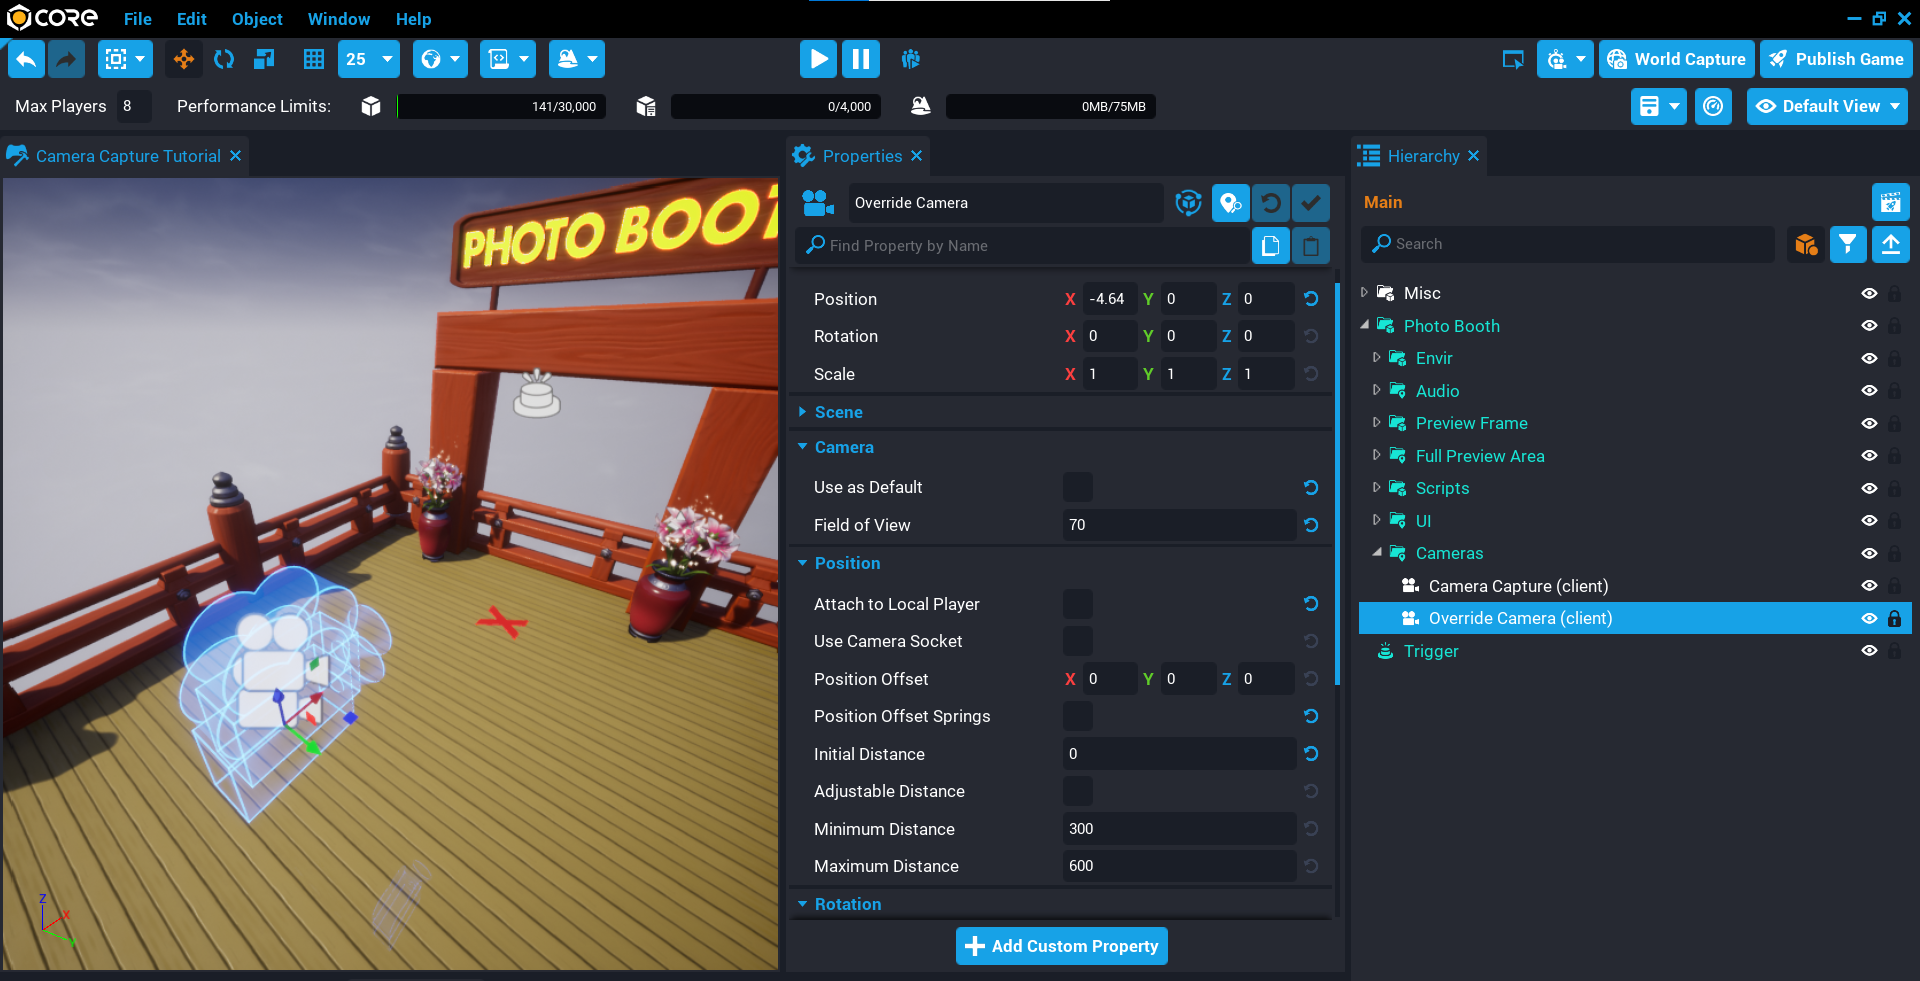
Create Override Camera
The override camera will switch the current player's camera to a different camera so they can see how they would be positioned in the photo. This will happen when the player enters the area of the photo booth, and when they leave it will switch back to their default camera.
- Create a Camera object and place it into the Camera folder in the Hierarchy.
- Rename the camera to
Override Camera. - Set the Position to X
-4.64, Y0, Z0. - Set the Field of View to
70. - Uncheck Use as Default.
- Uncheck Attach to Local Player.
- Set Initial Distance to
0. - Set Base Rotation Mode to Camera.
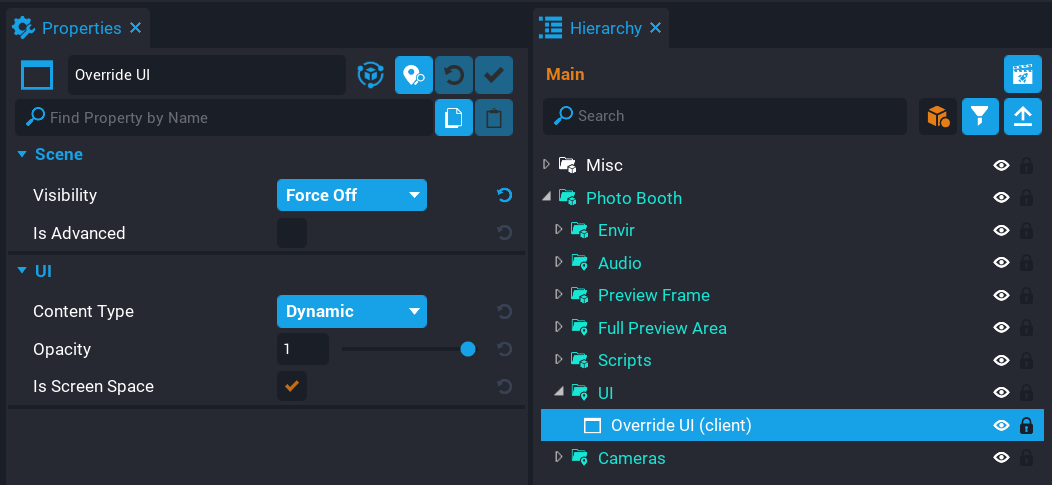
Create Override UI
The override UI will be displayed when the player enters the area to take a photo. This will also be responsible for showing the last photo took by the player, this part will be done in a later section.
Create UI Container
- Create a UI Container inside the UI folder in the Hierarchy.
- Rename the UI Container to
Override UI. - Set the Visibility to Force Off.
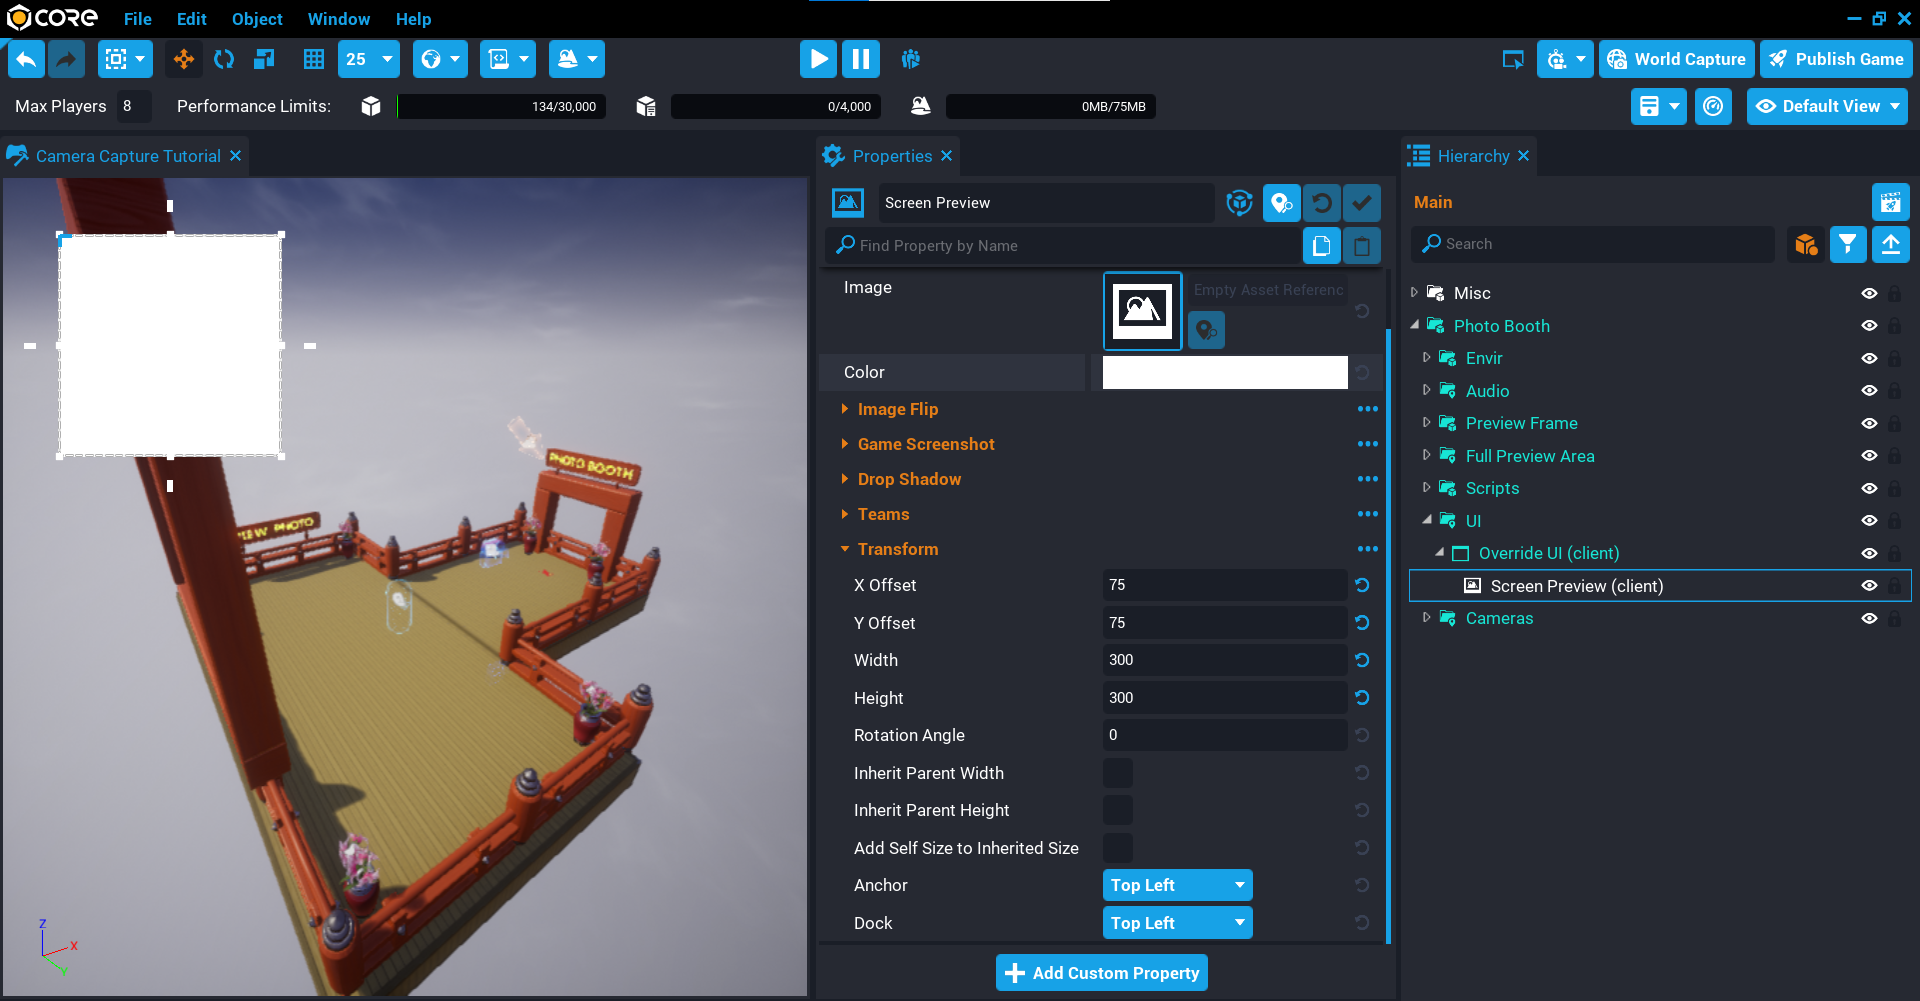
Create Screen Preview
The screen preview elements will be used to display the last picture the player took with a frame around it. There will also be a text object that will be dynamically set later on to let the player know if they can hold their photo in front of them.
Create Preview Image
- Inside the Override UI create a UI Image object and rename it
Screen Preview. - Set the X Offset to
75, and the Y Offset to75. - Set the Width to
300, and the Height to300. - Set the Anchor to Top Left, and Dock to Top Left.
- Set the Visibility to Force Off.
Create Frame Image
To give the image a nice look, you can add a frame that fits on top of the Screen Preview image.
- Inside the Screen Preview create a UI Image object and rename it to
Frame. - Change the Image property to
Japanese Frame 005. - Set the Width to
8, and the Height to 8. - Enable Inherit Parent Width, Inherit Parent Height, and Add Self to Inherited Size.
- Set the Anchor to Middle Center, and Dock to Middle Center.

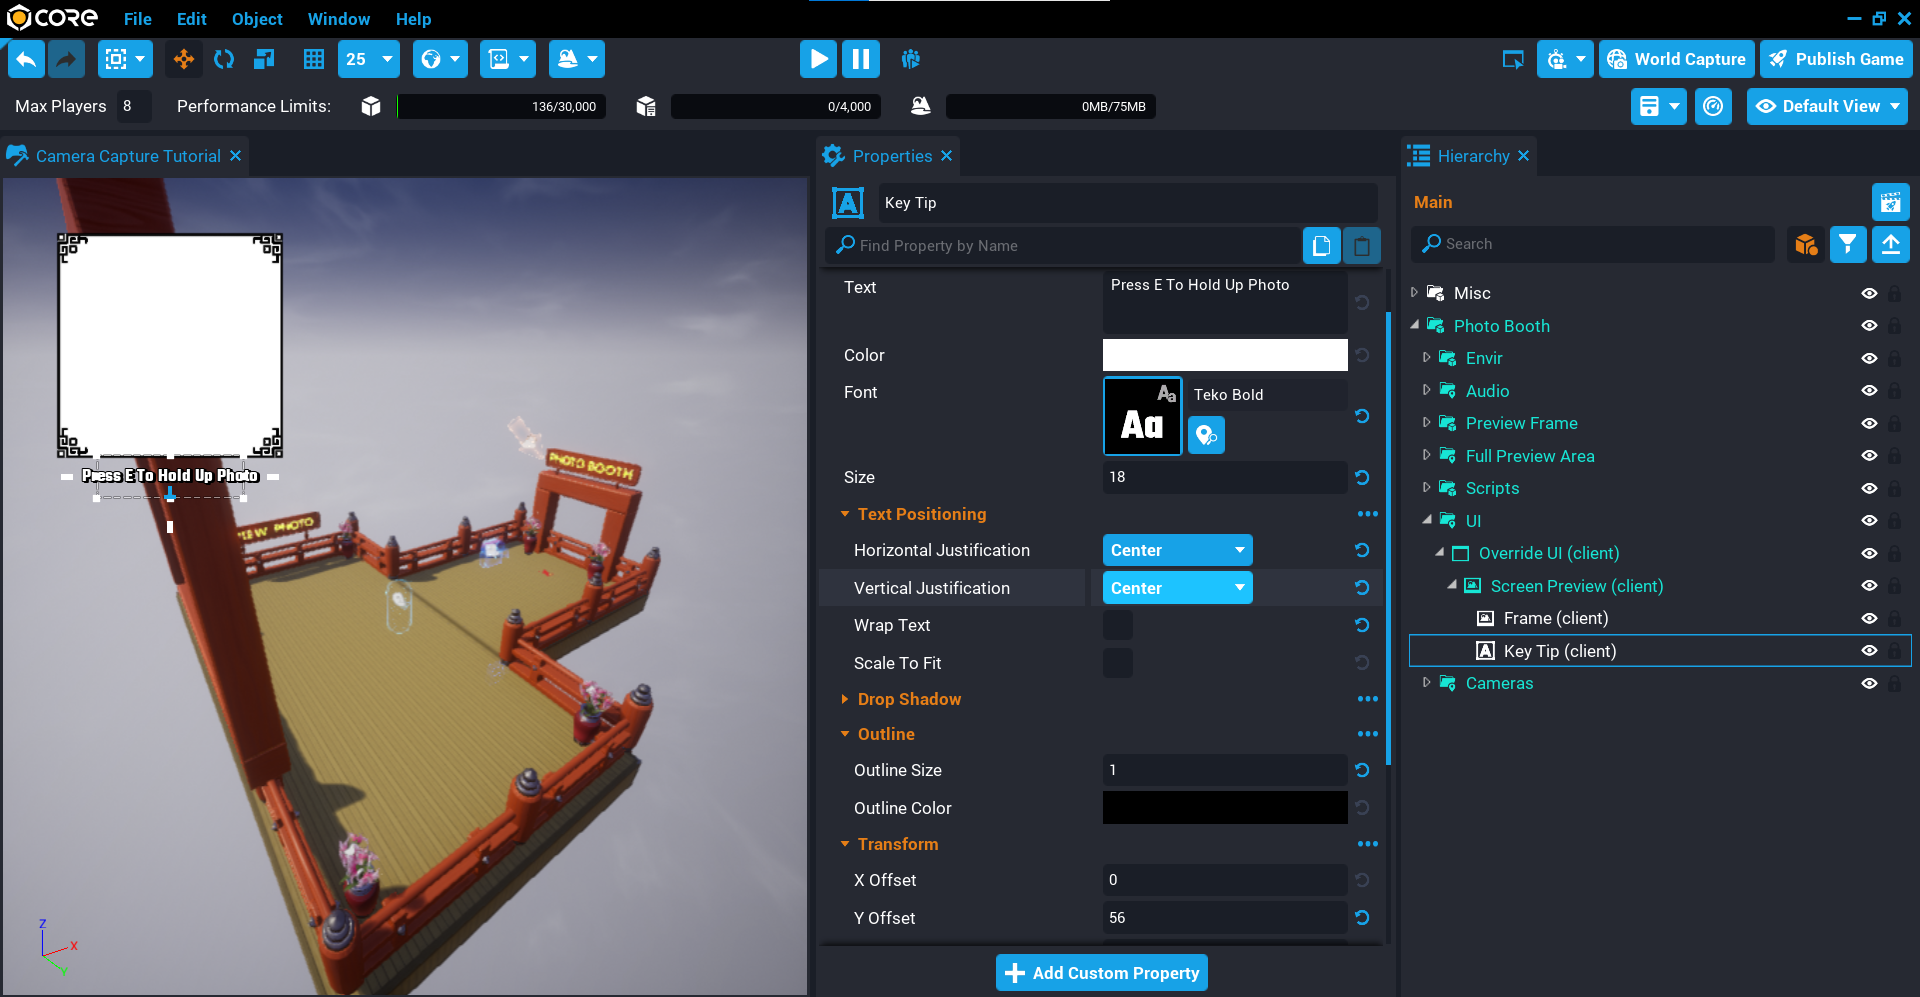
Create Key Tip Text
Later on in the tutorial you will be adding a feature where the player can pull out their last photo they took and walk around with it. A little tip under the screen preview image needs to be displayed, because at some point, the player can not equip their photo, so this text object will get updated dynamically.
- Inside Screen Preview create a UI Text object and rename it to
Key Tip. - Set the Text to
Press E To Hold Up Photo. - Set the Font to Teko Bold.
- Set the Size to
18. - Set the Horizontal Justification to Center.
- Set the Vertical Justification to Center.
- Uncheck Wrap Text.
- Set the Shadow Offset to X
2, and Y2. - Set the Outline Size to
1. - Set the Y Offset to
56. - Set the Width to
200, and Height to60. - Set the Anchor to Bottom Center, and Dock to Bottom Center.
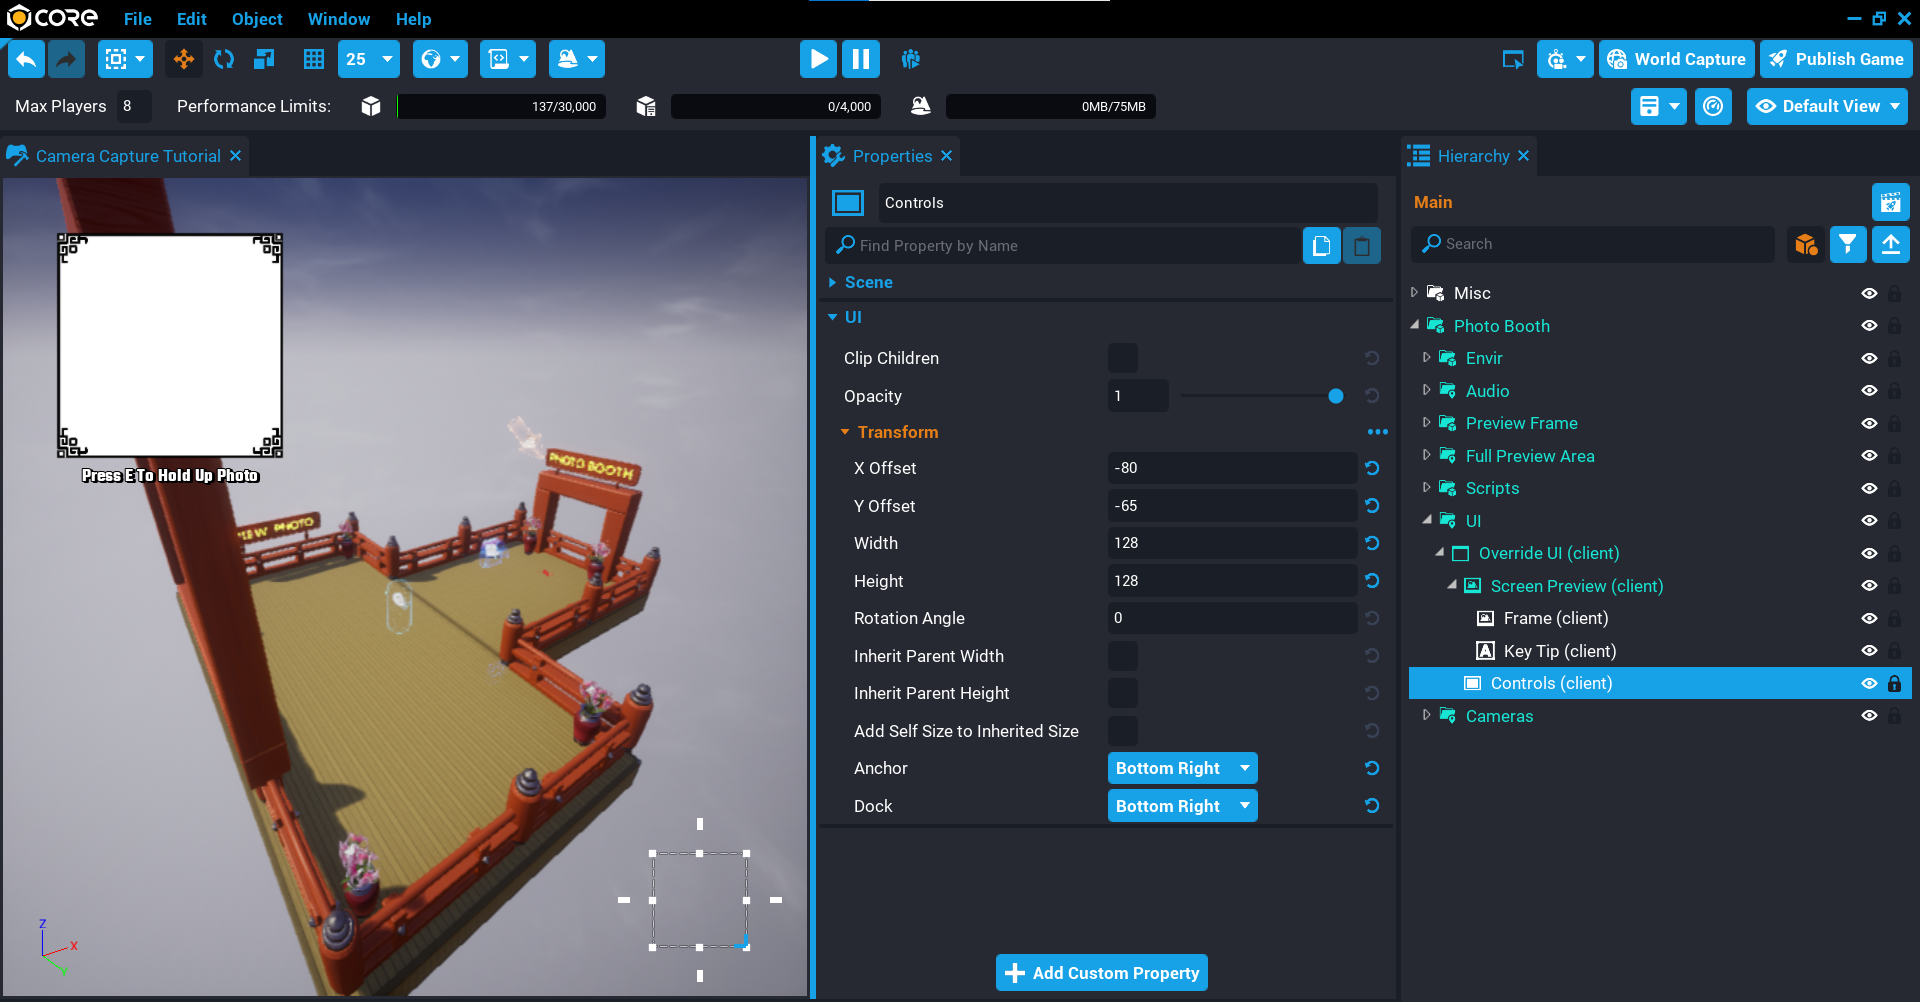
Create Controls
The controls will be what action the player can do when the override UI is displayed. In this case there will be just one control that will be the camera button that the player will need to click on to take a photo.
Create Panel
- Create a UI Panel inside the Override UI object and rename it to
Controls. - Set the X Offset to
-80, and Y Offset to-65. - Set the Width to
128, and the Height to128. - Set the Anchor to Bottom Right, and Dock to Bottom Right.
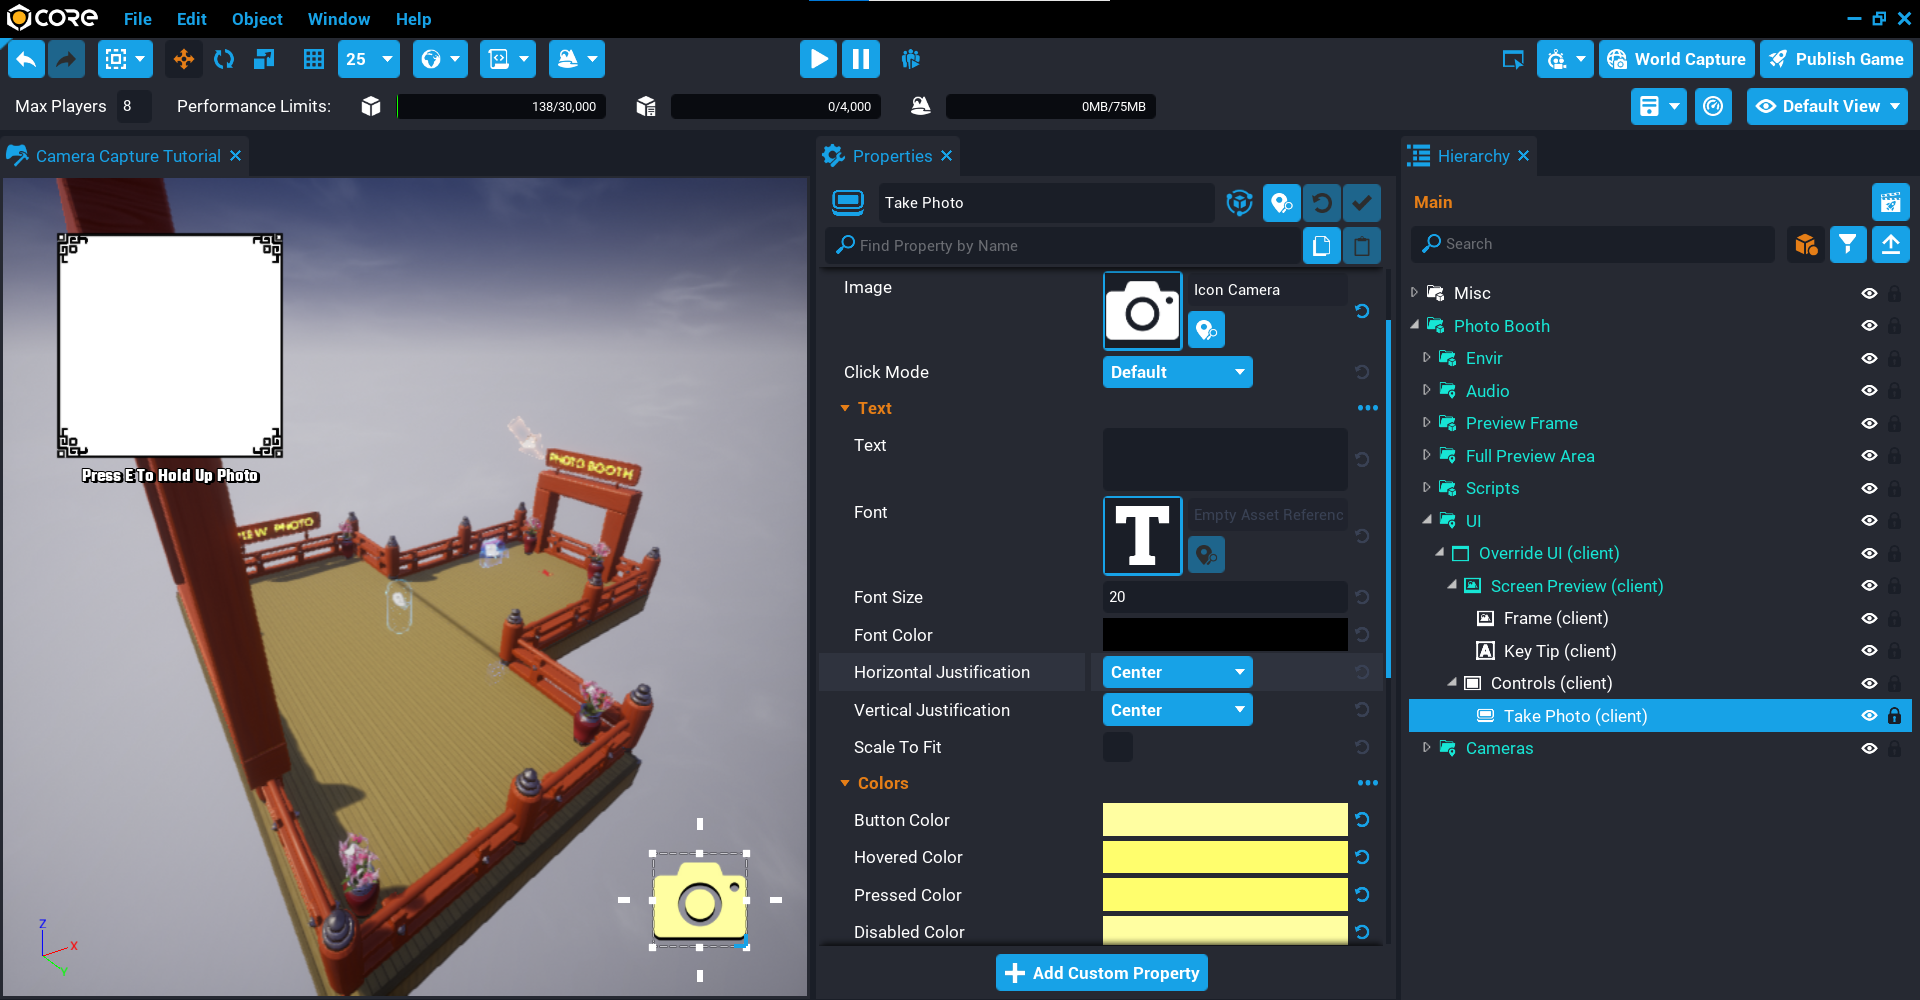
Create Camera Button
- Create a UI Button inside the Controls object and rename it to
Take Photo. - Change the Image to Icon Camera.
- Change the Take Photo button state colors to what you like.
- Set the Width to
150, and the Height to150. - Enable Inherit Parent Width, and Inherit Parent Height.
- Set the Anchor to Bottom Right, and Dock to Bottom Right.
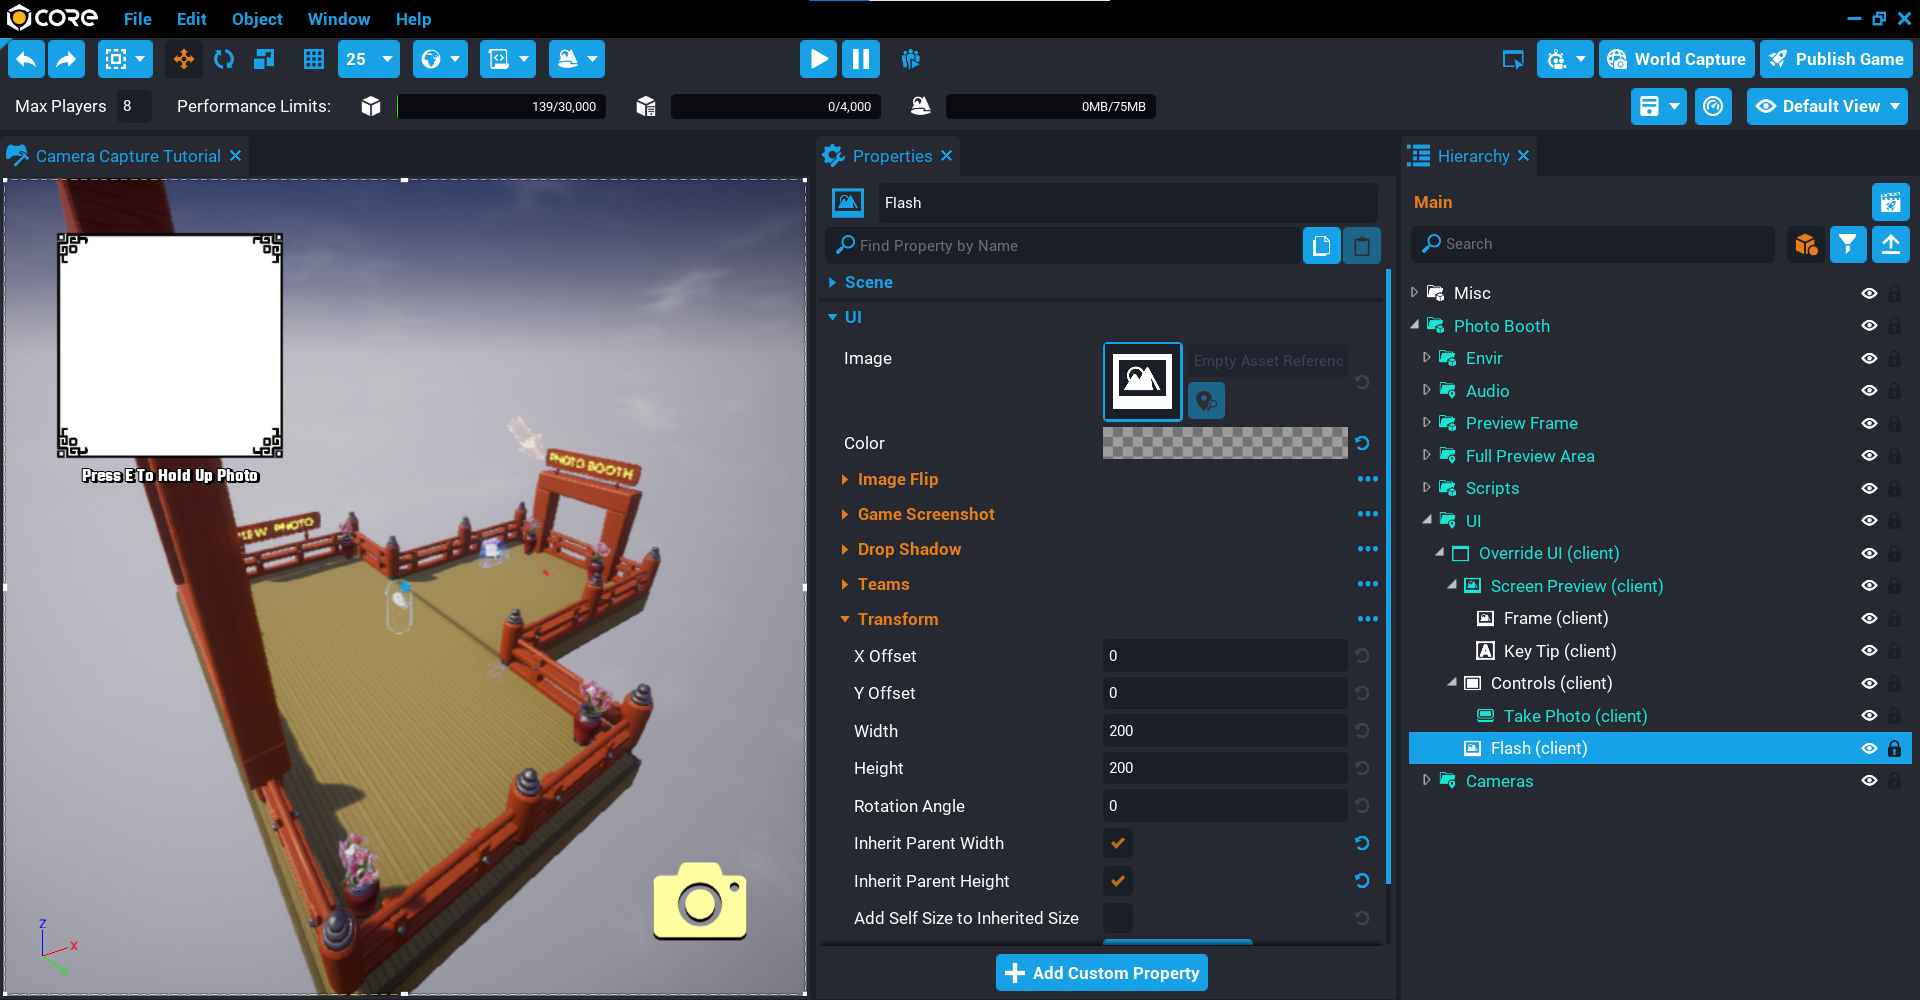
Create Flash Image
When the player takes a photo, it would be nice to display a flash. You can do this by creating an image and turning the visibility on then off quickly.
- Create a UI Image inside the Override UI object and name it to
Flash. - Set the Alpha of the Color to
0.05. - Enable Inherit Parent Width, and Inherit Parent Height.
Try not to set the Alpha too high, as it could be too harsh for players when the flash goes off.
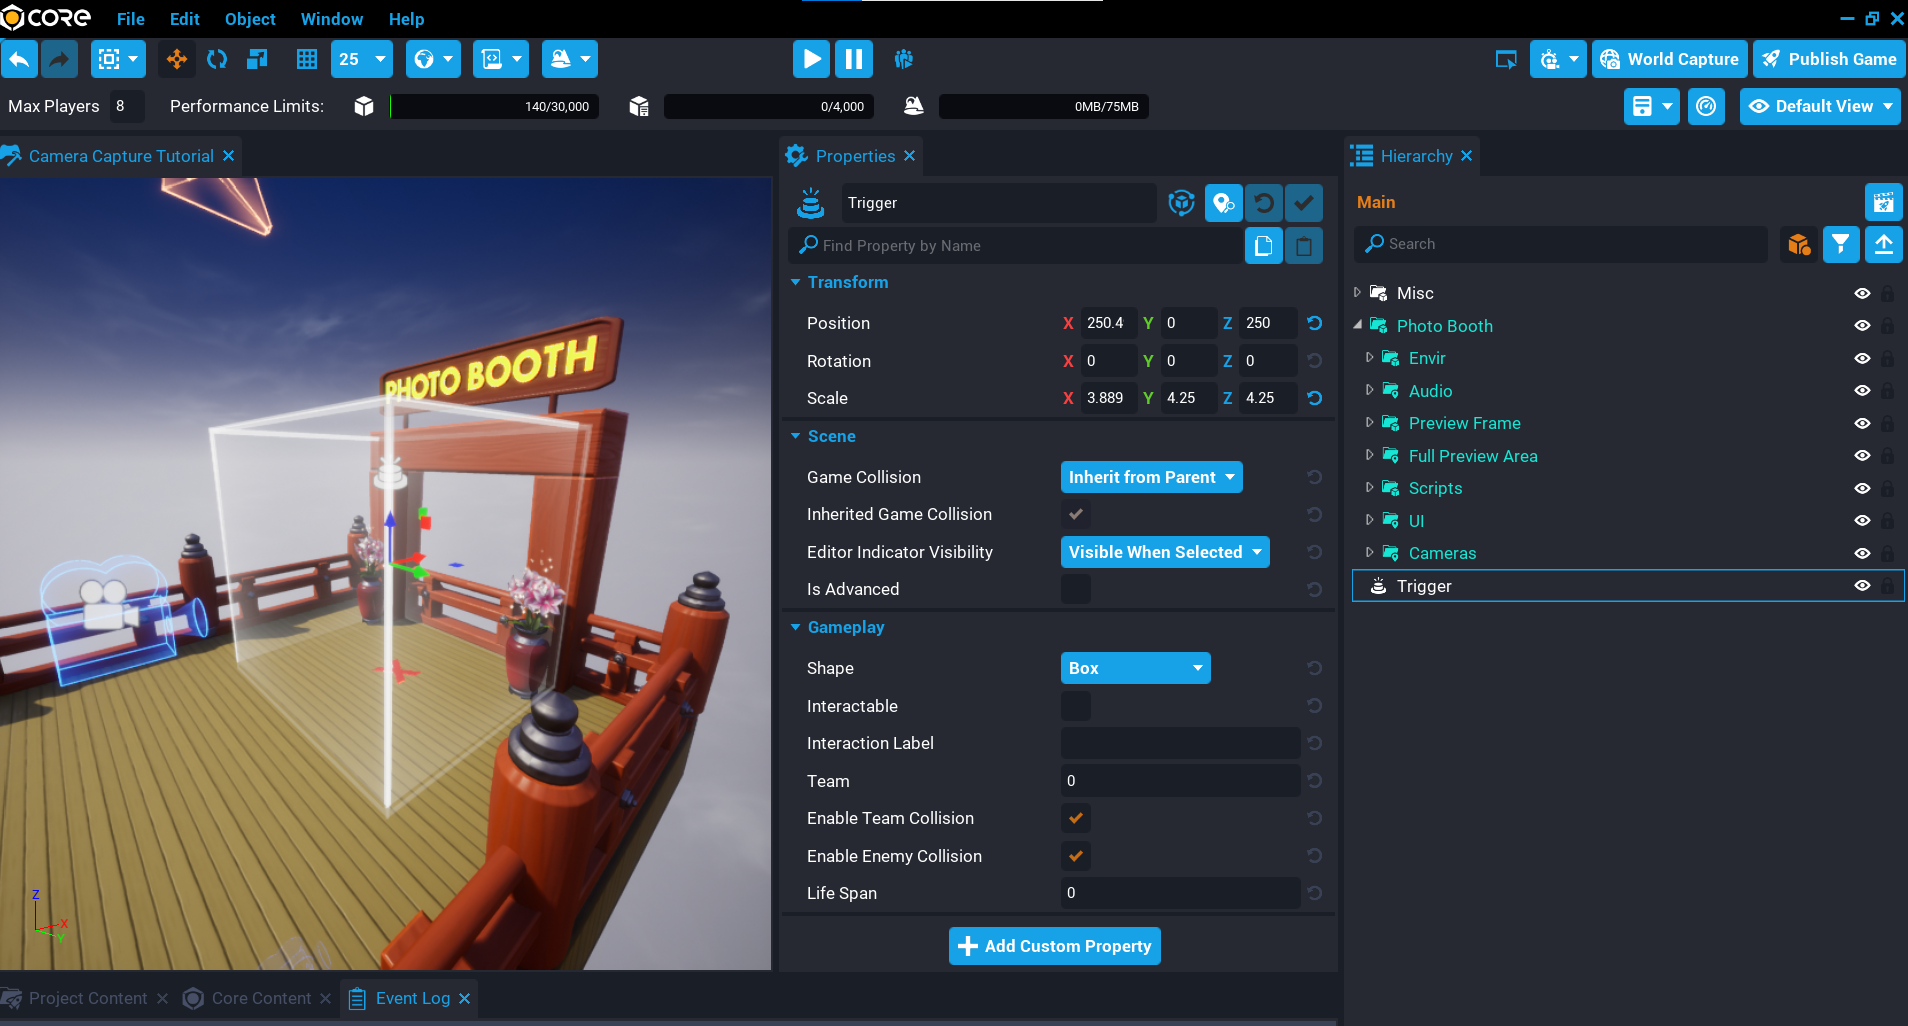
Create Override Trigger
A trigger will be used to detect when the player is in the photo booth area. This will override the player's camera and will display the UI so a photo can be took. Position and scale the trigger so it is in front of the photo booth frame.
- Create a Trigger and place it into the Photo Booth folder.
- Set the Position to X
250, Y0, and Z250. - Set the Scale to X
4, Y4, and Z4.
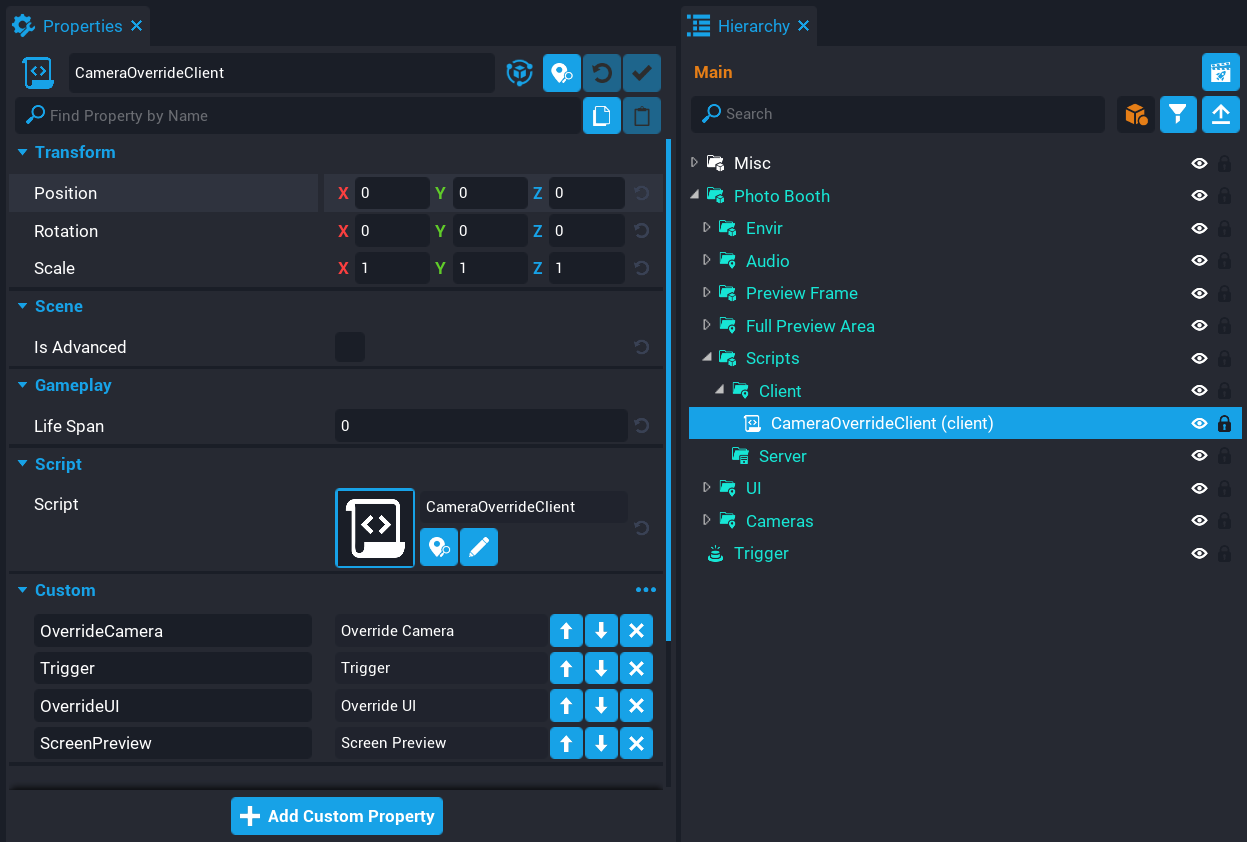
Create CameraOverrideClient Script
Create a script called CameraOverrideClient and place it into the Client folder in the Hierarchy. This script will be responsible for detecting when the player has overlapped the trigger volume so it can override the current players camera and show the UI.
Add Custom Properties
The script will need references to some objects in the Hierarchy.
- Add the Override Camera as a custom property and name it
OverrideCamera. - Add the Trigger as a custom property and name it
Trigger. - Add the Override UI as a custom property and name it
OverrideUI. - Add the Screen Preview as a custom property and name it
ScreenPreview.
Edit CameraOverrideClient Script
Open up the CameraOverrideClient script and add the references to the properties you added.
local OVERRIDE_CAMERA = script:GetCustomProperty("OverrideCamera"):WaitForObject()
local TRIGGER = script:GetCustomProperty("Trigger"):WaitForObject()
local OVERRIDE_UI = script:GetCustomProperty("OverrideUI"):WaitForObject()
local SCREEN_PREVIEW = script:GetCustomProperty("ScreenPreview"):WaitForObject()
You will also need a reference to the local player so you can check the player that is overlapping with the trigger is the current local player.
local localPlayer = Game.GetLocalPlayer()
Create OnTriggerEnter Function
Create a function called OnTriggerEnter that will be called when the player overlaps the trigger. Using SetOverrideCamera and passing in the OVERRIDE_CAMERA will change the player's camera to the override one instantly. At the same time the visibility of the OVERRIDE_UI is set to FORCE_ON which will show the camera icon so the player can take a photo.
local function OnTriggerEnter(trigger, other)
    if other:IsA("Player") and other == localPlayer then
        localPlayer:SetOverrideCamera(OVERRIDE_CAMERA)
        OVERRIDE_UI.visibility = Visibility.FORCE_ON
        UI.SetCursorVisible(true) -- (1)
        UI.SetCanCursorInteractWithUI(true) -- (2)
    end
end
- Show the cursor to the player.
- Allow the player to interact with the UI.
Create OnTriggerLeft Function
Create a function called OnTriggerLeft that will be called when the player leaves the trigger. When the player leaves the trigger, it will clear the current override camera that was set by calling ClearOverrideCamera. This will revert the player's camera back to the default camera.
local function OnTriggerLeft(trigger, other)
    if other:IsA("Player") and other == localPlayer then
        localPlayer:ClearOverrideCamera()
        OVERRIDE_UI.visibility = Visibility.FORCE_OFF -- (1)
        SCREEN_PREVIEW.visibility = Visibility.FORCE_OFF -- (2)
        UI.SetCursorVisible(false) -- (3)
        UI.SetCanCursorInteractWithUI(false) -- (4)
    end
end
- Hide the UI from the player.
- If the player has took a photo, then the preview image needs to be hidden.
- No longer need the cursor visible.
- Player can no longer interact with the UI.
Connect Trigger Events
Connect the TRIGGER events so they fire when the player overlaps or exits the trigger bounds.
TRIGGER.beginOverlapEvent:Connect(OnTriggerEnter)
TRIGGER.endOverlapEvent:Connect(OnTriggerLeft)
The CameraOverrideClient Script
CameraOverrideClient
local OVERRIDE_CAMERA = script:GetCustomProperty("OverrideCamera"):WaitForObject()
local TRIGGER = script:GetCustomProperty("Trigger"):WaitForObject()
local OVERRIDE_UI = script:GetCustomProperty("OverrideUI"):WaitForObject()
local SCREEN_PREVIEW = script:GetCustomProperty("ScreenPreview"):WaitForObject()

local localPlayer = Game.GetLocalPlayer()

local function OnTriggerEnter(trigger, other)
    if other:IsA("Player") and other == localPlayer then
        localPlayer:SetOverrideCamera(OVERRIDE_CAMERA)
        OVERRIDE_UI.visibility = Visibility.FORCE_ON
        UI.SetCursorVisible(true)
        UI.SetCanCursorInteractWithUI(true)
    end
end

local function OnTriggerLeft(trigger, other)
    if other:IsA("Player") and other == localPlayer then
        localPlayer:ClearOverrideCamera()
        OVERRIDE_UI.visibility = Visibility.FORCE_OFF
        SCREEN_PREVIEW.visibility = Visibility.FORCE_OFF
        UI.SetCursorVisible(false)
        UI.SetCanCursorInteractWithUI(false)
    end
end

TRIGGER.beginOverlapEvent:Connect(OnTriggerEnter)
TRIGGER.endOverlapEvent:Connect(OnTriggerLeft)
Test the Game
Test the game to make sure the following work:
- Player's camera changes when they enter the area with the X on the ground.
- UI is shown with the camera icon in the bottom right corner.
- Leaving the area clears the camera which reverts back to the default camera.
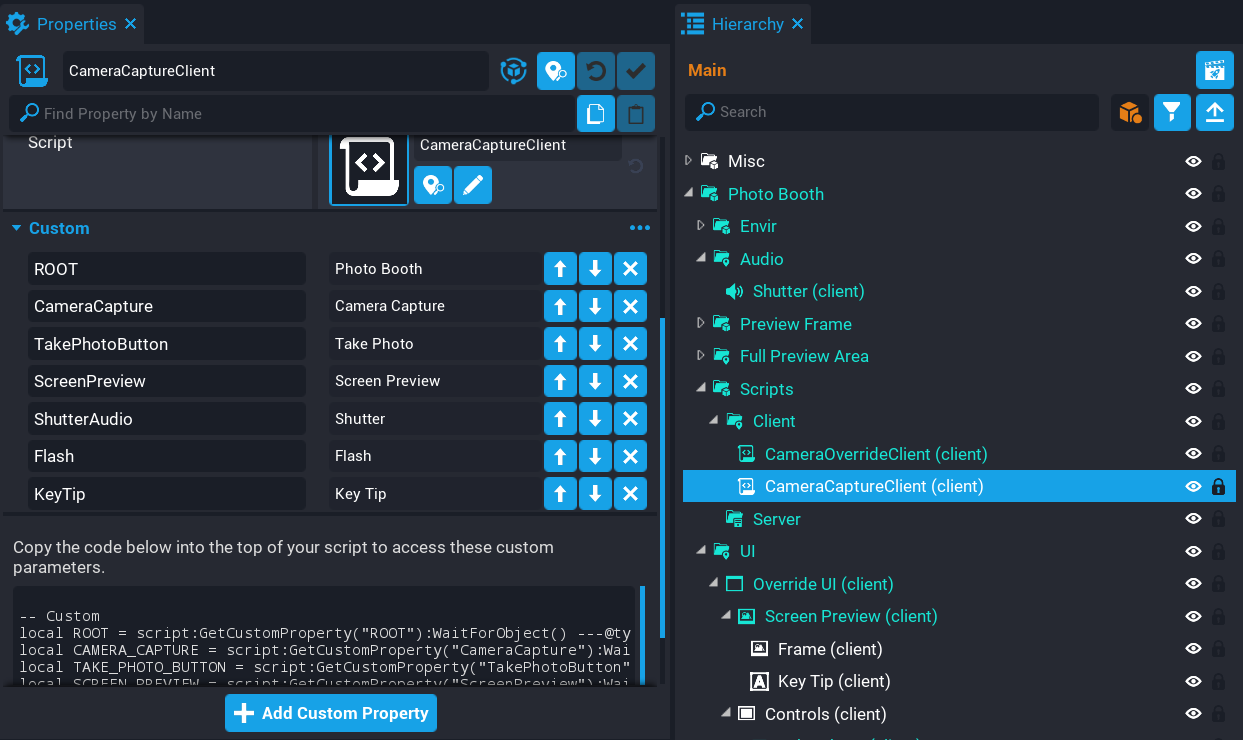
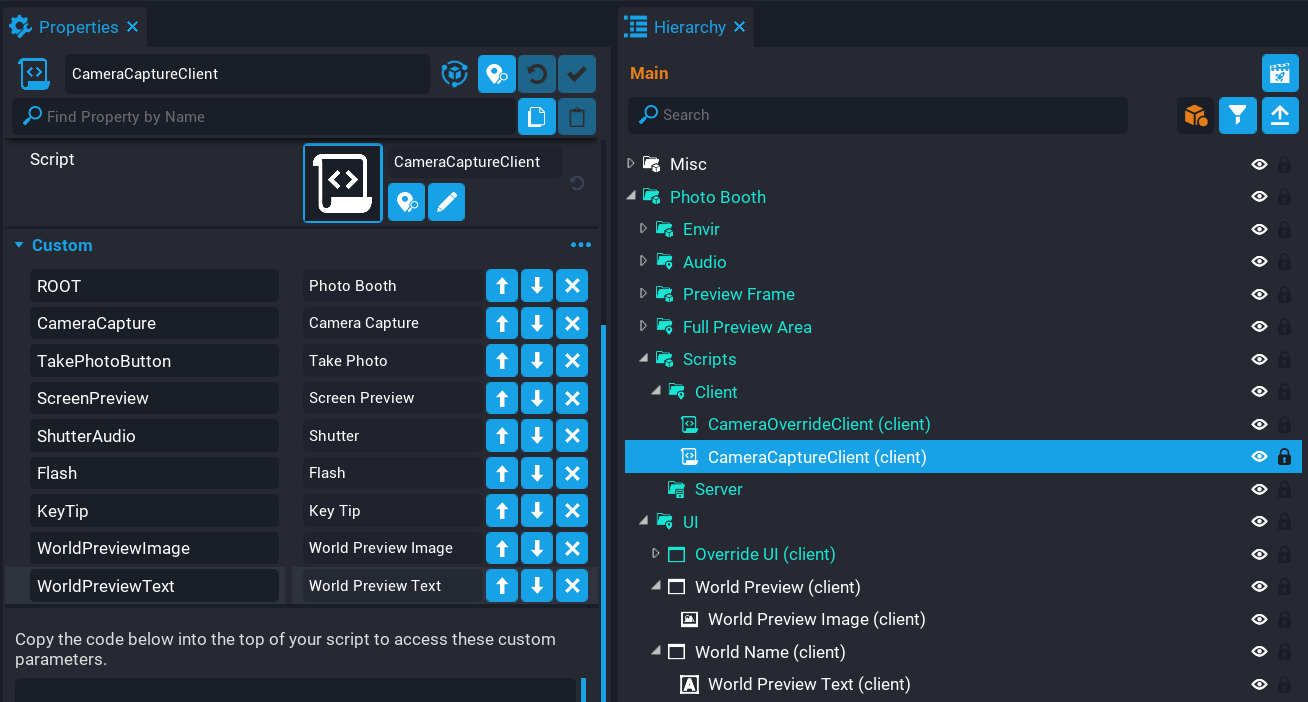
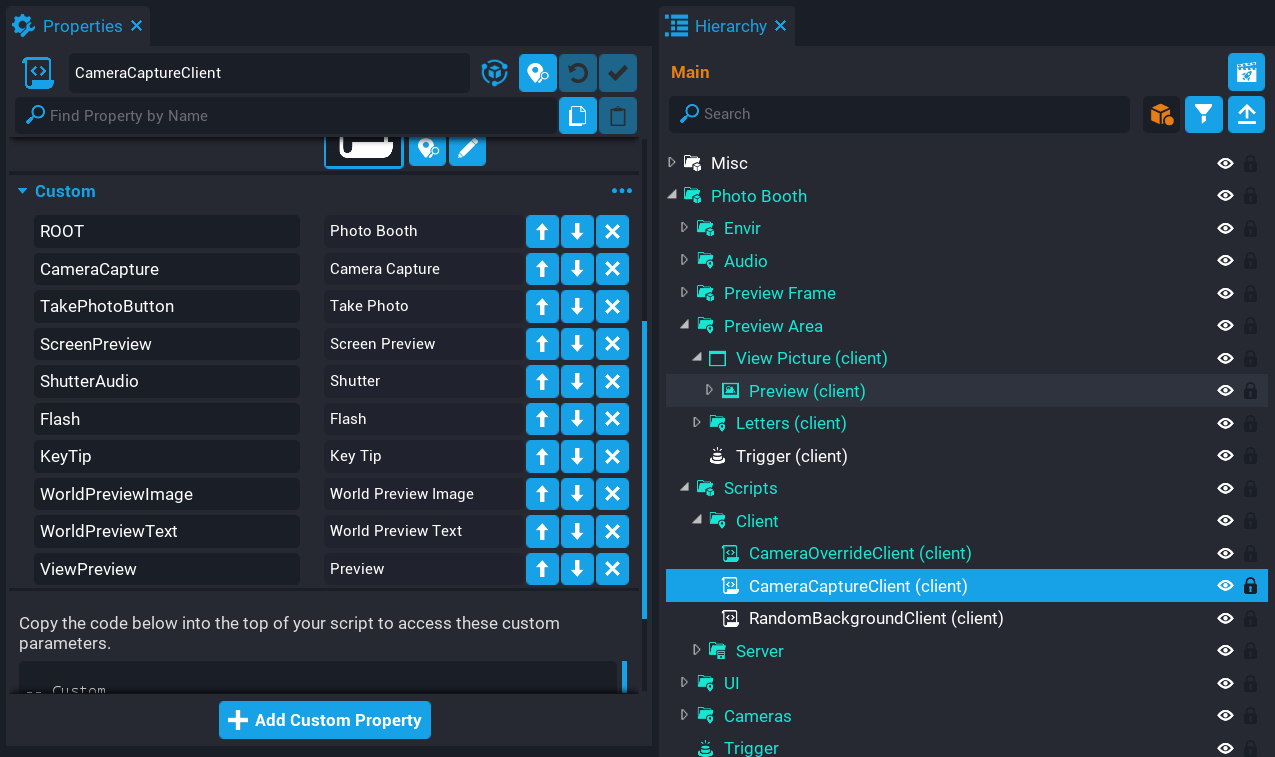
Create CameraCaptureClient Script
Create a script called CameraCaptureClient and place it into the Client folder in the Hierarchy. This script will be responsible for creating a camera capture and displaying it in the UI. The script will keep track of how many captures have been took, and automatically replace the oldest capture.
The resolution of the captures are going to be 512 x 512, which is the LARGE size. This allows you to have 32 captures at this size, but 1 of them will be used elsewhere.
The script will need references to a few objects that are in the Hierarchy.
- Add the Photo Booth folder as a custom property called
ROOT. - Add the Camera Capture camera object as a custom property called
Camera Capture. - Add the Take Photo button object as a custom property called
TakePhotoButton. - Add the Screen Preview image object as a custom property called
ScreenPreview. - Add the Shutter Audio audio object as a custom property called
ShutterAudio. - Add the Flash image object as a custom property called
Flash. - Add the KeyTip text object as a custom property called
KeyTip.
Edit CameraCaptureClient Script
Open up the CameraCaptureClient script and add in the references.
Add Root Property References
The Photo Booth folder is acting as the root object, and it contains some properties that can be changed. Instead of putting customizable properties on the script, they can be added to the root object so they are easier to find.
Add the following references to the script.
local ROOT = script:GetCustomProperty("ROOT"):WaitForObject()
local PHOTO_DURATION = ROOT:GetCustomProperty("PhotoDuration") -- (1)
local DISABLE_DURATION = ROOT:GetCustomProperty("DisableDuration") -- (2)
- The duration of how long a background image will display for before it changes.
- The duration of how long the take photo button is disabled before the player can take another photo.
Add Property References
Add the references to the properties on the script object.
local CAMERA_CAPTURE = script:GetCustomProperty("CameraCapture"):WaitForObject()
local TAKE_PHOTO_BUTTON = script:GetCustomProperty("TakePhotoButton"):WaitForObject()
local SCREEN_PREVIEW = script:GetCustomProperty("ScreenPreview"):WaitForObject()
local SHUTTER_AUDIO = script:GetCustomProperty("ShutterAudio"):WaitForObject()
local FLASH = script:GetCustomProperty("Flash"):WaitForObject()
local KEY_TIP = script:GetCustomProperty("KeyTip"):WaitForObject()
Create Variables
Add the following variables that will be needed.
local resolution = CameraCaptureResolution.LARGE -- (1)
local maxSize = 1024
local currentSize = 512
local maxImages = (~~((maxSize ^ 2 << 3) / currentSize ^ 2)) - 1 -- (2)

local captures = {}
local previewCapture = nil
local localPlayer = Game.GetLocalPlayer()
- The capture resolution that will be passed to the
Capturefunction. -
This line works out the maximum amount of images that can be created at the
currentSizeresolution.~~Uses the bitwise NOT operator twice, which is shorthand formath.floor. Bitwise doesn't support decimals.maxSize ^ 2 << 3Gives the total amount of memory budget./ currentSize ^ 2Divide the amount of memory you need by the total available to give the total images.- 1Decrement by1, as 1 image is needed elsewhere.
Sometimes the fancy way isn't always the best, as it can make it unreadable. Here is the expanded version:
math.floor((maxSize * maxSize * 8) / (currentSize * currentSize)) - 1
| Variable | Description |
|---|---|
resolution |
The capture resolution that will be passed to the Capture function. |
maxSize |
The maximum size that Core supports for the image. 1024 is the largest. |
currentSize |
The size to use for the captures. |
maxImages |
The total amount of images at the currentSize that can be created. |
captures |
A table that will hold all the captures created. Older ones will get removed when the limit has been reached. |
previewCapture |
Will be used to hold the capture instance for showing the preview to the player. |
localPlayer |
A reference to the local player for this script. |
Create PlayFlash Function
Create a function called PlayFlash. This function will turn on and off the FLASH image to give an effect that the camera flash has gone off. Notice that a task is being spawned, which is to prevent halting the script.
local function PlayFlash()
    Task.Spawn(function()
        FLASH.visibility = Visibility.FORCE_ON
        Task.Wait(.1)
        FLASH.visibility = Visibility.FORCE_OFF
    end)
end
Create DisableEnableButton Function
Create a function called DisableEnableButton. This function will disable and enable the camera icon that is clicked on by the player to take a photo. The reason for this, is to prevent the player from clicking the button too quickly which will result in a lot of event broadcasts being sent to the server.
local function DisableEnableButton()
    Task.Spawn(function()
        TAKE_PHOTO_BUTTON.isInteractable = false
        TAKE_PHOTO_BUTTON.parent.opacity = .3
        Task.Wait(DISABLE_DURATION)
        TAKE_PHOTO_BUTTON.isInteractable = true
        TAKE_PHOTO_BUTTON.parent.opacity = 1
    end)
end
Create UpdateKeyTip Function
Create a function called UpdateKeyTip. This function will update the message that shows under the preview image in the UI. If the player is mounted, then they will not be able to hold their photo, so it is a good idea to inform them of this. In a later section you will be creating this feature.
local function UpdateKeyTip()
    if(localPlayer.isMounted) then
        KEY_TIP.text = "Unmount to Hold up Photo"
    else
        KEY_TIP.text = "Press E to Hold up Photo"
    end
end
Create TakePhoto Function
Create a function called TakePhoto. This function will take a photo when the player clicks on the camera icon in the UI. This also is called for other players so on their end, they take a picture at the same time so they get to see your picture on the big preview.
The function takes a parameter called player. If this parameter is nil, then the function knows the player who took the photo is themself, so will update the SCREEN_PREVIEW image with the capture that was just took.
The function will also handle releasing capture images so that another image can be added to the table and show up on the big preview. This is done by checking how many captures are in the captures table, and if it is the same as maxImages it will release the oldest capture and remove it from the captures table. When getting a capture, you should check it is valid.
The imageInfo table will store the name of the player that took the photo. So if it is the local player, it will use the localPlayer.name, but if it is a broadcast from the server, then it will use the player parameter.
When the player takes a photo, it will also show in the UI. A new capture is created if the variable previewCapture is nil or invalid. If it is valid, then the capture will be refreshed.
Towards the end of the function, there is an event that gets broadcasted to the server. The server will be listening for this event and on firing, will broadcast to all other players so the image took by the current player is also took for them.
local function TakePhoto(player)
    if player == nil then
        SHUTTER_AUDIO:Play()
        PlayFlash()
        DisableEnableButton()
    end

    if #captures == maxImages then
        local firstCapture = captures[1]

        if(firstCapture.capture ~= nil and firstCapture.capture:IsValid()) then
            firstCapture.capture:Release()
        end

        table.remove(captures, 1)
    end

    local imageInfo = {

        playerName = (player and player.name) or localPlayer.name,
        capture = CAMERA_CAPTURE:Capture(resolution)

    }

    table.insert(captures, imageInfo)

    if player == nil and imageInfo.capture ~= nil and imageInfo.capture:IsValid() then
        if previewCapture == nil or not previewCapture:IsValid() then
            previewCapture = CAMERA_CAPTURE:Capture(resolution)
        else
            previewCapture:Refresh()
        end

        SCREEN_PREVIEW:SetCameraCapture(previewCapture)
        SCREEN_PREVIEW.visibility = Visibility.FORCE_ON

        UpdateKeyTip()

        Events.BroadcastToServer("photobooth.takephoto")
    end
end
Connect Button Event
Connect up the button that is used to take the screen shot. You can not just pass TakePhoto as the listener function, because the listener function will receive some parameters (that is the button clicked), and the TakePhoto function expects either nil or a Player object.
TAKE_PHOTO_BUTTON.clickedEvent:Connect(function()
    TakePhoto()
end)
Connect Event
Connect up the TakePhoto function so that when a player takes a photo, the server will then broadcast to the other players which will also take a photo. Captures can not be sent over the network, so call TakePhoto for all other players is a way to do this.
Events.Connect("photobooth.takephoto", TakePhoto)
The CameraCaptureClient Script
CameraCaptureClient
local ROOT = script:GetCustomProperty("ROOT"):WaitForObject()
local PHOTO_DURATION = ROOT:GetCustomProperty("PhotoDuration")
local DISABLE_DURATION = ROOT:GetCustomProperty("DisableDuration")

local CAMERA_CAPTURE = script:GetCustomProperty("CameraCapture"):WaitForObject()
local TAKE_PHOTO_BUTTON = script:GetCustomProperty("TakePhotoButton"):WaitForObject()
local SCREEN_PREVIEW = script:GetCustomProperty("ScreenPreview"):WaitForObject()
local SHUTTER_AUDIO = script:GetCustomProperty("ShutterAudio"):WaitForObject()
local FLASH = script:GetCustomProperty("Flash"):WaitForObject()
local KEY_TIP = script:GetCustomProperty("KeyTip"):WaitForObject()

local resolution = CameraCaptureResolution.LARGE
local maxSize = 1024
local currentSize = 512
local maxImages = (~~((maxSize ^ 2 << 3) / currentSize ^ 2)) - 1

local captures = {}
local previewCapture = nil
local localPlayer = Game.GetLocalPlayer()

local function PlayFlash()
    Task.Spawn(function()
        FLASH.visibility = Visibility.FORCE_ON
        Task.Wait(.1)
        FLASH.visibility = Visibility.FORCE_OFF
    end)
end

local function DisableEnableButton()
    Task.Spawn(function()
        TAKE_PHOTO_BUTTON.isInteractable = false
        TAKE_PHOTO_BUTTON.parent.opacity = .3
        Task.Wait(DISABLE_DURATION)
        TAKE_PHOTO_BUTTON.isInteractable = true
        TAKE_PHOTO_BUTTON.parent.opacity = 1
    end)
end

local function UpdateKeyTip()
    if(localPlayer.isMounted) then
        KEY_TIP.text = "Unmount to Hold up Photo"
    else
        KEY_TIP.text = "Press E to Hold up Photo"
    end
end

local function TakePhoto(player)
    if player == nil then
        SHUTTER_AUDIO:Play()
        PlayFlash()
        DisableEnableButton()
    end

    if #captures == maxImages then
        local firstCapture = captures[1]

        if(firstCapture.capture ~= nil and firstCapture.capture:IsValid()) then
            firstCapture.capture:Release()
        end

        table.remove(captures, 1)
    end

    local imageInfo = {

        playerName = (player and player.name) or localPlayer.name,
        capture = CAMERA_CAPTURE:Capture(resolution)

    }

    table.insert(captures, imageInfo)

    if player == nil and imageInfo.capture ~= nil and imageInfo.capture:IsValid() then
        if previewCapture == nil or not previewCapture:IsValid() then
            previewCapture = CAMERA_CAPTURE:Capture(resolution)
        else
            previewCapture:Refresh()
        end

        SCREEN_PREVIEW:SetCameraCapture(previewCapture)
        SCREEN_PREVIEW.visibility = Visibility.FORCE_ON

        UpdateKeyTip()

        Events.BroadcastToServer("photobooth.takephoto")
    end
end

TAKE_PHOTO_BUTTON.clickedEvent:Connect(function()
    TakePhoto()
end)

Events.Connect("photobooth.takephoto", TakePhoto)
Test the Game
Test the game and make sure the following work:
- Clicking on the camera icon plays the audio sound and flash effect.
- Camera icon becomes disabled and then enabled again.
- The capture is displayed in the preview image in the UI.
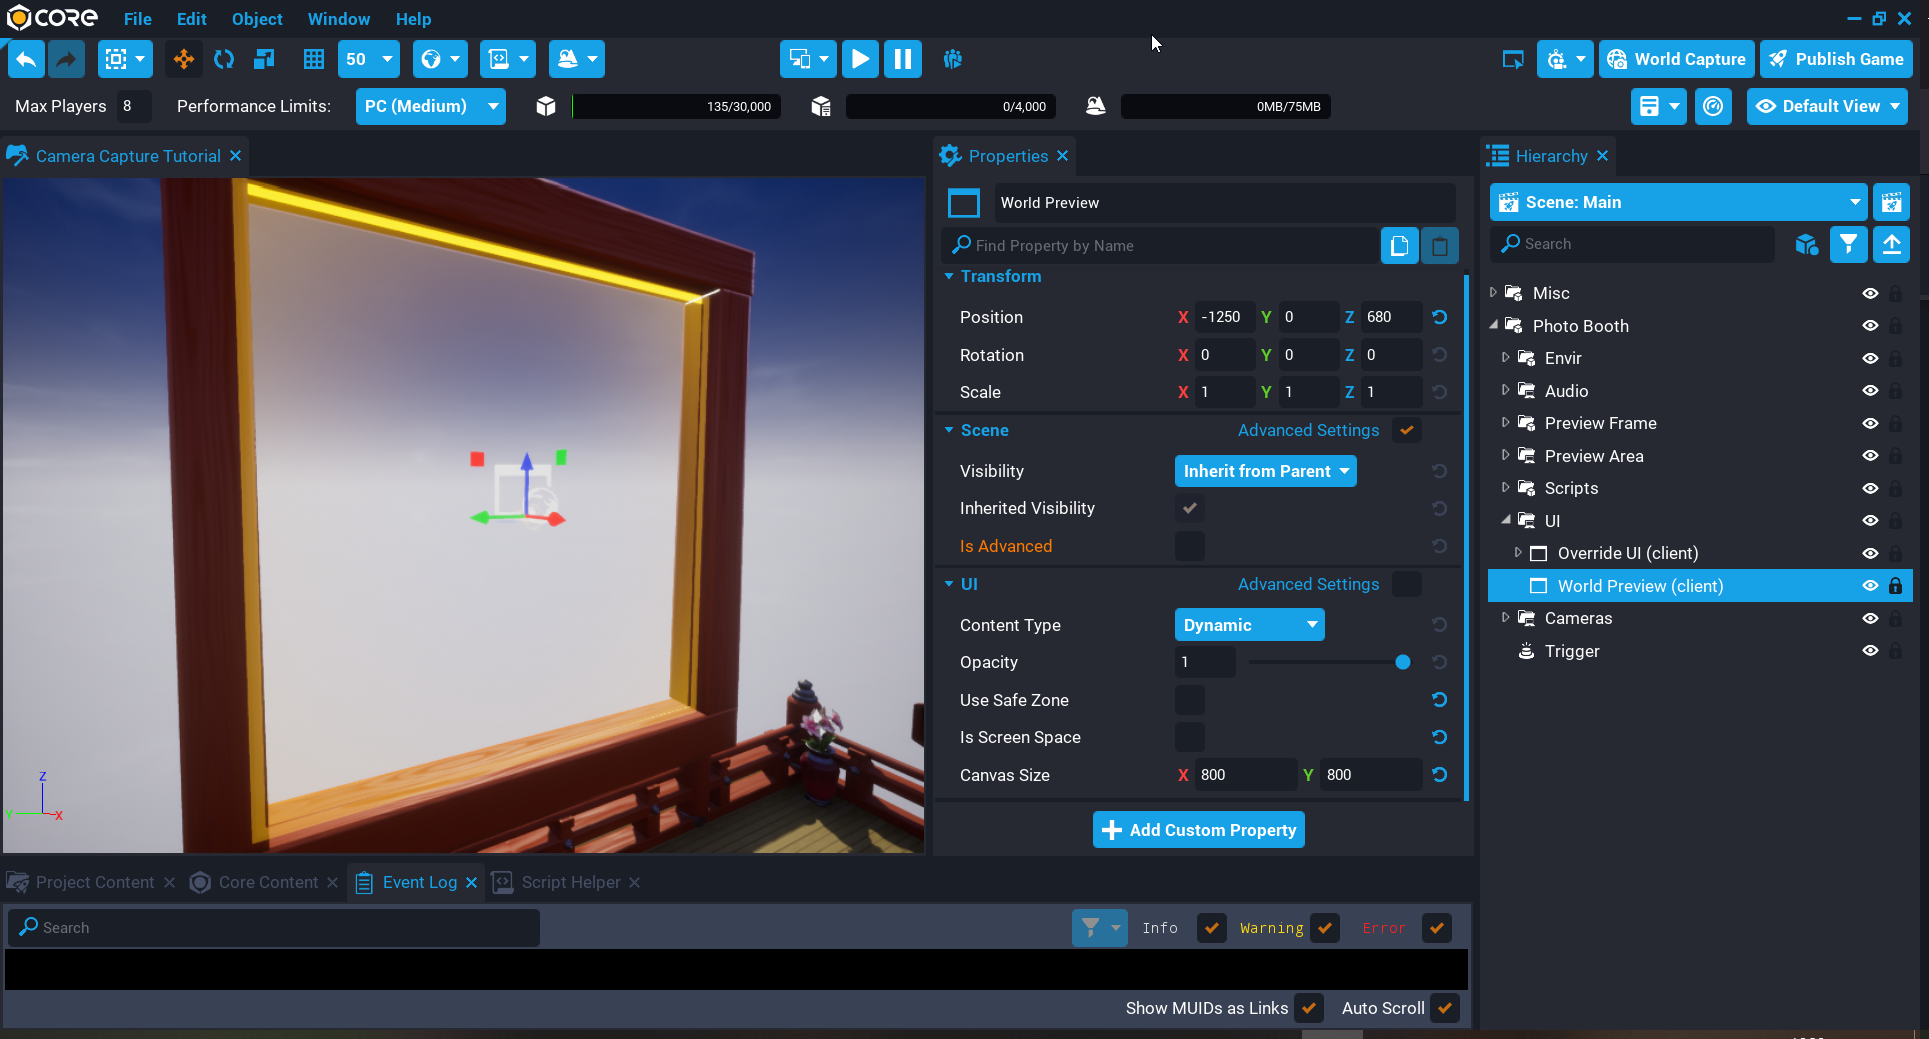
Create World UI
The next step is to set up the world space UI for the photos and name of the player who took the photo. The world space UI will also be used to display captures of other players.
Create World Preview UI
The world preview UI will be used for the photo.
Create UI Container
- Create a UI Container object inside the UI folder.
- Rename the UI Container to
World Preview. - Set the Position to X
-1250, Y0, Z680. - Uncheck Is Screen Space.
- Set the Canvas Size to X
800, Y800.
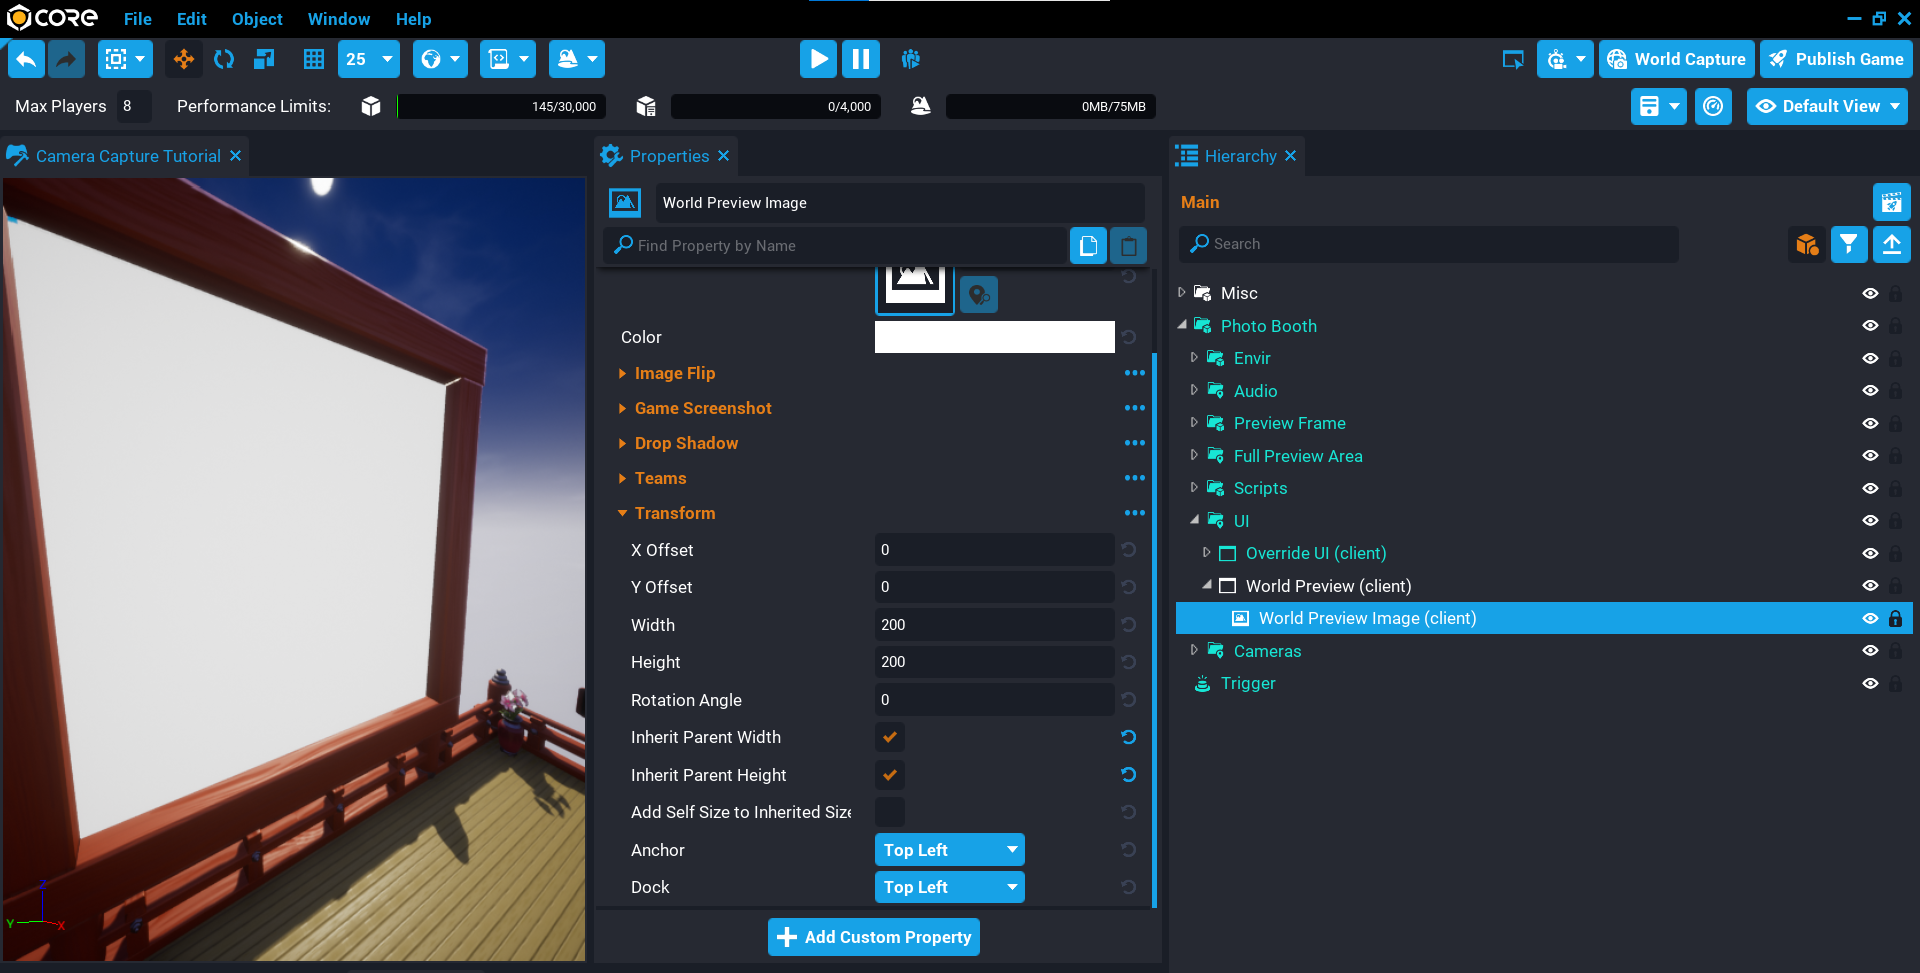
Create UI Image
- Create a UI Image object inside the World Preview object in the Hierarchy.
- Rename the UI Image to
World Preview Image. - Enable Inherit Parent Width, and Inherit Parent Height.
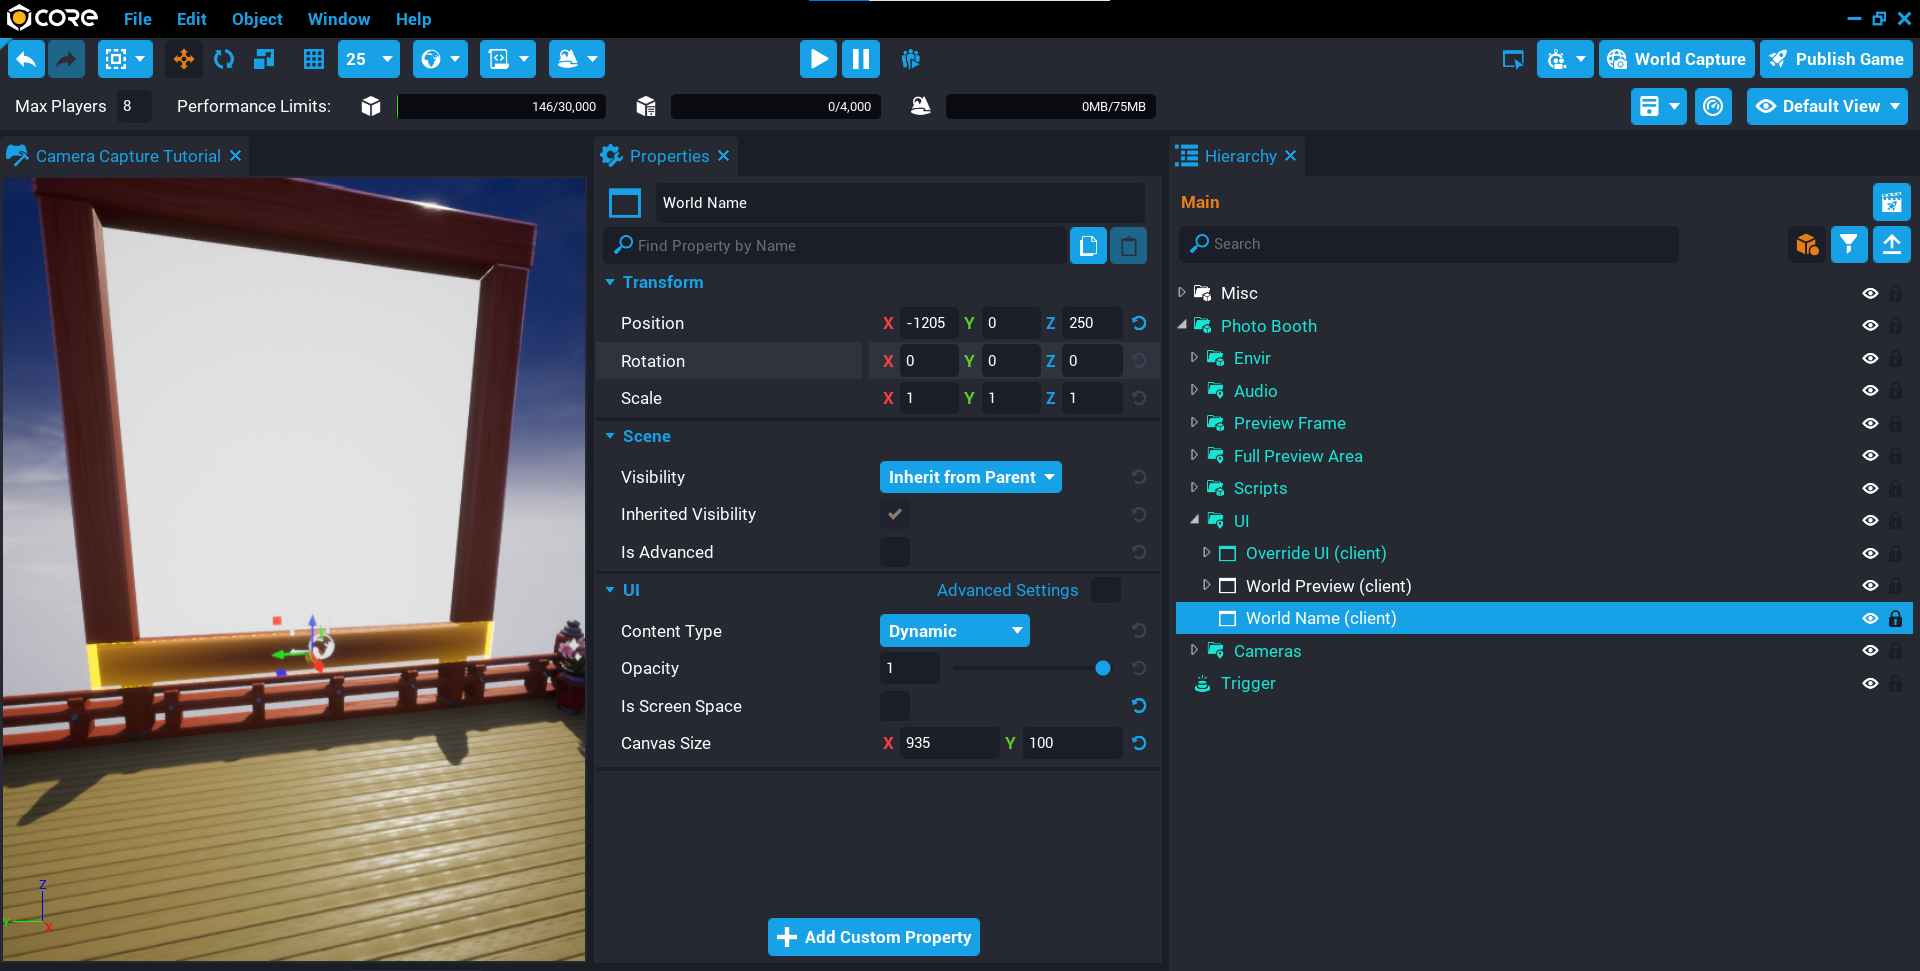
Create World Name UI
The world name UI will be used to display the name of the player who took the photo.
Create UI Container
- Create a UI Container object inside the UI folder.
- Rename the UI Container to
World Name. - Set the Position to X
-1205, Y0, Z250. - Uncheck Is Screen Space.
- Set the Canvas Size to X
935, Y100.
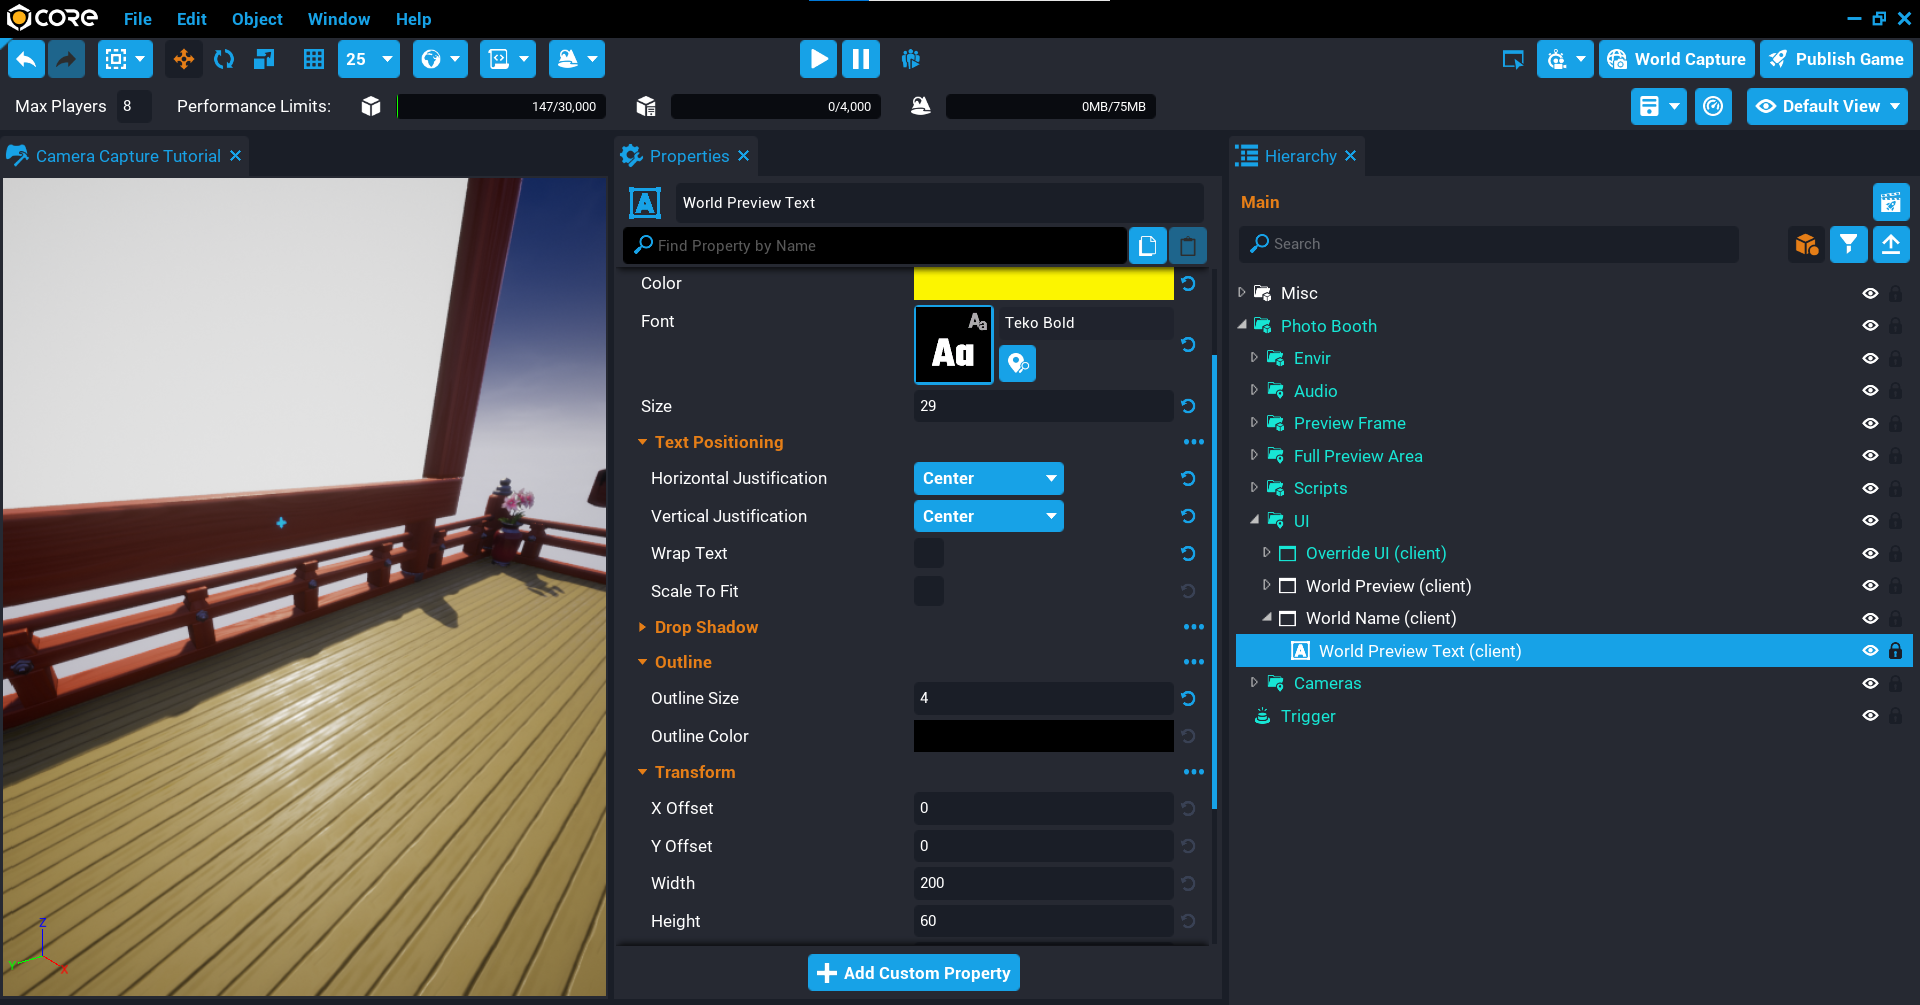
Create UI Text
- Create a UI Text object inside the World Name object in the Hierarchy.
- Rename the UI Text to
World Preview Text. - Set the Font to Teko Bold.
- Set the Size to
29. - Set the Horizontal Justification to Center.
- Set the Vertical Justification to Center.
- Uncheck Wrap Text.
- Set the Outline Size to
4. - Set the Width to
200, and Height to60. - Set the Anchor to Middle Center, and Dock to Middle Center.
Edit CameraCaptureClient Script
The CameraCaptureClient script will need to be update so that when the player takes a photo, it will show up in the world preview image and also show the player's name.
Add World UI Custom Properties
The script will need references to the World Preview Image and World Preview Text objects.
- Add the World Preview Image object as a custom property and name it
WorldPreviewImage. - Add the World Preview Text object as a custom property and name it
WorldPreviewText.
Open up the CameraCaptureClient script and add the new property references.
local WORLD_PREVIEW = script:GetCustomProperty("WorldPreviewImage"):WaitForObject()
local WORLD_NAME = script:GetCustomProperty("WorldPreviewText"):WaitForObject()
Add Variables
You will need 2 variables that will be used to handle changing images over time so that players will see other photos.
The currentIndex variable will be incremented each iteration so it can keep track of what photo is currently being displayed, and the elapsedTime variable will be used handle changing to the next photo.
local currentIndex = 1
local elapsedTime = 0
Create ShowImage Function
Create a function called ShowImage, make sure to place this above the TakePhoto function.
This function will change the WORLD_PREVIEW image to the next camera capture in the captures table. It will also update the WORLD_NAME text to show who took the photo.
The function will cycle through the captures table, once it reaches the end of the table (#captures), it will reset back to 1 and start the cycle again.
Notice that the function accepts a parameter called index. This parameter is used when the local player takes a photo so that it is displayed right away. Otherwise, the player would have to wait for their photo to show up.
local function ShowImage(index)
    local imageInfo = captures[index or currentIndex]

    if(imageInfo.capture == nil or not imageInfo.capture:IsValid()) then
        return
    end

    WORLD_PREVIEW:SetCameraCapture(imageInfo.capture)
    WORLD_NAME.text = "By " .. imageInfo.playerName

    if not index then
        currentIndex = (currentIndex == #captures and 1) or (currentIndex + 1)
    else
        elapsedTime = 0
    end
end
Modify TakePhoto Function
Modify the TakePhoto function and add a call to the ShowImage function so that when the local player takes a photo, it updates the world UI image right away so the player doesn't need to wait to see their photo.
local function TakePhoto(player)
    if player == nil then
        SHUTTER_AUDIO:Play()
        PlayFlash()
        DisableEnableButton()
    end

    if #captures == maxImages then
        local firstCapture = captures[1]

        if(firstCapture.capture ~= nil and firstCapture.capture:IsValid()) then
            firstCapture.capture:Release()
        end

        table.remove(captures, 1)
    end

    local imageInfo = {

        playerName = (player and player.name) or localPlayer.name,
        capture = CAMERA_CAPTURE:Capture(resolution)

    }

    table.insert(captures, imageInfo)

    if player == nil and imageInfo.capture ~= nil and imageInfo.capture:IsValid() then
        ShowImage(#captures)

        if previewCapture == nil or not previewCapture:IsValid() then
            previewCapture = CAMERA_CAPTURE:Capture(resolution)
        else
            previewCapture:Refresh()
        end

        SCREEN_PREVIEW:SetCameraCapture(previewCapture)
        SCREEN_PREVIEW.visibility = Visibility.FORCE_ON

        UpdateKeyTip()

        Events.BroadcastToServer("photobooth.takephoto")
    end
end
Create Tick Function
Create a Tick function that will handle cycling the captured images.
The elapsedTime will be incremented by adding the current value of elapsedTime and adding dt (delta time). This can be compared against the PHOTO_DURATION time, if it is larger, then it will show the next image by calling ShowImage and resetting the elapsedTime to 0 to start again.
You can change the PHOTO_DURATION on the root object Photo Booth.
function Tick(dt)
    elapsedTime = elapsedTime + dt

    if #captures > 0 and elapsedTime > PHOTO_DURATION then
        ShowImage()
        elapsedTime = 0
    end
end
The CameraCaptureClient Script
CaptureCaptureClient
local ROOT = script:GetCustomProperty("ROOT"):WaitForObject()
local PHOTO_DURATION = ROOT:GetCustomProperty("PhotoDuration")
local DISABLE_DURATION = ROOT:GetCustomProperty("DisableDuration")

local CAMERA_CAPTURE = script:GetCustomProperty("CameraCapture"):WaitForObject()
local TAKE_PHOTO_BUTTON = script:GetCustomProperty("TakePhotoButton"):WaitForObject()
local SCREEN_PREVIEW = script:GetCustomProperty("ScreenPreview"):WaitForObject()
local SHUTTER_AUDIO = script:GetCustomProperty("ShutterAudio"):WaitForObject()
local FLASH = script:GetCustomProperty("Flash"):WaitForObject()
local KEY_TIP = script:GetCustomProperty("KeyTip"):WaitForObject()

local WORLD_PREVIEW = script:GetCustomProperty("WorldPreviewImage"):WaitForObject()
local WORLD_NAME = script:GetCustomProperty("WorldPreviewText"):WaitForObject()

local resolution = CameraCaptureResolution.LARGE
local maxSize = 1024
local currentSize = 512
local maxImages = (~~((maxSize ^ 2 << 3) / currentSize ^ 2)) - 1

local captures = {}
local previewCapture = nil
local localPlayer = Game.GetLocalPlayer()
local currentIndex = 1
local elapsedTime = 0

local function PlayFlash()
    Task.Spawn(function()
        FLASH.visibility = Visibility.FORCE_ON
        Task.Wait(.1)
        FLASH.visibility = Visibility.FORCE_OFF
    end)
end

local function DisableEnableButton()
    Task.Spawn(function()
        TAKE_PHOTO_BUTTON.isInteractable = false
        TAKE_PHOTO_BUTTON.parent.opacity = .3
        Task.Wait(DISABLE_DURATION)
        TAKE_PHOTO_BUTTON.isInteractable = true
        TAKE_PHOTO_BUTTON.parent.opacity = 1
    end)
end

local function UpdateKeyTip()
    if(localPlayer.isMounted) then
        KEY_TIP.text = "Unmount to Hold up Photo"
    else
        KEY_TIP.text = "Press E to Hold up Photo"
    end
end

local function ShowImage(index)
    local imageInfo = captures[index or currentIndex]

    if(imageInfo.capture == nil or not imageInfo.capture:IsValid()) then
        return
    end

    WORLD_PREVIEW:SetCameraCapture(imageInfo.capture)
    WORLD_NAME.text = "By " .. imageInfo.playerName

    if not index then
        currentIndex = (currentIndex == #captures and 1) or (currentIndex + 1)
    else
        elapsedTime = 0
    end
end

local function TakePhoto(player)
    if player == nil then
        SHUTTER_AUDIO:Play()
        PlayFlash()
        DisableEnableButton()
    end

    if #captures == maxImages then
        local firstCapture = captures[1]

        if(firstCapture.capture ~= nil and firstCapture.capture:IsValid()) then
            firstCapture.capture:Release()
        end

        table.remove(captures, 1)
    end

    local imageInfo = {

        playerName = (player and player.name) or localPlayer.name,
        capture = CAMERA_CAPTURE:Capture(resolution)

    }

    table.insert(captures, imageInfo)

    if player == nil and imageInfo.capture ~= nil and imageInfo.capture:IsValid() then
        ShowImage(#captures)

        if previewCapture == nil or not previewCapture:IsValid() then
            previewCapture = CAMERA_CAPTURE:Capture(resolution)
        else
            previewCapture:Refresh()
        end

        SCREEN_PREVIEW:SetCameraCapture(previewCapture)
        SCREEN_PREVIEW.visibility = Visibility.FORCE_ON

        UpdateKeyTip()

        Events.BroadcastToServer("photobooth.takephoto")
    end
end

function Tick(dt)
    elapsedTime = elapsedTime + dt

    if #captures > 0 and elapsedTime > PHOTO_DURATION then
        ShowImage()
        elapsedTime = 0
    end
end

TAKE_PHOTO_BUTTON.clickedEvent:Connect(function()
    TakePhoto()
end)

Events.Connect("photobooth.takephoto", TakePhoto)
Test the Game
Test the game and make sure that when taking a photo it displays in the world UI, and with multiple photos took it changes over time.
Create Random Backgrounds UI
In this section you will be adding background images that will be picked from by random so players can take a photo with the background behind them.
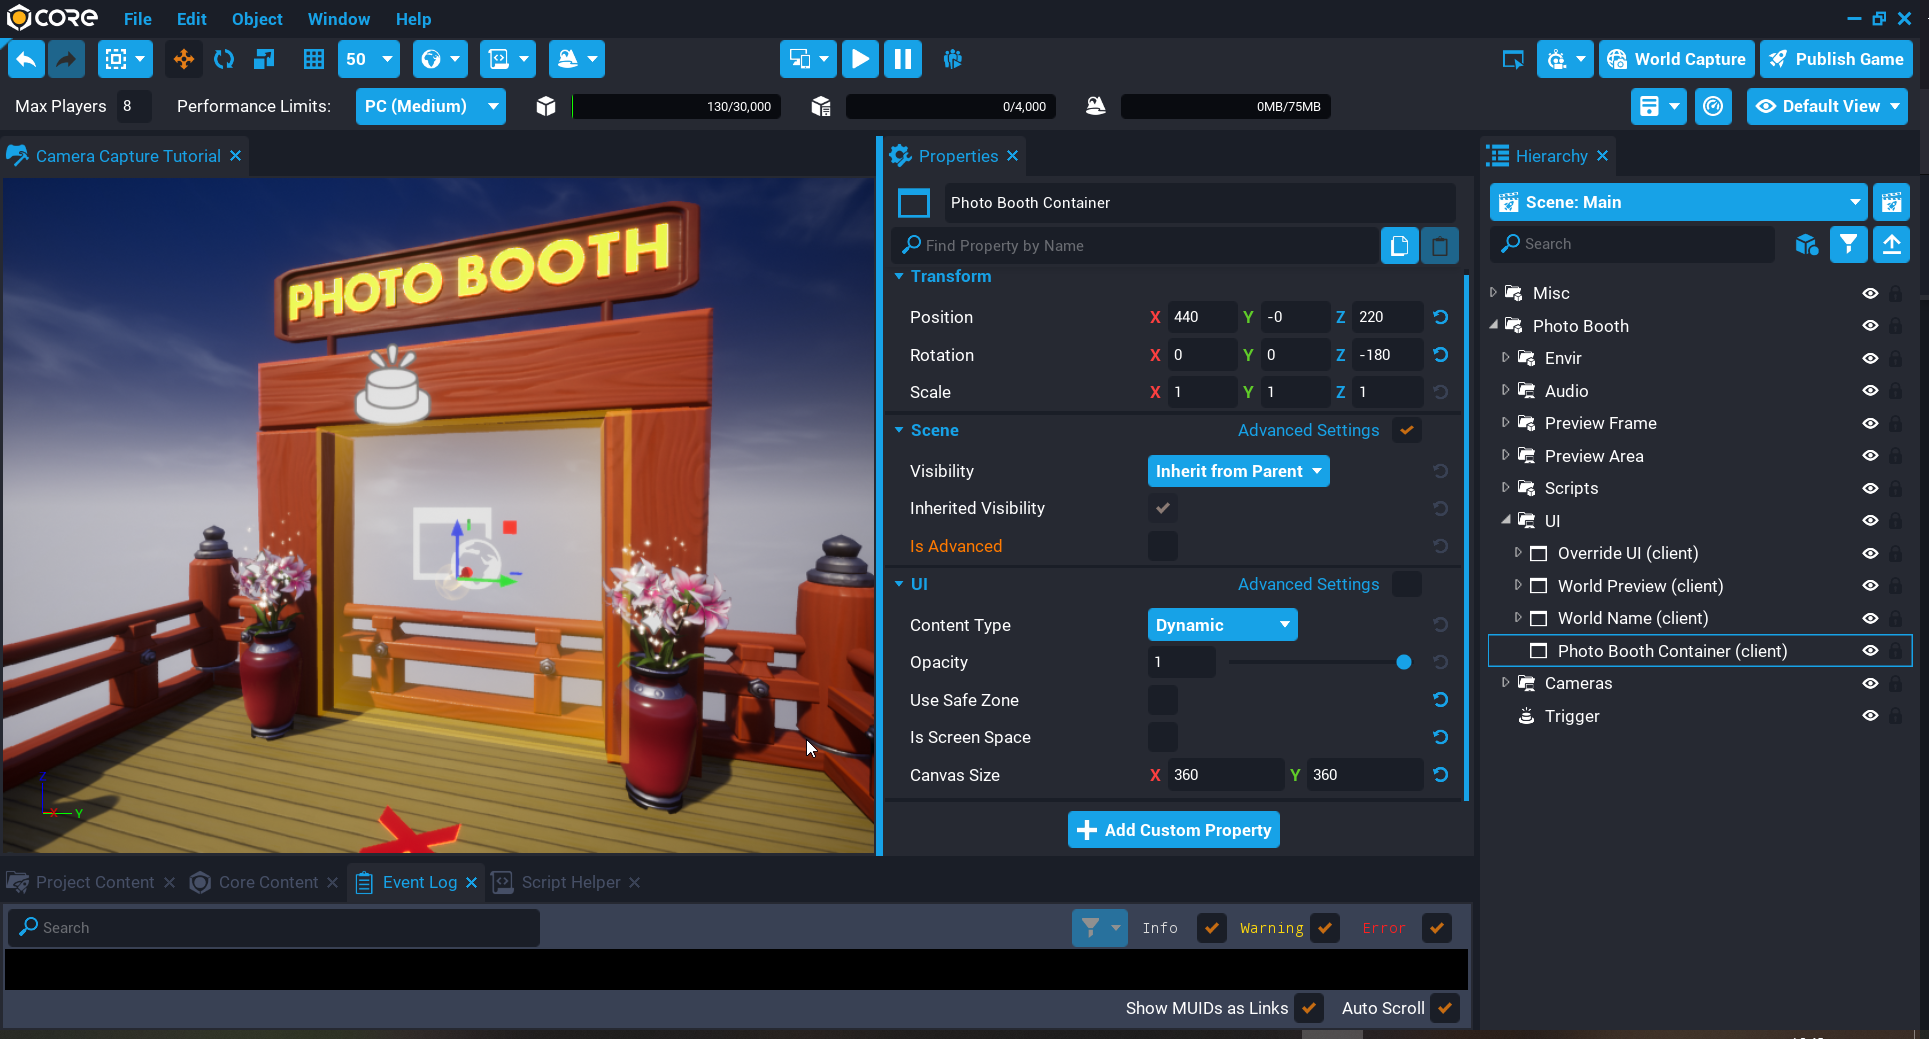
Create Background UI
You will need a world space UI container to display the background images.
- Create a UI Container object inside the UI folder.
- Rename the UI Container to
Photo Booth Container. - Set the Position to X
440, Y0, Z220. - Set the Rotation to X
0, Y0, Z-180. - Enable Is Screen Space.
- Set the Width to
360, and the Height to360. - Enable the Advanced Settings option and turn on Is Lit.
Create UI Panel
The UI panel will contain all the background images that will get shown to the player.
- Create a UI Panel object inside the Photo Booth Container.
- Rename the UI Panel to
Background Images. - Enable Inherit Parent Width, and Inherit Parent Height.
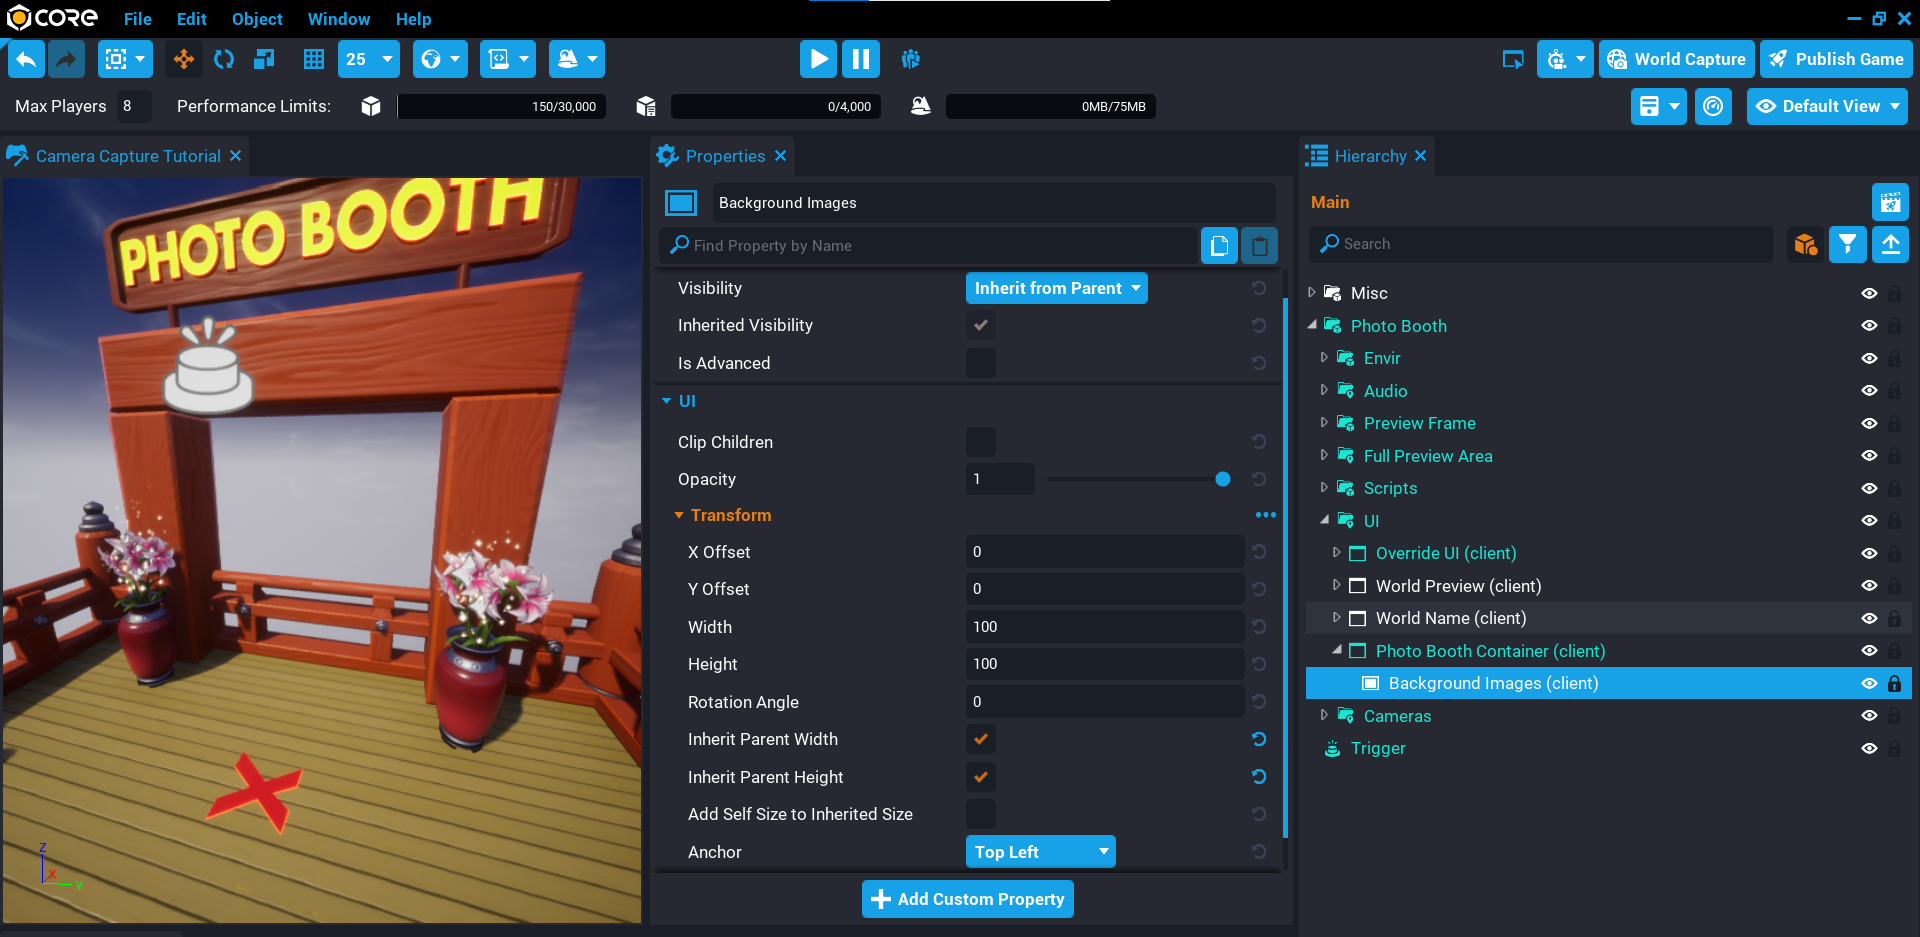
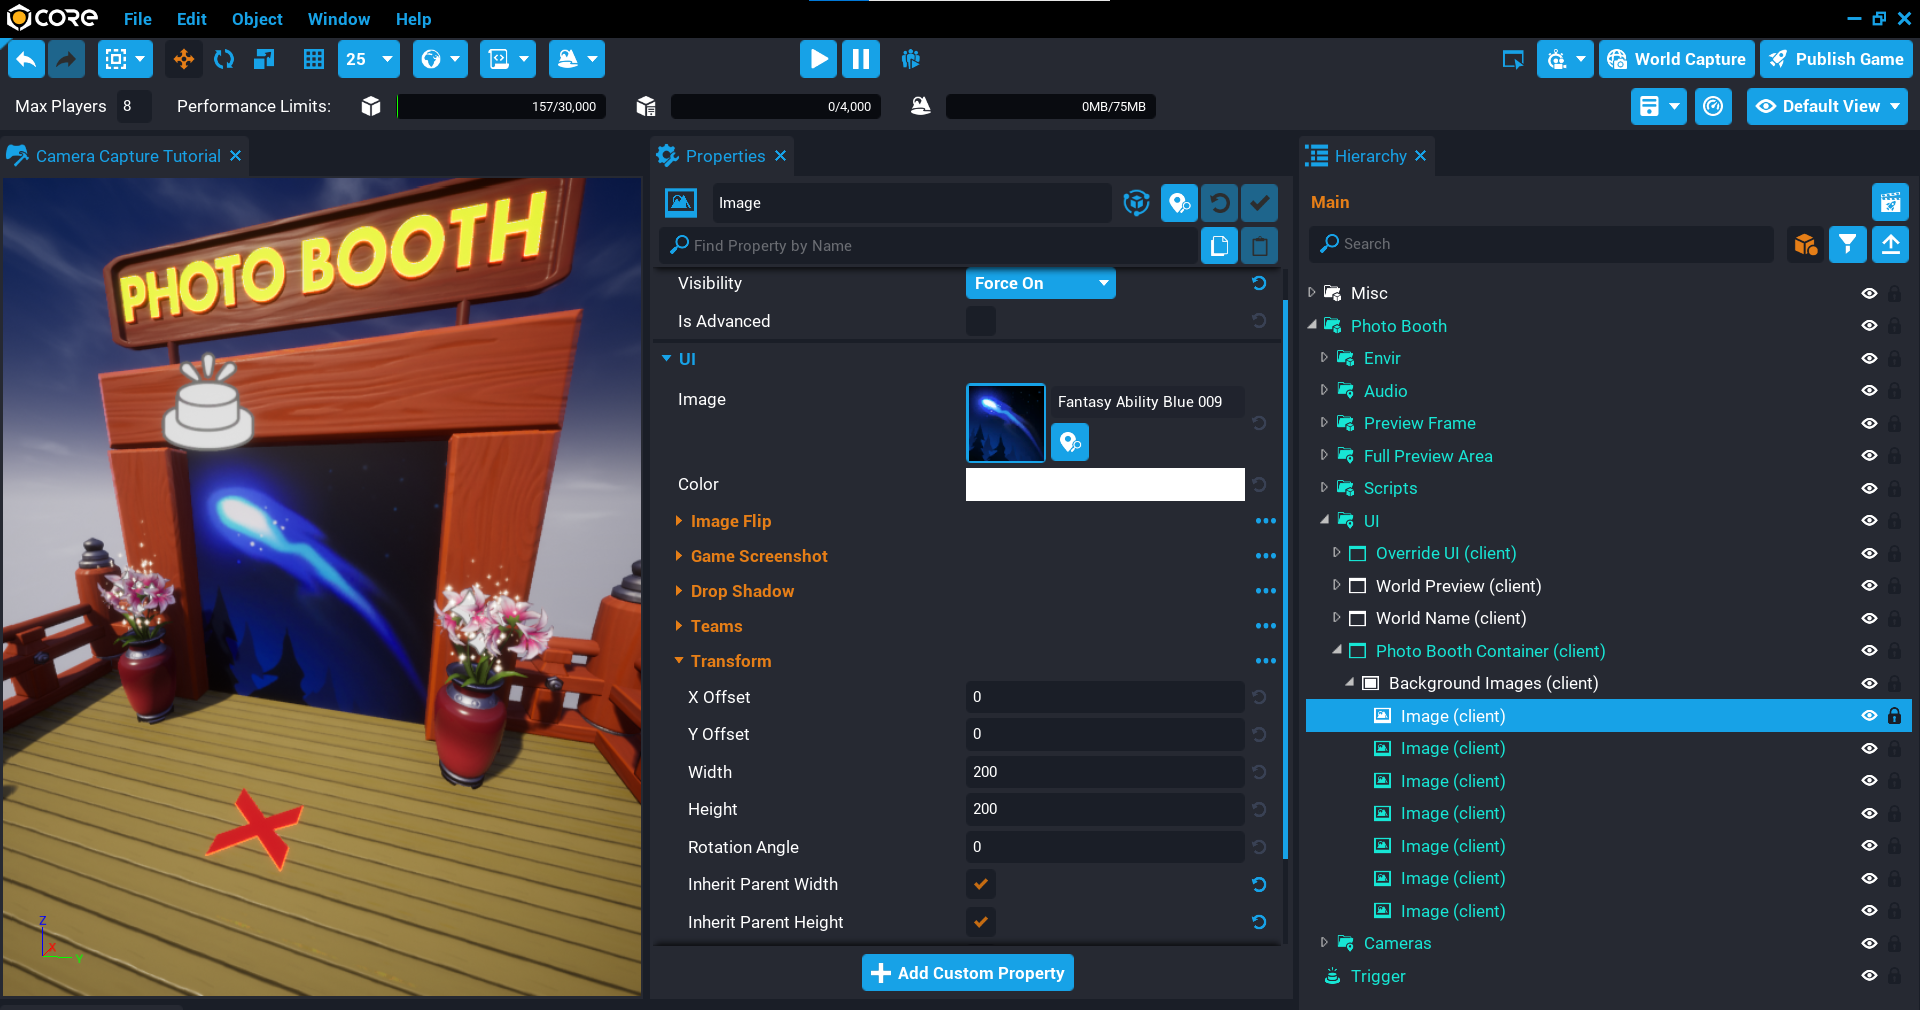
Create Background Images
You will now add some images that will be used for the background. All images apart from the first image will need to have their Visibility property in the Hierarchy set to Force Off.
- Create a UI Image object inside the Background Images panel.
- Change the Image property to a background image you would like players to use.
- Enable Inherit Parent Width, and Inherit Parent Height.
Create as many images as you like.
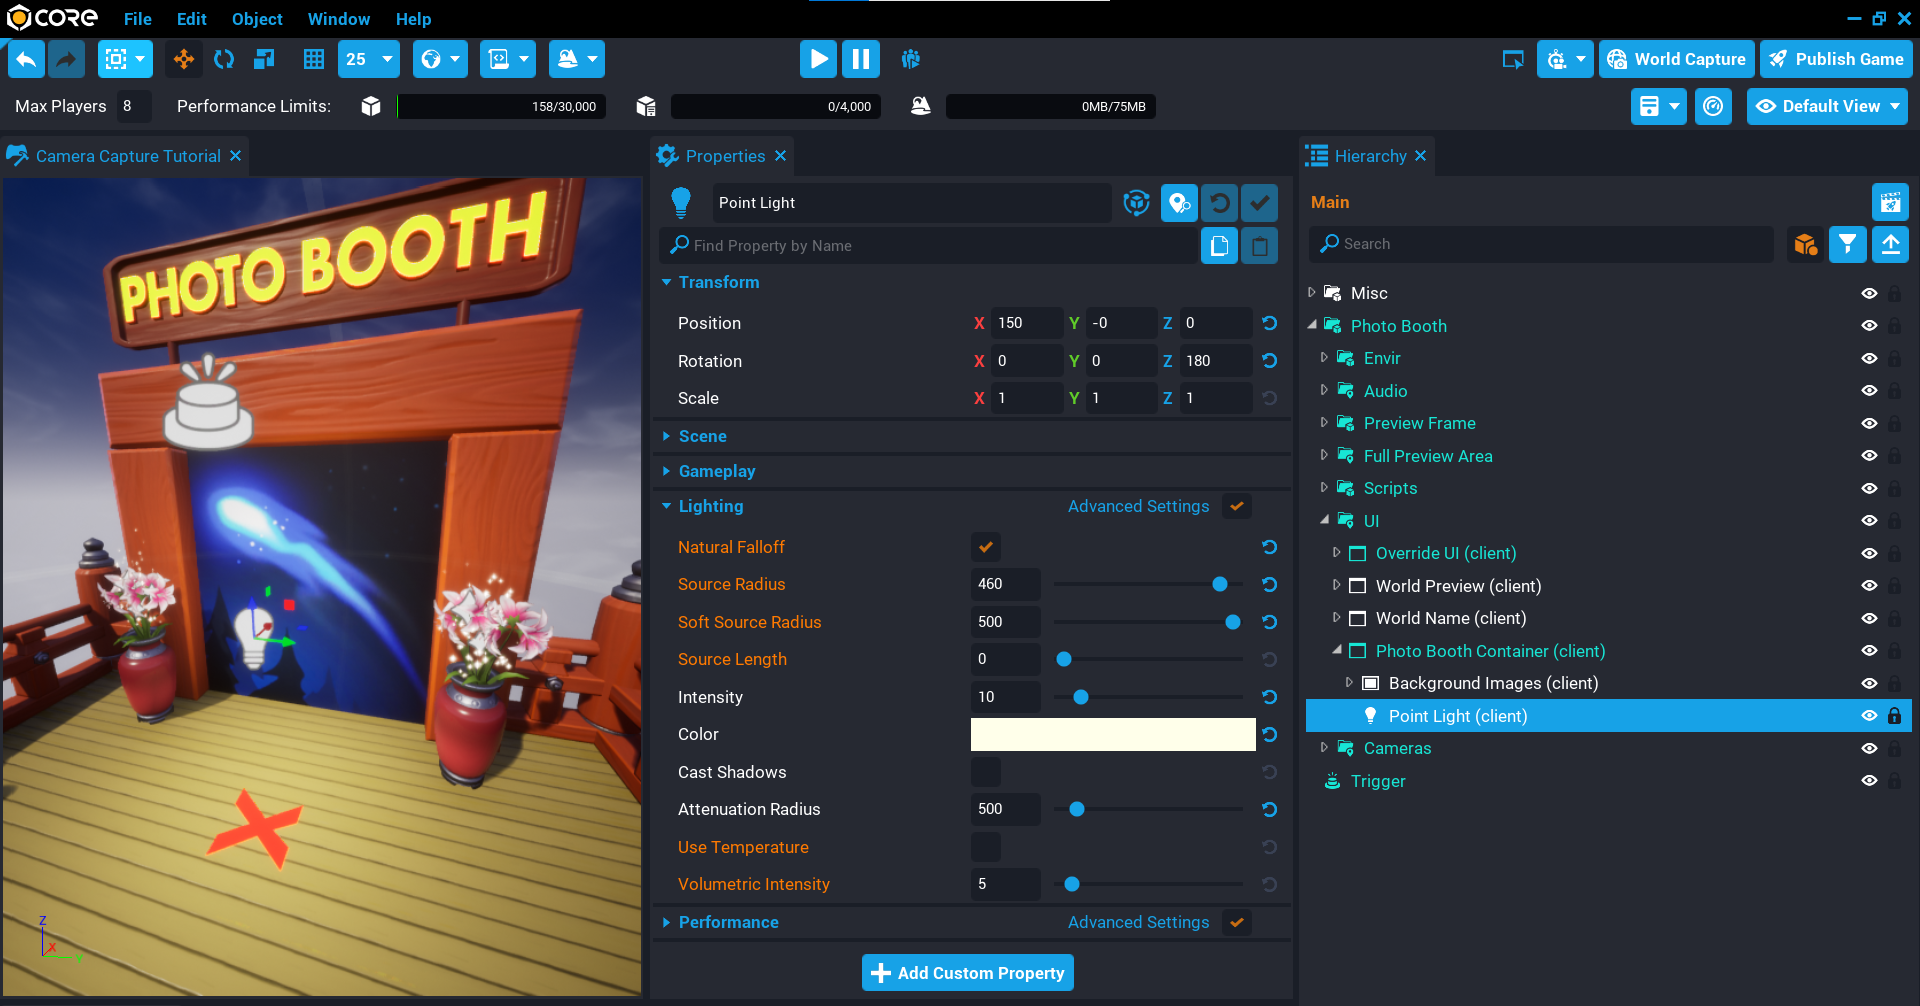
Create Point Light
You may have noticed that the background images are a little dark. So you could add a point light to adjust the lighting on the UI.
- Create a Point Light object inside the Photo Booth Container.
- Set the Position to X
150, Y0, Z0. - Adjust the light settings to suit your game.
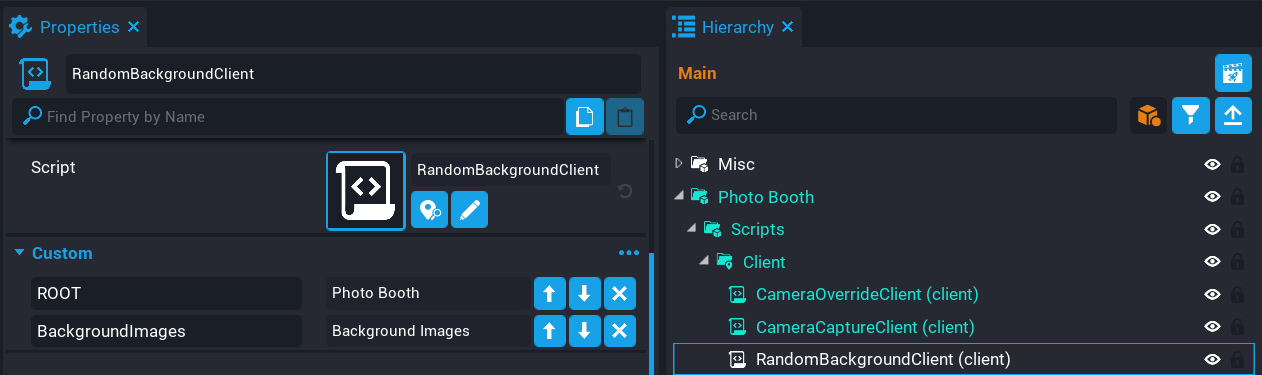
Create RandomBackgroundClient Script
Create a script called RandomBackgroundClient and place it into the Client folder in the Hierarchy. This script will be responsible for selecting a random background image.
Add Custom Properties
The script will need references to the root folder (Photo Booth) so it can access the BackgroundDuration property, and access to all the background images so it can pick a random one.
- Add the Photo Booth folder as a custom property called
ROOT. - Add the Background Images panel as a custom property called
BackgroundImages.
Edit RandomBackgroundClient Script
Open up the RandomBackgroundClient script and add the property references.
local ROOT = script:GetCustomProperty("ROOT"):WaitForObject()
local BACKGROUND_DURATION = ROOT:GetCustomProperty("BackgroundDuration")
local BACKGROUND_IMAGES = script:GetCustomProperty("BackgroundImages"):WaitForObject()
Create Variables
Add the following variables to the script.
The images variable will be a reference to the children of the BACKGROUND_IMAGES panel so you can access each image. Because the first image is shown by default, then the selected variable can default to the first image in that list.
local localPlayer = Game.GetLocalPlayer()
local images = BACKGROUND_IMAGES:GetChildren()
local selected = images[1]
local RNG = nil -- (1)
local elapsedTime = 0 -- (2)
- This variable will hold a reference to a RandomStream instance.
- This variable will be used to keep track of when to change the background image.
Create ShowRandomImage Function
Create a function called ShowRandomImage. This function will select a random image from the images list and set the visibility to FORCE_ON. The previous selected image will be turned off.
RandomStream has a few functions to get a random number, because you need a whole number, then you can use the GetInteger function and pass in the min and max values (inclusive).
local function ShowRandomImage()
    if RNG == nil then -- (1)
        return
    end

    local rndImage = images[RNG:GetInteger(1, #images)]

    if rndImage ~= selected then
        selected.visibility = Visibility.FORCE_OFF
        selected = rndImage
        selected.visibility = Visibility.FORCE_ON
    end
end
- If
RNGisnilthen return.RNGis setup in theGetDatafunction.
Create GetData Function
Create a function called GetData. This function will handle receiving data from the server by checking for a key called photobooth.data. The reason data is being sent to the client from the server is so that the client receives some important information so that it can display the background images in sync with other players. This is not full proof because of latency (that is player has a poor connection to the server), but it does do a good job of syncing up the background images so that when a player takes a photo, that background image should be the same on all other players screen.
Syncing up background images between players isn't too important. But if you are playing in a party and using voice chat, it improves the experience with the images being in sync.
When the player joins the game, they will be sent information on how much time has elapsed for the current iteration, and also how many mutations has occurred. The reason for the mutation tracking, is that the server has no way to know how many times a background image has changed on the client. By keeping track of the mutations on the server, it can send this to the player and mutate the random stream to sync up with other players.
local function GetData(player, key)
    if key == "photobooth.data" then
        local data = localPlayer:GetPrivateNetworkedData(key)

        if data ~= nil then
            elapsedTime = data[1] -- (1)
            RNG = RandomStream.New(1) -- (2)

            for m = 1, data[2] do -- (3)
                RNG:Mutate() -- (4)
            end
        end
    end
end
data[1]is the elapsed time from the server.- Create a new random stream and set the starting seed to
1that matches the server seed. data[2]is a number that contains the amount of mutations that have happened.- Mutate the random stream to get the player in sync with the server and other players.
Create Tick Function
Create a function called Tick. This function will be responsible for keeping track of when to change the background image.
By adding the current elapsedTime and dt (delta time) to the existing elapsedTime, it will increment like a stop watch. If the elapsed time is greater than the BACKGROUND_DURATION time, then calling ShowRandomImage will pick a random image to show behind the player. The variable elapsedTime is then reset back to 0 to start a new iteration.
function Tick(dt)
    if RNG == nil then
        return
    end

    elapsedTime = elapsedTime + dt

    if elapsedTime > BACKGROUND_DURATION then
        ShowRandomImage()
        elapsedTime = 0
    end
end
Connect Private Networked Event
Connect up the GetData function to the privateNetworkedDataChangedEvent that will call the GetData function when the player's private data has changed.
localPlayer.privateNetworkedDataChangedEvent:Connect(GetData)
Call GetData Function
If the server has already set the player's private networked data before the client script has ran, then the player will miss the data. To get around this, you can do a manual call to the GetData function and pass in nil as the first argument because that is not being used, and photobooth.data as the section argument for the key to check for.
GetData(nil, "photobooth.data")
The RandomBackgroundClient Script
RandomBackgroundClient
local ROOT = script:GetCustomProperty("ROOT"):WaitForObject()
local BACKGROUND_DURATION = ROOT:GetCustomProperty("BackgroundDuration")
local BACKGROUND_IMAGES = script:GetCustomProperty("BackgroundImages"):WaitForObject()

local localPlayer = Game.GetLocalPlayer()
local images = BACKGROUND_IMAGES:GetChildren()
local selected = images[1]
local RNG = nil
local elapsedTime = 0

local function ShowRandomImage()
    if RNG == nil then
        return
    end

    local rndImage = images[RNG:GetInteger(1, #images)]

    if rndImage ~= selected then
        selected.visibility = Visibility.FORCE_OFF
        selected = rndImage
        selected.visibility = Visibility.FORCE_ON
    end
end

local function GetData(player, key)
    if key == "photobooth.data" then
        local data = localPlayer:GetPrivateNetworkedData(key)

        if data ~= nil then
            elapsedTime = data[1]
            RNG = RandomStream.New(1)

            for m = 1, data[2] do
                RNG:Mutate()
            end
        end
    end
end

function Tick(dt)
    if RNG == nil then
        return
    end

    elapsedTime = elapsedTime + dt

    if elapsedTime > BACKGROUND_DURATION then
        ShowRandomImage()
        elapsedTime = 0
    end
end

localPlayer.privateNetworkedDataChangedEvent:Connect(GetData)

GetData(nil, "photobooth.data")
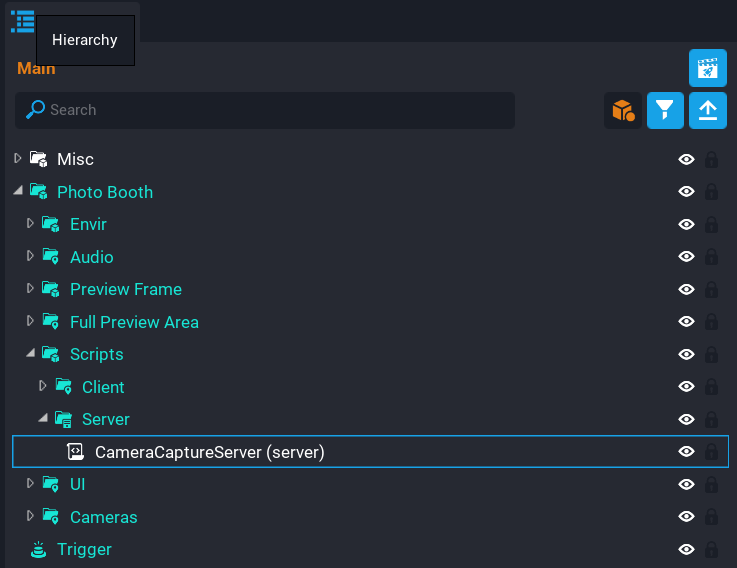
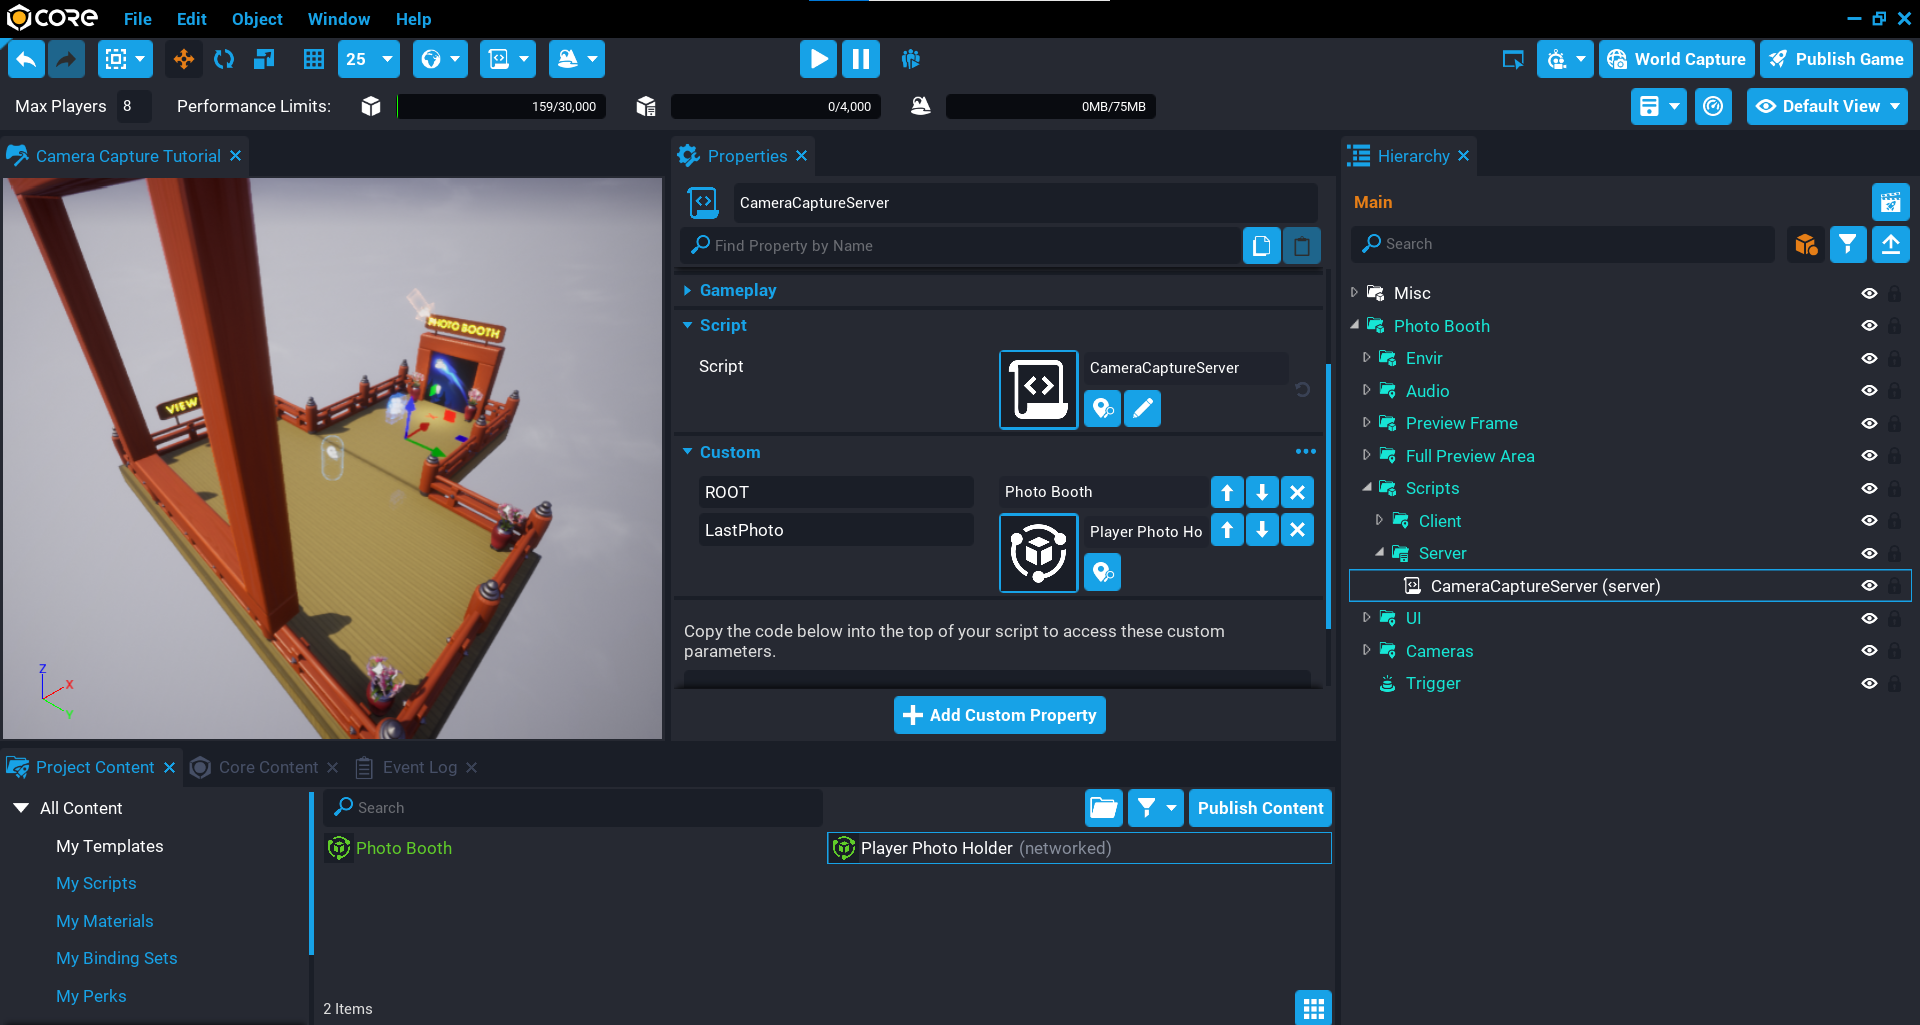
Create CameraCaptureServer Script
Create a script called CameraCaptureServer and place it in the Server folder in the Script folder.
This script will be responsible for sending the elapsed time and seed mutation count to the player that joins the game.
Add Custom Property
The script will need a reference to the Photo Booth folder so it can access the BackgroundDuration property.
Add the Photo Booth as a custom property and name it ROOT.
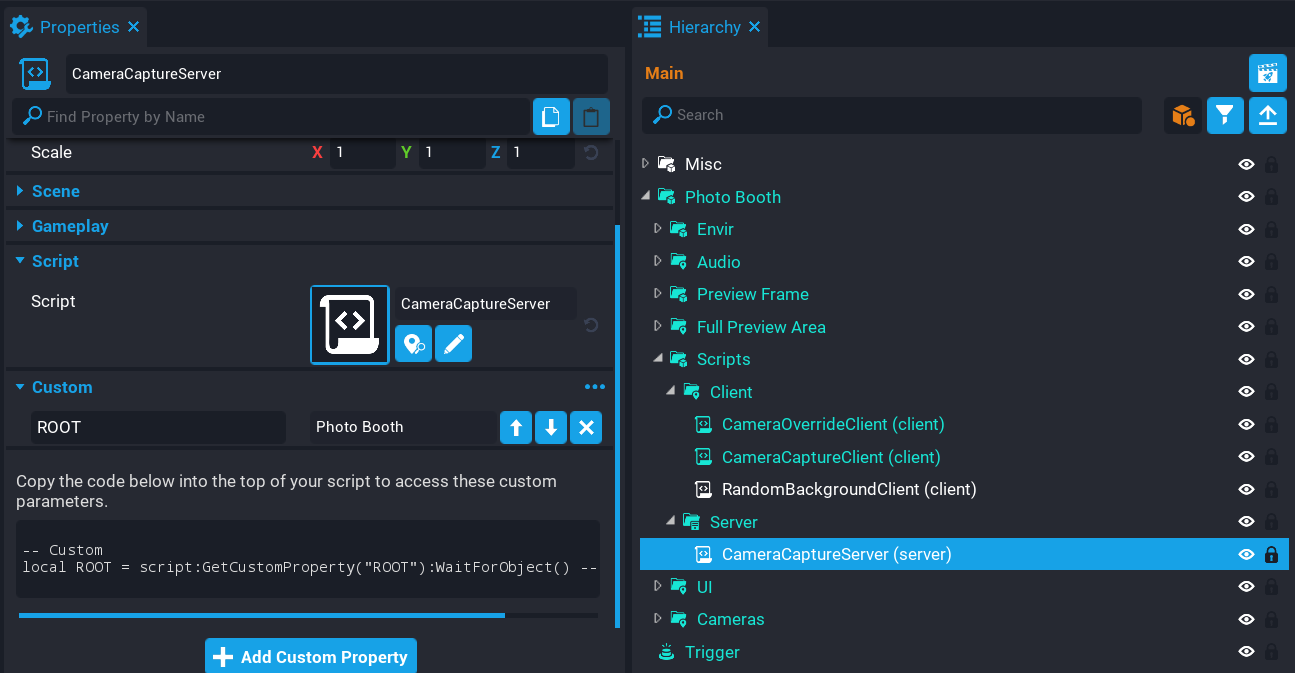
Edit CameraCaptureServer Script
Open up the CameraCaptureServer script and add references to the root and background duration properties.
local ROOT = script:GetCustomProperty("ROOT"):WaitForObject()
local BACKGROUND_DURATION = ROOT:GetCustomProperty("BackgroundDuration")
Add Variables
Add the following variables.
local elapsedTime = 0 -- (1)
local RNG = RandomStream.New(1) -- (2)
local mutations = 0 -- (3)
- The
elapsedTimewill be used to keep track of the time between each image change. - Creating a new instance of a
RandomStreamwith a seed of1to match the client. - A counter to keep track of the total seed mutations that has happened. Each
GetIntegercall on the client will mutate the seed, so the server needs to mimic what is happening on the client so that future players that join will get the total mutations sent to them so the background images are in sync.
Create TakePhoto Function
Create a function called TakePhoto. This function is called when the client broadcasts to the server from the CameraCaptureClient script. It will loop through all the players in the game, and broadcast to each player apart from the player who sent the broadcast. The reason for this, is that the player who sent the broadcast does not need to retake their photo.
local function TakePhoto(photoPlayer)
    for i, player in ipairs(Game.GetPlayers()) do
        if player ~= photoPlayer then
            Events.BroadcastToPlayer(player, "photobooth.takephoto", photoPlayer)
        end
    end
end
Create OnPlayerJoined Function
Create a function called OnPlayerJoined that will be called when a player joins the server. This function will set a private networked data key called photobooth.data and pass an object that contains the current elapsedTime, and the total mutations.
local function OnPlayerJoined(player)
    player:SetPrivateNetworkedData("photobooth.data", { elapsedTime, mutations })
end
Create Tick Function
Create a Tick function that will mimic the client version of this function. This is done to keep track of the elapsed time and mutations done so that background images remain in sync for all players when selecting a random background.
function Tick(dt)
    elapsedTime = elapsedTime + dt

    if elapsedTime > BACKGROUND_DURATION then
        elapsedTime = 0
        RNG:Mutate()
        mutations = mutations + 1
    end
end
Connect Broadcast Event
Connect up the event that is broadcasted from the client to the server so that it calls the TakePhoto function. This is fired when a player takes a photo on the client.
Events.ConnectForPlayer("photobooth.takephoto", TakePhoto)
Connect Player Joined Event
The server needs to listen for when a player joins the game so that player can receive the data about the elapsedTime and mutations.
Game.playerJoinedEvent:Connect(OnPlayerJoined)
The CameraCaptureServer Script
CameraCaptureServer
local ROOT = script:GetCustomProperty("ROOT"):WaitForObject()
local BACKGROUND_DURATION = ROOT:GetCustomProperty("BackgroundDuration")

local elapsedTime = 0
local RNG = RandomStream.New(1)
local mutations = 0

local function TakePhoto(photoPlayer)
    for i, player in ipairs(Game.GetPlayers()) do
        if player ~= photoPlayer then
            Events.BroadcastToPlayer(player, "photobooth.takephoto", photoPlayer)
        end
    end
end

local function OnPlayerJoined(player)
    player:SetPrivateNetworkedData("photobooth.data", { elapsedTime, mutations })
end

function Tick(dt)
    elapsedTime = elapsedTime + dt

    if elapsedTime > BACKGROUND_DURATION then
        elapsedTime = 0
        RNG:Mutate()
        mutations = mutations + 1
    end
end

Events.ConnectForPlayer("photobooth.takephoto", TakePhoto)

Game.playerJoinedEvent:Connect(OnPlayerJoined)
Test the Game
Test the game and make sure the following work:
- Background image of the photo booth randomly changes over time.
- Taking a photo displays on the big preview with the background image displayed.
- In multiplayer preview, the background images are synced up (or close enough).
- Taking a photo in multiplayer preview displays the photo and name to the other player in the big preview.
Create Player Photo Frame
In this section you will be adding a feature that will allow the player to press the E key and hold a photo of the last picture they took so they can walk around with it and show it off to other players in the game.
Add Template Property
The CameraCaptureServer script needs a reference to a template that will be spawned when the player joins the game. This template will be invisible but attached to the player's right wrist.
- In Project Content find the template called
Player Photo Holderand add it as a custom property. - Name the custom property
LastPhoto.
Create a new Binding
The Default Binding set will need a new binding added to detect when the player presses a specific key.
Open up the Bindings Manager window from the Window menu, or by double clicking on the Default Binding set in My Binding Sets found in the Project Content window.
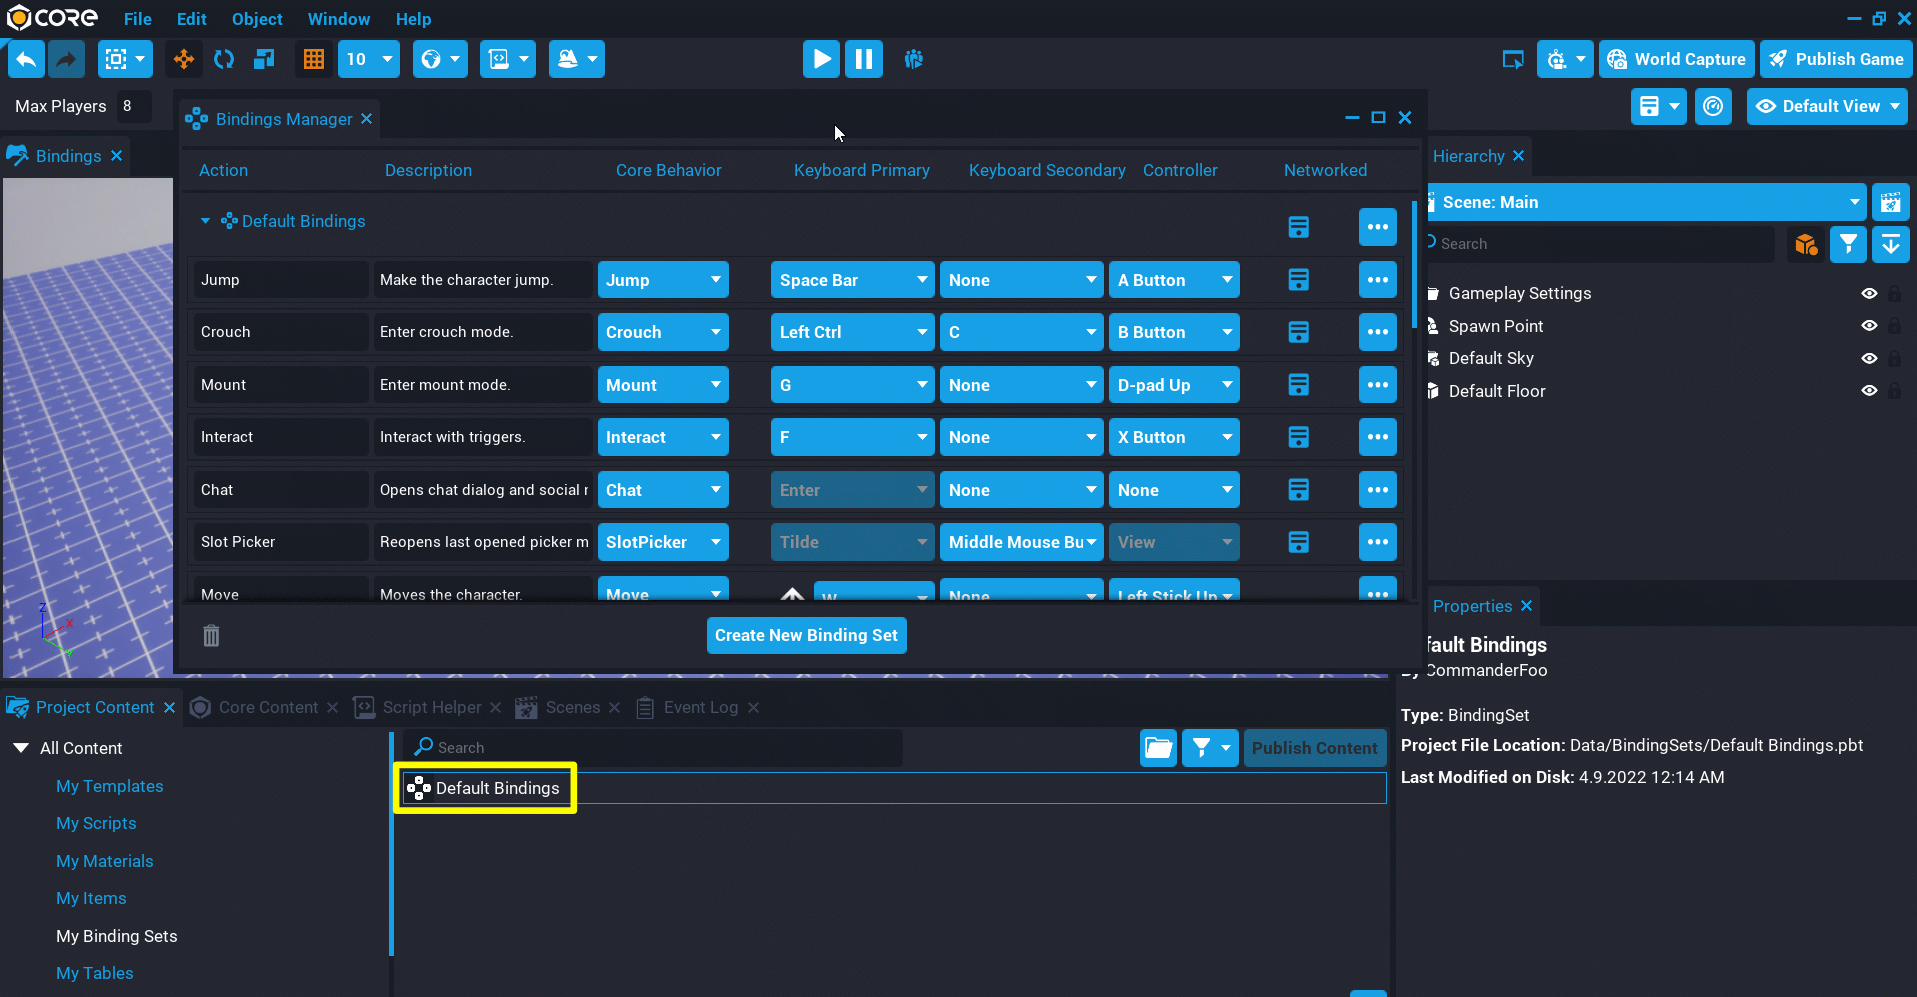
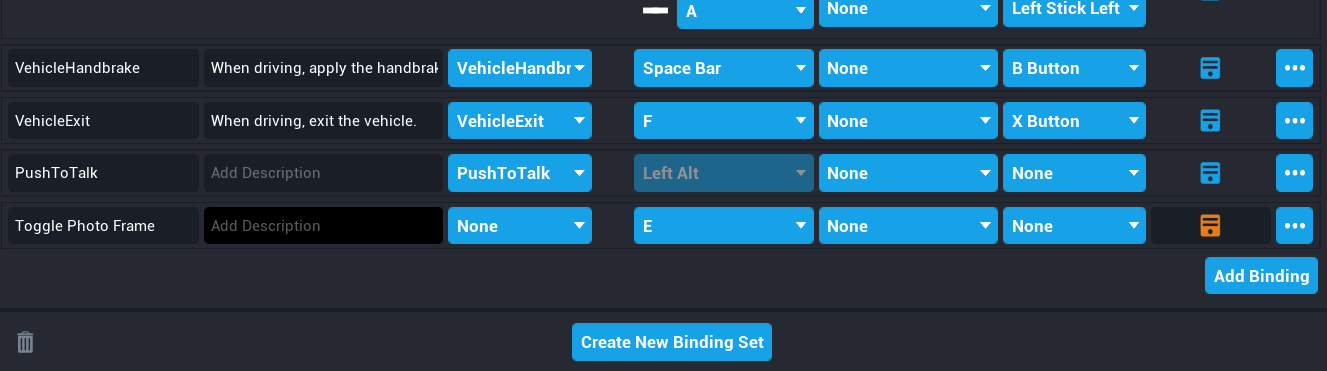
Add Binding
From the Bindings Window, click on the Add Bindings button to add a new row to the binding set.
- In the Action field, enter
Toggle Photo Frame. - From the Keyboard Primary drop down, select the E key.
- Enable networking for the binding so it can be detected on the server.
Edit CameraCaptureServer Script
Open up the CameraCaptureServer script and add a reference to the property.
local LAST_PHOTO = script:GetCustomProperty("LastPhoto")
Add Variable
The server script needs to keep track of when the photo frame has been spawned for each player so that when they leave the game it can be destroyed and not just left in the world.
The players table will hold information for each player when they join the game.
local players = {}
Create OnActionPressed Function
Create a function called OnActionPressed that will check which action the player has pressed. If the action matches Toggle Photo Frame, then it show or hide the photo frame.
If the player has the photo frame equipment, then it will disable the players mount, otherwise it will allow the player to mount. This is done because animation stances can not be played while the player is mounted, so the photo frame would appear in the wrong position and not look very good.
local function OnActionPressed(player, action)
    if action == "Toggle Photo Frame" then -- E
        if(players[player.id].visibility == Visibility.FORCE_ON) then
            player.canMount = true
            players[player.id].visibility = Visibility.FORCE_OFF
            player.animationStance = "unarmed_stance"
        elseif(not player.isMounted) then
            player.canMount = false
            players[player.id].visibility = Visibility.FORCE_ON
            player.animationStance = "unarmed_carry_object_low"
        end
    end
end
Modify OnPlayerJoined Function
Update the OnPlayerJoined function. When a player joins, a photo frame is spawned and attached to the players right_wrist.
You will want to spawn the template as a networked template so that it is replicated to all players in the game. This can be done by passing in an optional table, and setting networkContext = NetworkContextType.NETWORKED. This is really handy because it means you can do this from a server context script.
local function OnPlayerJoined(player)
    local frame = World.SpawnAsset(LAST_PHOTO, { networkContext = NetworkContextType.NETWORKED })

    frame.name = "Last Photo" -- (1)
    frame:AttachToPlayer(player, "right_wrist")

    players[player.id] = frame -- (2)

    player:SetPrivateNetworkedData("photobooth.data", { elapsedTime, mutations })
end
- Name the frame to
Last Photoas it will be searched for on the client. - Store the asset instance in the
playerstable for this player who joined.
Create OnPlayerLeft Function
Create a function called OnPlayerLeft. This function will be called when a player leaves the game. It will clear up the photo frame from the server by destroying it, and then setting the table entry to nil to clear it out.
local function OnPlayerLeft(player)
    if players[player.id] ~= nil then
        players[player.id]:Destroy()
        players[player.id] = nil
    end
end
Connect Player Left Event
Connect up the playerLeftEvent so that the OnPlayerLeft function is called when a player leaves the game.
Game.playerLeftEvent:Connect(OnPlayerLeft)
Connect actionPressedEvent
The actionPressedEvent needs to be connect so that when the player presses a key, the OnActionPressed function is called, which will check which it is.
Input.actionPressedEvent:Connect(OnActionPressed)
The CameraCaptureServer Script
CameraCaptureServer
local ROOT = script:GetCustomProperty("ROOT"):WaitForObject()
local BACKGROUND_DURATION = ROOT:GetCustomProperty("BackgroundDuration")
local LAST_PHOTO = script:GetCustomProperty("LastPhoto")

local elapsedTime = 0
local RNG = RandomStream.New(1)
local mutations = 0

local players = {}

local function TakePhoto(photoPlayer)
    for i, player in ipairs(Game.GetPlayers()) do
        if player ~= photoPlayer then
            Events.BroadcastToPlayer(player, "photobooth.takephoto", photoPlayer)
        end
    end
end

local function OnActionPressed(player, action)
    if action == "Toggle Photo Frame" then -- E
        if(players[player.id].visibility == Visibility.FORCE_ON) then
            player.canMount = true
            players[player.id].visibility = Visibility.FORCE_OFF
            player.animationStance = "unarmed_stance"
        elseif(not player.isMounted) then
            player.canMount = false
            players[player.id].visibility = Visibility.FORCE_ON
            player.animationStance = "unarmed_carry_object_low"
        end
    end
end

local function OnPlayerJoined(player)
    local frame = World.SpawnAsset(LAST_PHOTO, { networkContext = NetworkContextType.NETWORKED })

    frame.name = "Last Photo"
    frame:AttachToPlayer(player, "right_wrist")

    players[player.id] = frame

    player:SetPrivateNetworkedData("photobooth.data", { elapsedTime, mutations })
end

local function OnPlayerLeft(player)
    if players[player.id] ~= nil then
        players[player.id]:Destroy()
        players[player.id] = nil
    end
end

function Tick(dt)
    elapsedTime = elapsedTime + dt

    if elapsedTime > BACKGROUND_DURATION then
        elapsedTime = 0
        RNG:Mutate()
        mutations = mutations + 1
    end
end

Events.ConnectForPlayer("photobooth.takephoto", TakePhoto)

Game.playerJoinedEvent:Connect(OnPlayerJoined)
Game.playerLeftEvent:Connect(OnPlayerLeft)

Input.actionPressedEvent:Connect(OnActionPressed)
Test the Game
Test the game by pressing E to hold the photo. For now it will be a white picture, in the next section you will be modifying the CameraCaptureClient script to show the last took photo.
Update CameraCaptureClient Script
The CameraCaptureClient script needs to be updated so that it displays the last photo the player took when they hold their photo frame out.
Open up the CameraCaptureClient script.
Create GetPlayerPhotoFrame Function
Create a function called GetPlayerPhotoFrame above the ShowImage function.
This function will loop over all the objects that are attached to the player and find the object called Last Photo and return it. This object is attached to the player when they join the game.
local function GetPlayerPhotoFrame(player)
    local attachedObjects = player:GetAttachedObjects()

    for i, o in ipairs(attachedObjects) do
        if o.name == "Last Photo" then
            return o
        end
    end
end
Create UpdatePlayerPhotoFrame Function
Create a function called UpdatePlayerPhotoFrame above the ShowImage function.
This function will be responsible for updating the UI image for the player who took the photo. It will find the photo frame for the player, and then set the camera capture on the image.
If you are using this in an active game, you may want to consider lowering the capture resolution so the capture for the photo frame is not overwritten too quickly.
local function UpdatePlayerPhotoFrame(player, capture)
    if(capture == nil or not capture:IsValid()) then
        return
    end

    local frame = GetPlayerPhotoFrame(player or localPlayer)

    if frame ~= nil then
        frame:FindDescendantByType("UIImage"):SetCameraCapture(capture)
    end
end
Modify TakePhoto Function
Modify the TakePhoto function so it calls the UpdatePlayerPhotoFrame function for the local player. If the it not the local player who took the photo, then it will pass the player instead of nil to the function.
local function TakePhoto(player)
    if player == nil then
        SHUTTER_AUDIO:Play()
        PlayFlash()
        DisableEnableButton()
    end

    if #captures == maxImages then
        local firstCapture = captures[1]

        if(firstCapture.capture ~= nil and firstCapture.capture:IsValid()) then
            firstCapture.capture:Release()
        end

        table.remove(captures, 1)
    end

    local imageInfo = {

        playerName = (player and player.name) or localPlayer.name,
        capture = CAMERA_CAPTURE:Capture(resolution)

    }

    table.insert(captures, imageInfo)

    if player == nil and imageInfo.capture ~= nil and imageInfo.capture:IsValid() then
        ShowImage(#captures)

        if previewCapture == nil or not previewCapture:IsValid() then
            previewCapture = CAMERA_CAPTURE:Capture(resolution)
        else
            previewCapture:Refresh()
        end

        SCREEN_PREVIEW:SetCameraCapture(previewCapture)
        SCREEN_PREVIEW.visibility = Visibility.FORCE_ON

        UpdateKeyTip()
        UpdatePlayerPhotoFrame(nil, imageInfo.capture)

        Events.BroadcastToServer("photobooth.takephoto")
    else
        UpdatePlayerPhotoFrame(player, imageInfo.capture)
    end
end
The CameraCaptureClient Script
CameraCaptureClient
local ROOT = script:GetCustomProperty("ROOT"):WaitForObject()
local PHOTO_DURATION = ROOT:GetCustomProperty("PhotoDuration")
local DISABLE_DURATION = ROOT:GetCustomProperty("DisableDuration")

local CAMERA_CAPTURE = script:GetCustomProperty("CameraCapture"):WaitForObject()
local TAKE_PHOTO_BUTTON = script:GetCustomProperty("TakePhotoButton"):WaitForObject()
local SCREEN_PREVIEW = script:GetCustomProperty("ScreenPreview"):WaitForObject()
local SHUTTER_AUDIO = script:GetCustomProperty("ShutterAudio"):WaitForObject()
local FLASH = script:GetCustomProperty("Flash"):WaitForObject()
local KEY_TIP = script:GetCustomProperty("KeyTip"):WaitForObject()

local WORLD_PREVIEW = script:GetCustomProperty("WorldPreviewImage"):WaitForObject()
local WORLD_NAME = script:GetCustomProperty("WorldPreviewText"):WaitForObject()

local resolution = CameraCaptureResolution.LARGE
local maxSize = 1024
local currentSize = 512
local maxImages = (~~((maxSize ^ 2 << 3) / currentSize ^ 2)) - 1

local captures = {}
local previewCapture = nil
local localPlayer = Game.GetLocalPlayer()
local currentIndex = 1
local elapsedTime = 0

local function PlayFlash()
    Task.Spawn(function()
        FLASH.visibility = Visibility.FORCE_ON
        Task.Wait(.1)
        FLASH.visibility = Visibility.FORCE_OFF
    end)
end

local function DisableEnableButton()
    Task.Spawn(function()
        TAKE_PHOTO_BUTTON.isInteractable = false
        TAKE_PHOTO_BUTTON.parent.opacity = .3
        Task.Wait(DISABLE_DURATION)
        TAKE_PHOTO_BUTTON.isInteractable = true
        TAKE_PHOTO_BUTTON.parent.opacity = 1
    end)
end

local function UpdateKeyTip()
    if(localPlayer.isMounted) then
        KEY_TIP.text = "Unmount to Hold up Photo"
    else
        KEY_TIP.text = "Press E to Hold up Photo"
    end
end

local function GetPlayerPhotoFrame(player)
    local attachedObjects = player:GetAttachedObjects()

    for i, o in ipairs(attachedObjects) do
        if o.name == "Last Photo" then
            return o
        end
    end
end

local function UpdatePlayerPhotoFrame(player, capture)
    if(capture == nil or not capture:IsValid()) then
        return
    end

    local frame = GetPlayerPhotoFrame(player or localPlayer)

    if frame ~= nil then
        frame:FindDescendantByType("UIImage"):SetCameraCapture(capture)
    end
end

local function ShowImage(index)
    local imageInfo = captures[index or currentIndex]

    if(imageInfo.capture == nil or not imageInfo.capture:IsValid()) then
        return
    end

    WORLD_PREVIEW:SetCameraCapture(imageInfo.capture)
    WORLD_NAME.text = "By " .. imageInfo.playerName

    if not index then
        currentIndex = (currentIndex == #captures and 1) or (currentIndex + 1)
    else
        elapsedTime = 0
    end
end

local function TakePhoto(player)
    if player == nil then
        SHUTTER_AUDIO:Play()
        PlayFlash()
        DisableEnableButton()
    end

    if #captures == maxImages then
        local firstCapture = captures[1]

        if(firstCapture.capture ~= nil and firstCapture.capture:IsValid()) then
            firstCapture.capture:Release()
        end

        table.remove(captures, 1)
    end

    local imageInfo = {

        playerName = (player and player.name) or localPlayer.name,
        capture = CAMERA_CAPTURE:Capture(resolution)

    }

    table.insert(captures, imageInfo)

    if player == nil and imageInfo.capture ~= nil and imageInfo.capture:IsValid() then
        ShowImage(#captures)

        if previewCapture == nil or not previewCapture:IsValid() then
            previewCapture = CAMERA_CAPTURE:Capture(resolution)
        else
            previewCapture:Refresh()
        end

        SCREEN_PREVIEW:SetCameraCapture(previewCapture)
        SCREEN_PREVIEW.visibility = Visibility.FORCE_ON

        UpdateKeyTip()
        UpdatePlayerPhotoFrame(nil, imageInfo.capture)

        Events.BroadcastToServer("photobooth.takephoto")
    else
        UpdatePlayerPhotoFrame(player, imageInfo.capture)
    end
end

function Tick(dt)
    elapsedTime = elapsedTime + dt

    if #captures > 0 and elapsedTime > PHOTO_DURATION then
        ShowImage()
        elapsedTime = 0
    end
end

TAKE_PHOTO_BUTTON.clickedEvent:Connect(function()
    TakePhoto()
end)

Events.Connect("photobooth.takephoto", TakePhoto)
Test the Game
Test the game to make sure that the last photo the player has took is displayed in the photo frame they are holding.
View Bigger Photo
In this section you will create a feature so that the player can open up their captured photo on the screen to see a bigger version by entering a trigger. Players will only be able to interact with the trigger if they have took a photo already.
The UI has already been created which is already in the Hierarchy in the folder Preview Area.
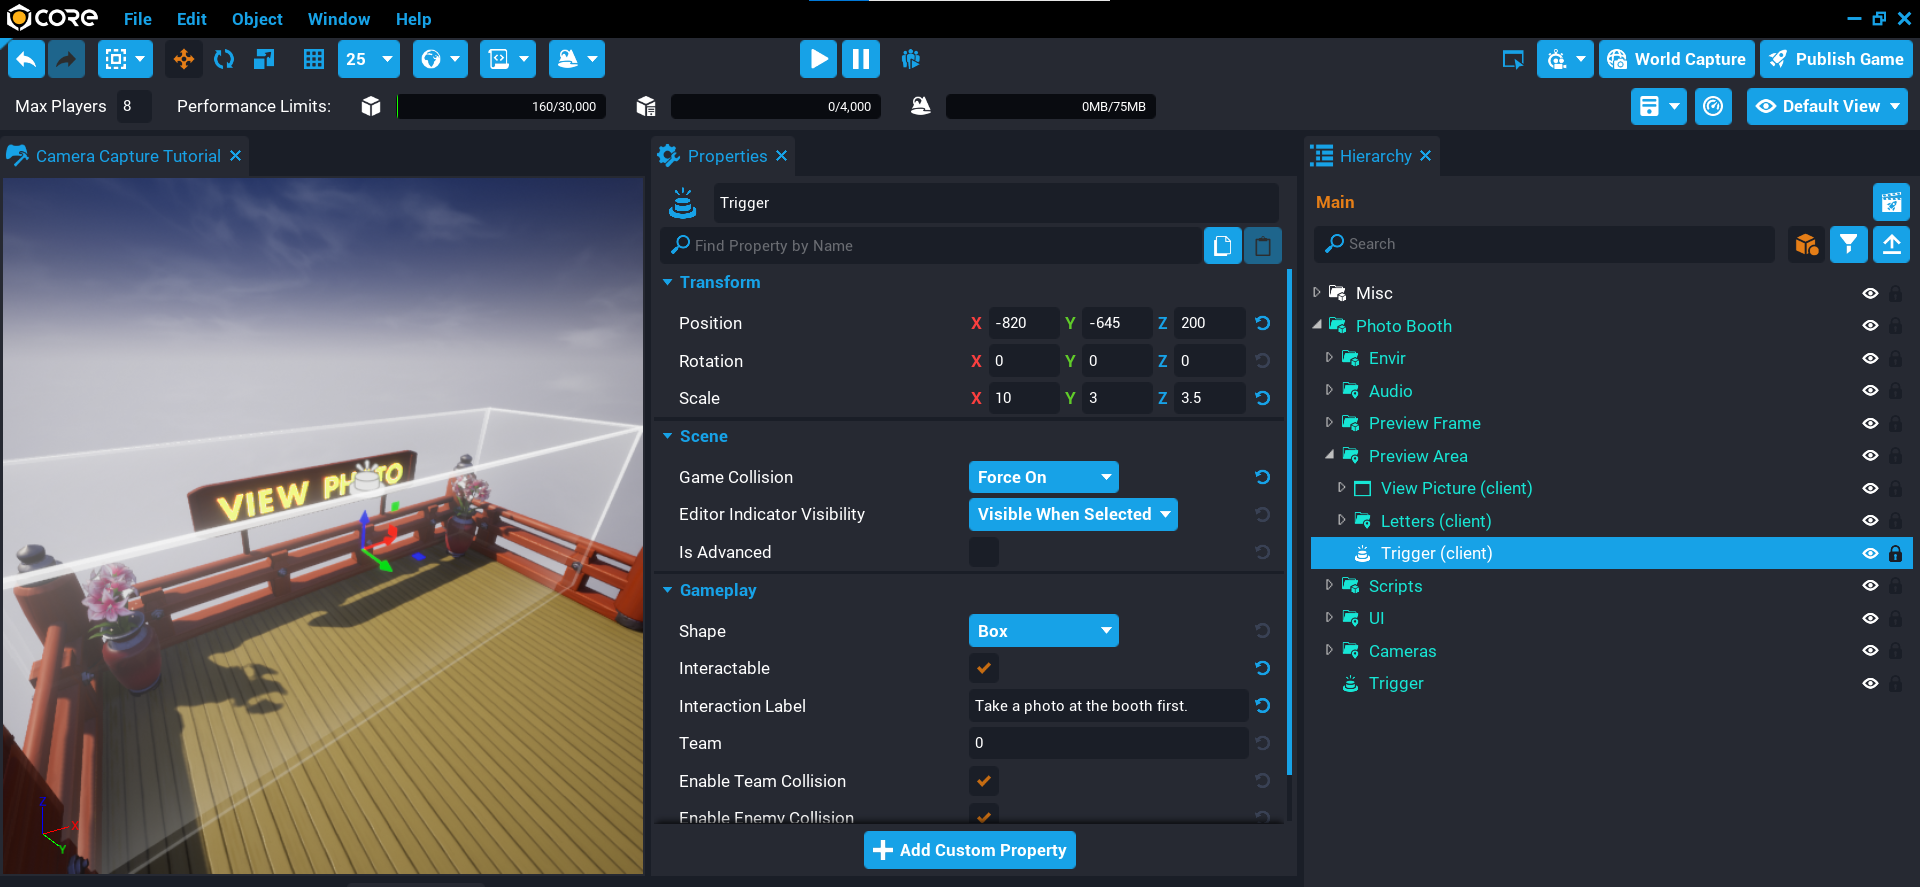
Create Trigger
- Create a Trigger inside the Preview Area folder.
- Set the Position to X
-820, Y-645, Z200. - Set the Scale to X
10, Y3, Z3.5. - Set the Game Collision to Force On.
- Enable the property Interactable.
- Set the Interaction Label to
Take a photo at the booth first..
Update CameraCaptureClient Script
The CameraCaptureClient script needs a reference to the Preview image in the Preview Area folder so it can set the player's last photo capture.
Add the Preview image as a custom property called ViewPreview.
Edit CameraCaptureClient Script
Open up the CameraCaptureClient script and add a reference to the ViewPreview property.
local VIEW_PREVIEW = script:GetCustomProperty("ViewPreview"):WaitForObject()
Update TakePhoto Function
Update the TakePhoto function so that it sets the capture instance for the ViewPreview image, and also sends a broadcast which will be connected in another script.
local function TakePhoto(player)
    if player == nil then
        SHUTTER_AUDIO:Play()
        PlayFlash()
        DisableEnableButton()
    end

    if #captures == maxImages then
        local firstCapture = captures[1]

        if(firstCapture.capture ~= nil and firstCapture.capture:IsValid()) then
            firstCapture.capture:Release()
        end

        table.remove(captures, 1)
    end

    local imageInfo = {

        playerName = (player and player.name) or localPlayer.name,
        capture = CAMERA_CAPTURE:Capture(resolution)

    }

    table.insert(captures, imageInfo)

    if player == nil and imageInfo.capture ~= nil and imageInfo.capture:IsValid() then
        ShowImage(#captures)

        if previewCapture == nil or not previewCapture:IsValid() then
            previewCapture = CAMERA_CAPTURE:Capture(resolution)
        else
            previewCapture:Refresh()
        end

        VIEW_PREVIEW:SetCameraCapture(imageInfo.capture)
        SCREEN_PREVIEW:SetCameraCapture(previewCapture)
        SCREEN_PREVIEW.visibility = Visibility.FORCE_ON

        UpdateKeyTip()
        UpdatePlayerPhotoFrame(nil, imageInfo.capture)

        Events.Broadcast("PlayerTookPhoto")
        Events.BroadcastToServer("photobooth.takephoto")
    else
        UpdatePlayerPhotoFrame(player, imageInfo.capture)
    end
end
The CameraCaptureClient Script
CameraCaptureClient
local ROOT = script:GetCustomProperty("ROOT"):WaitForObject()
local PHOTO_DURATION = ROOT:GetCustomProperty("PhotoDuration")
local DISABLE_DURATION = ROOT:GetCustomProperty("DisableDuration")

local CAMERA_CAPTURE = script:GetCustomProperty("CameraCapture"):WaitForObject()
local TAKE_PHOTO_BUTTON = script:GetCustomProperty("TakePhotoButton"):WaitForObject()
local SCREEN_PREVIEW = script:GetCustomProperty("ScreenPreview"):WaitForObject()
local SHUTTER_AUDIO = script:GetCustomProperty("ShutterAudio"):WaitForObject()
local FLASH = script:GetCustomProperty("Flash"):WaitForObject()
local KEY_TIP = script:GetCustomProperty("KeyTip"):WaitForObject()

local WORLD_PREVIEW = script:GetCustomProperty("WorldPreviewImage"):WaitForObject()
local WORLD_NAME = script:GetCustomProperty("WorldPreviewText"):WaitForObject()
local VIEW_PREVIEW = script:GetCustomProperty("ViewPreview"):WaitForObject()

local resolution = CameraCaptureResolution.LARGE
local maxSize = 1024
local currentSize = 512
local maxImages = (~~((maxSize ^ 2 << 3) / currentSize ^ 2)) - 1

local captures = {}
local previewCapture = nil
local localPlayer = Game.GetLocalPlayer()
local currentIndex = 1
local elapsedTime = 0

local function PlayFlash()
    Task.Spawn(function()
        FLASH.visibility = Visibility.FORCE_ON
        Task.Wait(.1)
        FLASH.visibility = Visibility.FORCE_OFF
    end)
end

local function DisableEnableButton()
    Task.Spawn(function()
        TAKE_PHOTO_BUTTON.isInteractable = false
        TAKE_PHOTO_BUTTON.parent.opacity = .3
        Task.Wait(DISABLE_DURATION)
        TAKE_PHOTO_BUTTON.isInteractable = true
        TAKE_PHOTO_BUTTON.parent.opacity = 1
    end)
end

local function UpdateKeyTip()
    if(localPlayer.isMounted) then
        KEY_TIP.text = "Unmount to Hold up Photo"
    else
        KEY_TIP.text = "Press E to Hold up Photo"
    end
end

local function GetPlayerPhotoFrame(player)
    local attachedObjects = player:GetAttachedObjects()

    for i, o in ipairs(attachedObjects) do
        if o.name == "Last Photo" then
            return o
        end
    end
end

local function UpdatePlayerPhotoFrame(player, capture)
    if(capture == nil or not capture:IsValid()) then
        return
    end

    local frame = GetPlayerPhotoFrame(player or localPlayer)

    if frame ~= nil then
        frame:FindDescendantByType("UIImage"):SetCameraCapture(capture)
    end
end

local function ShowImage(index)
    local imageInfo = captures[index or currentIndex]

    if(imageInfo.capture == nil or not imageInfo.capture:IsValid()) then
        return
    end

    WORLD_PREVIEW:SetCameraCapture(imageInfo.capture)
    WORLD_NAME.text = "By " .. imageInfo.playerName

    if not index then
        currentIndex = (currentIndex == #captures and 1) or (currentIndex + 1)
    else
        elapsedTime = 0
    end
end

local function TakePhoto(player)
    if player == nil then
        SHUTTER_AUDIO:Play()
        PlayFlash()
        DisableEnableButton()
    end

    if #captures == maxImages then
        local firstCapture = captures[1]

        if(firstCapture.capture ~= nil and firstCapture.capture:IsValid()) then
            firstCapture.capture:Release()
        end

        table.remove(captures, 1)
    end

    local imageInfo = {

        playerName = (player and player.name) or localPlayer.name,
        capture = CAMERA_CAPTURE:Capture(resolution)

    }

    table.insert(captures, imageInfo)

    if player == nil and imageInfo.capture ~= nil and imageInfo.capture:IsValid() then
        ShowImage(#captures)

        if previewCapture == nil or not previewCapture:IsValid() then
            previewCapture = CAMERA_CAPTURE:Capture(resolution)
        else
            previewCapture:Refresh()
        end

        VIEW_PREVIEW:SetCameraCapture(imageInfo.capture)
        SCREEN_PREVIEW:SetCameraCapture(previewCapture)
        SCREEN_PREVIEW.visibility = Visibility.FORCE_ON

        UpdateKeyTip()
        UpdatePlayerPhotoFrame(nil, imageInfo.capture)

        Events.Broadcast("PlayerTookPhoto")
        Events.BroadcastToServer("photobooth.takephoto")
    else
        UpdatePlayerPhotoFrame(player, imageInfo.capture)
    end
end

function Tick(dt)
    elapsedTime = elapsedTime + dt

    if #captures > 0 and elapsedTime > PHOTO_DURATION then
        ShowImage()
        elapsedTime = 0
    end
end

TAKE_PHOTO_BUTTON.clickedEvent:Connect(function()
    TakePhoto()
end)

Events.Connect("photobooth.takephoto", TakePhoto)
Create ViewPictureClient Script
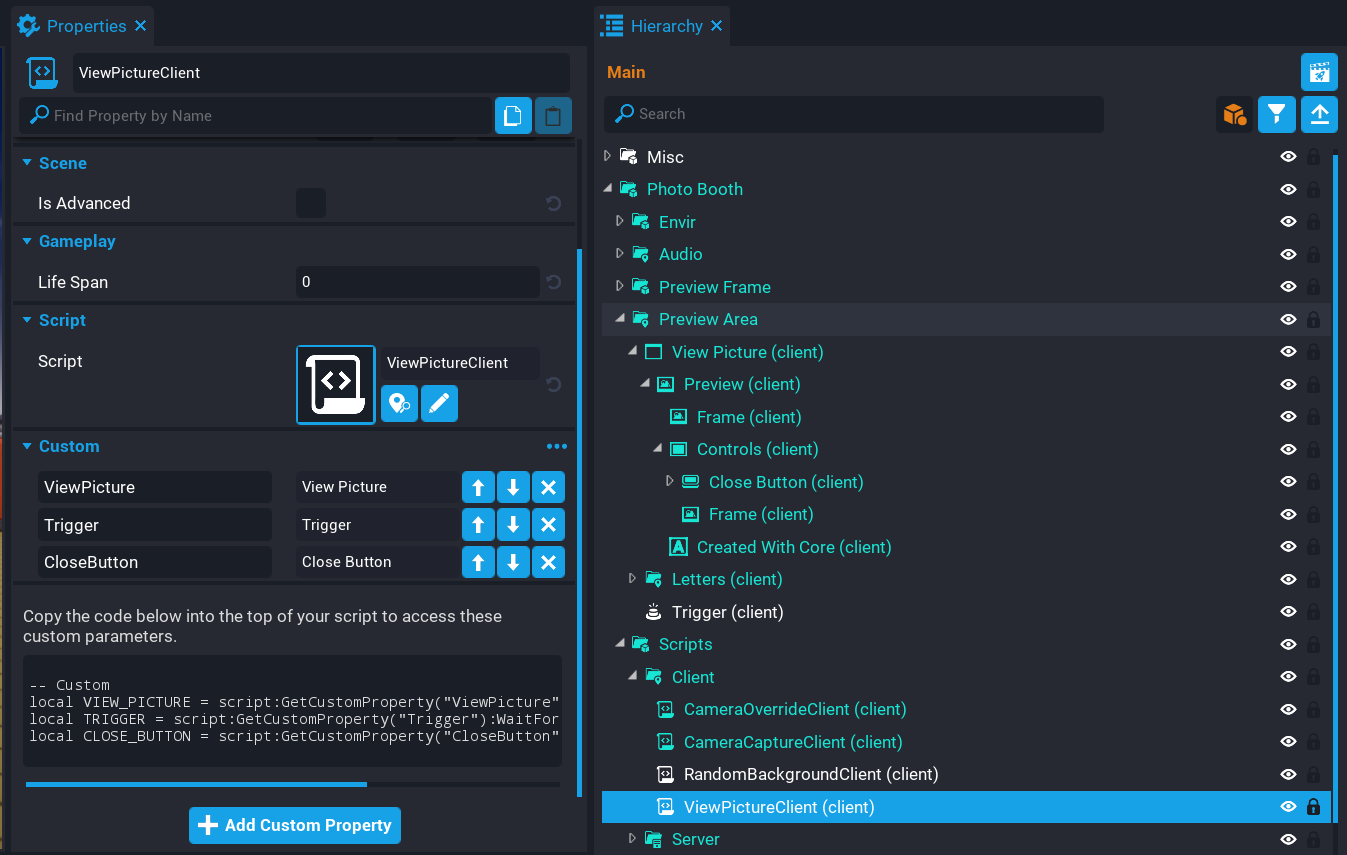
Create a script called ViewPictureClient and place it into the Client folder in the Hierarchy. This script will be responsible for showing the UI to the player when they interact with the trigger to view their picture.
Some custom properties need to be added so the script can reference them.
- Add the View Picture UI Container as a custom property, and name it
ViewPicture. - Add the Trigger that is inside the Preview Area as a custom property, and name it
Trigger. - Add the Close Button as a custom property, and name it
CloseButton.
Edit ViewPictureClient Script
Open up the ViewPictureClient script and add the property references.
local VIEW_PICTURE = script:GetCustomProperty("ViewPicture"):WaitForObject()
local TRIGGER = script:GetCustomProperty("Trigger"):WaitForObject()
local CLOSE_BUTTON = script:GetCustomProperty("CloseButton"):WaitForObject()
Add Variables
Add the following variables.
local localPlayer = Game.GetLocalPlayer()
local inTrigger = false -- (1)
local canOpen = false -- (2)
- When the player enters the volume of the trigger, this will be set to true.
- If the player has a photo, then this will be set to true so the UI can be opened.
Create CloseUI Function
Create a function called CloseUI that will set the visibility of the VIEW_PICTURE UI to FORCE_OFF. It will also reset the isInteractable property depending on if the player is inside the trigger or not. If they are inside the trigger, then the label would need to show up for that player.
local function CloseUI()
    VIEW_PICTURE.visibility = Visibility.FORCE_OFF

    if inTrigger then
        TRIGGER.isInteractable = true
    else
        TRIGGER.isInteractable = false
    end

    UI.SetCursorVisible(false)
    UI.SetCanCursorInteractWithUI(false)
end
Create OnInteracted Function
Create a function called OnInteracted. This function will check of the obj in the trigger volume is the localPlayer. The reason for this check, is because other players can trigger this for each other which you don't want.
local function OnInteracted(trigger, obj)
    if inTrigger and Object.IsValid(obj) and obj:IsA("Player") and obj == localPlayer then
        VIEW_PICTURE.visibility = Visibility.FORCE_ON
        TRIGGER.isInteractable = false

        UI.SetCursorVisible(true)
        UI.SetCanCursorInteractWithUI(true)
    end
end
Create OnExitTrigger Function
Create a function called OnExitTrigger that will handle closing the UI.
local function OnExitTrigger(trigger, obj)
    if Object.IsValid(obj) and obj:IsA("Player") and obj == localPlayer then
        inTrigger = false
        CloseUI()
    end
end
Create OnEnterTrigger Function
Create a function called OnEnterTrigger. This function will be called when the player enters the volume of the trigger. It will check to see if the UI can open, and if so, change the interactionLabel property. The reason for the canOpen variable check, is that if a player has not took a photo at the photo booth, then they will not have a photo to view.
local function OnEnterTrigger(trigger, obj)
    if Object.IsValid(obj) and obj:IsA("Player") and obj == localPlayer then
        if canOpen then
            TRIGGER.interactionLabel = "View photo."
            TRIGGER.isInteractable = true
            inTrigger = true
        else
            TRIGGER.interactionLabel = "Take a photo at the booth first."
        end
    end
end
Create SetCanOpenUI Function
Create a function called SetCanOpenUI. This function will be called when the broadcast event PlayerTookPhoto is triggered. It will set the canOpen variable to true, and the interactionLabel text, meaning that now the player can open the UI to view their photo they took.
local function SetCanOpenUI()
    canOpen = true
    TRIGGER.interactionLabel = "View photo."
end
Connect Trigger Events
Connect up the trigger events so they are called when the player interacts, enters, and leaves the trigger.
TRIGGER.interactedEvent:Connect(OnInteracted)
TRIGGER.endOverlapEvent:Connect(OnExitTrigger)
TRIGGER.beginOverlapEvent:Connect(OnEnterTrigger)
Connect Button Event
Connect up the clickedEvent so that the player is able to close the UI by clicking a button.
CLOSE_BUTTON.clickedEvent:Connect(CloseUI)
Connect Broadcast Event
Connect the broadcast event PlayerTookPhoto. This event is broadcasted from the CameraCaptureClient script the local player has took a photo. This will call the SetCanOpenUI which will enable the UI to be opened by the player.
Events.Connect("PlayerTookPhoto", SetCanOpenUI)
The ViewPictureClient Script
ViewPictureClient
local VIEW_PICTURE = script:GetCustomProperty("ViewPicture"):WaitForObject()
local TRIGGER = script:GetCustomProperty("Trigger"):WaitForObject()
local CLOSE_BUTTON = script:GetCustomProperty("CloseButton"):WaitForObject()

local localPlayer = Game.GetLocalPlayer()
local inTrigger = false
local canOpen = false

local function CloseUI()
    VIEW_PICTURE.visibility = Visibility.FORCE_OFF

    if inTrigger then
        TRIGGER.isInteractable = true
    else
        TRIGGER.isInteractable = false
    end

    UI.SetCursorVisible(false)
    UI.SetCanCursorInteractWithUI(false)
end

local function OnInteracted(trigger, obj)
    if inTrigger and Object.IsValid(obj) and obj:IsA("Player") and obj == localPlayer then
        VIEW_PICTURE.visibility = Visibility.FORCE_ON
        TRIGGER.isInteractable = false

        UI.SetCursorVisible(true)
        UI.SetCanCursorInteractWithUI(true)
    end
end

local function OnExitTrigger(trigger, obj)
    if Object.IsValid(obj) and obj:IsA("Player") and obj == localPlayer then
        inTrigger = false
        CloseUI()
    end
end

local function OnEnterTrigger(trigger, obj)
    if Object.IsValid(obj) and obj:IsA("Player") and obj == localPlayer then
        if canOpen then
            TRIGGER.interactionLabel = "View photo."
            TRIGGER.isInteractable = true
            inTrigger = true
        else
            TRIGGER.interactionLabel = "Take a photo at the booth first."
        end
    end
end

local function SetCanOpenUI()
    canOpen = true
    TRIGGER.interactionLabel = "View photo."
end

TRIGGER.interactedEvent:Connect(OnInteracted)
TRIGGER.endOverlapEvent:Connect(OnExitTrigger)
TRIGGER.beginOverlapEvent:Connect(OnEnterTrigger)

CLOSE_BUTTON.clickedEvent:Connect(CloseUI)

Events.Connect("PlayerTookPhoto", SetCanOpenUI)
Test the Game
Test the game to make sure the following work:
- The preview UI can not be opened until a photo has been took.
- The preview UI can be opened and closed after taking a photo.
Summary
Using camera capturing in your game can lead to some interesting features. In this case it was about standing in front of an image to take a picture, and then progressed into making it a multiplayer experience so other players could see each others pictures.
The are a wide range of uses for camera captures, from inventory icons, photo booth, galleries, and many more ideas.
Consider improving on the photo booth to use 3D scenes behind the player instead of background images. You could setup multiple photo booths in your game. Experiment and see what you can come up with.
Learn More
Camera Captures Tutorial | Icon Generator Tutorial | Camera Reference | Camera Capture API | Camera API | Camera Capture Resolution RandomStream API | Binding Sets