Curves
Summary
Curves in Core provide a variety of uses to a game creator. With curves, a creator can customize the path and speed it takes for an object to interpolate between two points, create a bouncing coin, create fully customizable and beautiful UI animations, and so much more.
Curve Custom Properties
Curves can be stored as custom properties for ease of editing and referencing.
Adding a Curve Custom Property
- Click on the object to add a curve to and navigate to the Properties window.
- Click Add Custom Property in the bottom of the Properties window.
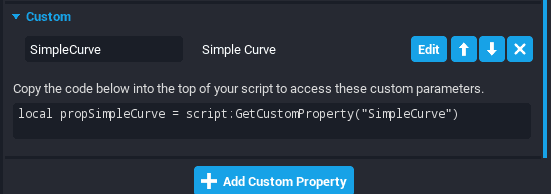
- Click Simple Curve and name it what you want it to be referenced as.
- Click Edit to edit the curve to perfection.
Referencing a Curve in a Script
- Copy-and-paste the provided code snippet in the Custom category of the Properties window.
It should look similar to:
local propSimpleCurve = script:GetCustomProperty("SimpleCurve")
Curve Editor
The Curve Editor is home to changing how a curve and its keyframes behaves.
Opening the Curve Editor
- In the top bar, click Window.
- Find and click on Curve Editor.
A window like such should appear:

Curve Graph
The largest portion of the Curve Editor window is the Curve Graph. This is a visual representation of the curve and is used to create and edit keyframes.

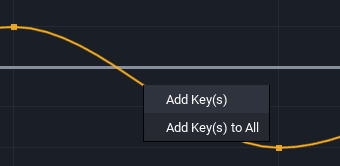
Creating a Keyframe
- Move your mouse to the location on the curve you want the keyframe to be inserted.
- Right-click and then click Add Key(s).
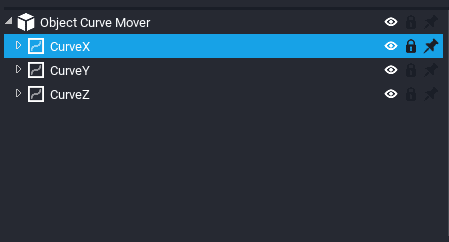
Curve List
On the left of the Curve Editor window is the Curve List. This lists selected objects with curve properties and under each is a list of all curves attached to that object. This makes switching between curves easier for quickly making edits.
In / Out
This is the behaviour of the curve before or after the range of time respectively.
There are five different behaviours:
| Name | Description |
|---|---|
| Cycle | Repeat the curve |
| Cycle with Offset | Repeat the curve but start the next value where the last left value off |
| Oscillate | Repeat the curve but flip the time values |
| Linear | Extends the line from the first two (in) or last two (out) keys and extrapolates it forever before/after respectively |
| Constant | Takes the value of the first (in) or last (out) key and sets a constant value before/after respectively |
Keyframes
A keyframe is a user-set point that controls the shape of the curve.
| Name | Description |
|---|---|
| Time | Point in time relative to the beginning (0) of the curve |
| Value | The position that the curve should be in at the corresponding point in time |
| Interpolation Type | How the curve will transition to the next keyframe |
| Tangent Type | How the tangents will be aligned for this keyframe |
| Tangent Values | The value for the in/out tangent if Tangent Type is user-set |
Interpolation Type
There are three interpolation types:
| Name | Description |
|---|---|
| Constant Interpolation | The value will remain constant until it reach the next keyframe to which it will snap to the next value |
| Linear Interpolation | The value will interpolate linearly to the next keyframe |
| Cubic Interpolation | The value will use a cubic algorithm to transition to the next keyframe |
Tangent Type and Values
There are three tangent types:
| Name | Description |
|---|---|
| Automatic Computation | Core will take into account the position in time, the value, and surrounding keyframes to automatically set a tangent |
| User-Set Aligned | The tangent can be set by the creator and the in/out tangent will remain aligned |
| User-Set Independent | The tangent can be set by the creator but the in/out values can be set without changing one another |
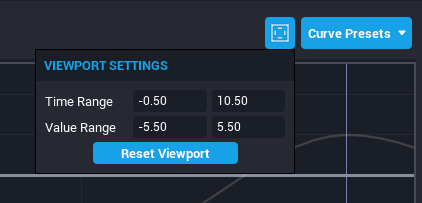
Viewport Settings
In the top right of the Curve Editor window is a blue button that opens the Viewport Settings. This allows you to customize how the Curve Graph looks by changing the range of time and the range of values that is visible.
Hint
You can zoom in and out of the Curve Graph with your mouse wheel. By holding Ctrl or Shift, you can zoom just vertically or horizontally.
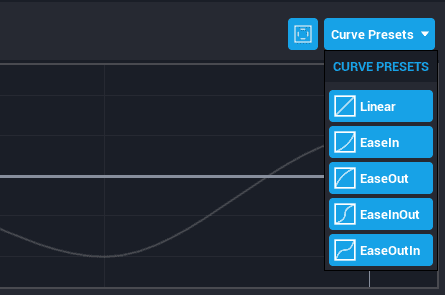
Curve Presets
In the top right of the Curve Editor window is a blue button that opens the Curve Presets. This is a list of predefined keyframes to create some common curves. Clicking on one of these will reset the curve to the preset.
Note
If you need to undo this action, press Ctrl+Z.
Getting the Value of a Curve for a Time
A main powerhouse feature of curves is to be able to get a value on a specific point in time anywhere along the curve. For instance, if a curve has a range of 0 - 3 seconds on a linear path and you get the value at 1.5 seconds, the value returned would be 1.5.
This can be obtained through SimpleCurve:GetValue(time). More information can be found at the SimpleCurve API.
Note
Time is continuous for curves and getting the value at 100 on a curve with a range of 0 - 3 would automatically do the calculations to get the correct value based on its In/Out values.
Sample Scripts Using Curves
Provided in the Core Content window are three sample scripts that can be used to explore some possibilities of using curves.
Curve Mover
This script will continuously move an object to add the value of the three X, Y, and Z curves.
- Search "
Object Curve Mover" in the Core Content window. - Drag-and-drop the script into the object of choice in the Hierarchy.
- In the Properties window, assign the object the script is in to the
Objectcustom property.
| Custom Property | Description |
|---|---|
| Object | Object to transform |
| CurveX | Curve that will change the position on the X axis |
| CurveY | Curve that will change the position on the Y axis |
| CurveZ | Curve that will change the position on the Z axis |
| Multiplier | Multiply curve value by this number. Set 0 to disable transform. Set 1 to only use curve values |
| Additive | Whether to use the object current position as the starting point |
| LocalSpace | Whether object transform is in local space. Set to false if it should be in world space |
Curve Rotator
This script will continuously rotate an object to add the value of the three X, Y, and Z curves.
- Search "
Object Curve Rotator" in the Core Content window. - Drag-and-drop the script into the object of choice in the Hierarchy.
- In the Properties window, assign the object the script is in to the
Objectcustom property.
| Custom Property | Description |
|---|---|
| Object | Object to transform |
| CurveX | Curve that will change the rotation on the X axis |
| CurveY | Curve that will change the rotation on the Y axis |
| CurveZ | Curve that will change the rotation on the Z axis |
| Multiplier | Multiply curve value by this number. Set 0 to disable transform. Set 1 to only use curve values |
| Additive | Whether to use the object current position as the starting point |
| LocalSpace | Whether object transform is in local space. Set to false if it should be in world space |
Curve Scaler
This script will continuously move an object to add the value uniformly.
- Search "
Object Curve Scaler" in the Core Content window. - Drag-and-drop the script into the object of choice in the Hierarchy.
- In the Properties window, assign the object the script is in to the
Objectcustom property.
| Custom Property | Description |
|---|---|
| Object | Object to transform |
| Curve | Curve that will change the scale on all axes |
| Multiplier | Multiply curve value by this number. Set 0 to disable transform. Set 1 to only use curve values |
| Additive | Whether to use the object current position as the starting point |
| LocalSpace | Whether object transform is in local space. Set to false if it should be in world space |
Learn More
SimpleCurve API | SimpleCurve GetValue Example