Creating Inventories
Overview
In this tutorial, you will be learning how to create inventories in your game that allows players to store and transfer items between other inventories. You will gain knowledge on how to create inventories and data tables, and learn to use the Inventory API to create a system seen in other games that allow players to move items, and persistently save the player's inventory.
- Completion Time: ~2 hours
- Knowledge Level: It is recommended to have completed the Scripting Beginner and Scripting Intermediate tutorials.
- Skills you will learn:
- Creating inventories for players and world objects
- Creating item assets and item objects
- Using the Inventory API to move items
- Using Data Tables to keep track of inventory assets
- Saving and loading the player's inventory
- Creating an API
- Discarding Items
Import Asset from Community Content
You will be importing an asset from Community Content that will contain assets to help build up the project. These assets have been designed for ease of use so you can focus on the inventory API and objects.
- Open the Community Content window.
- Search for
Creating Inventories Tutorialby CoreAcademy. - Click Import.

Create Inventory Item Assets
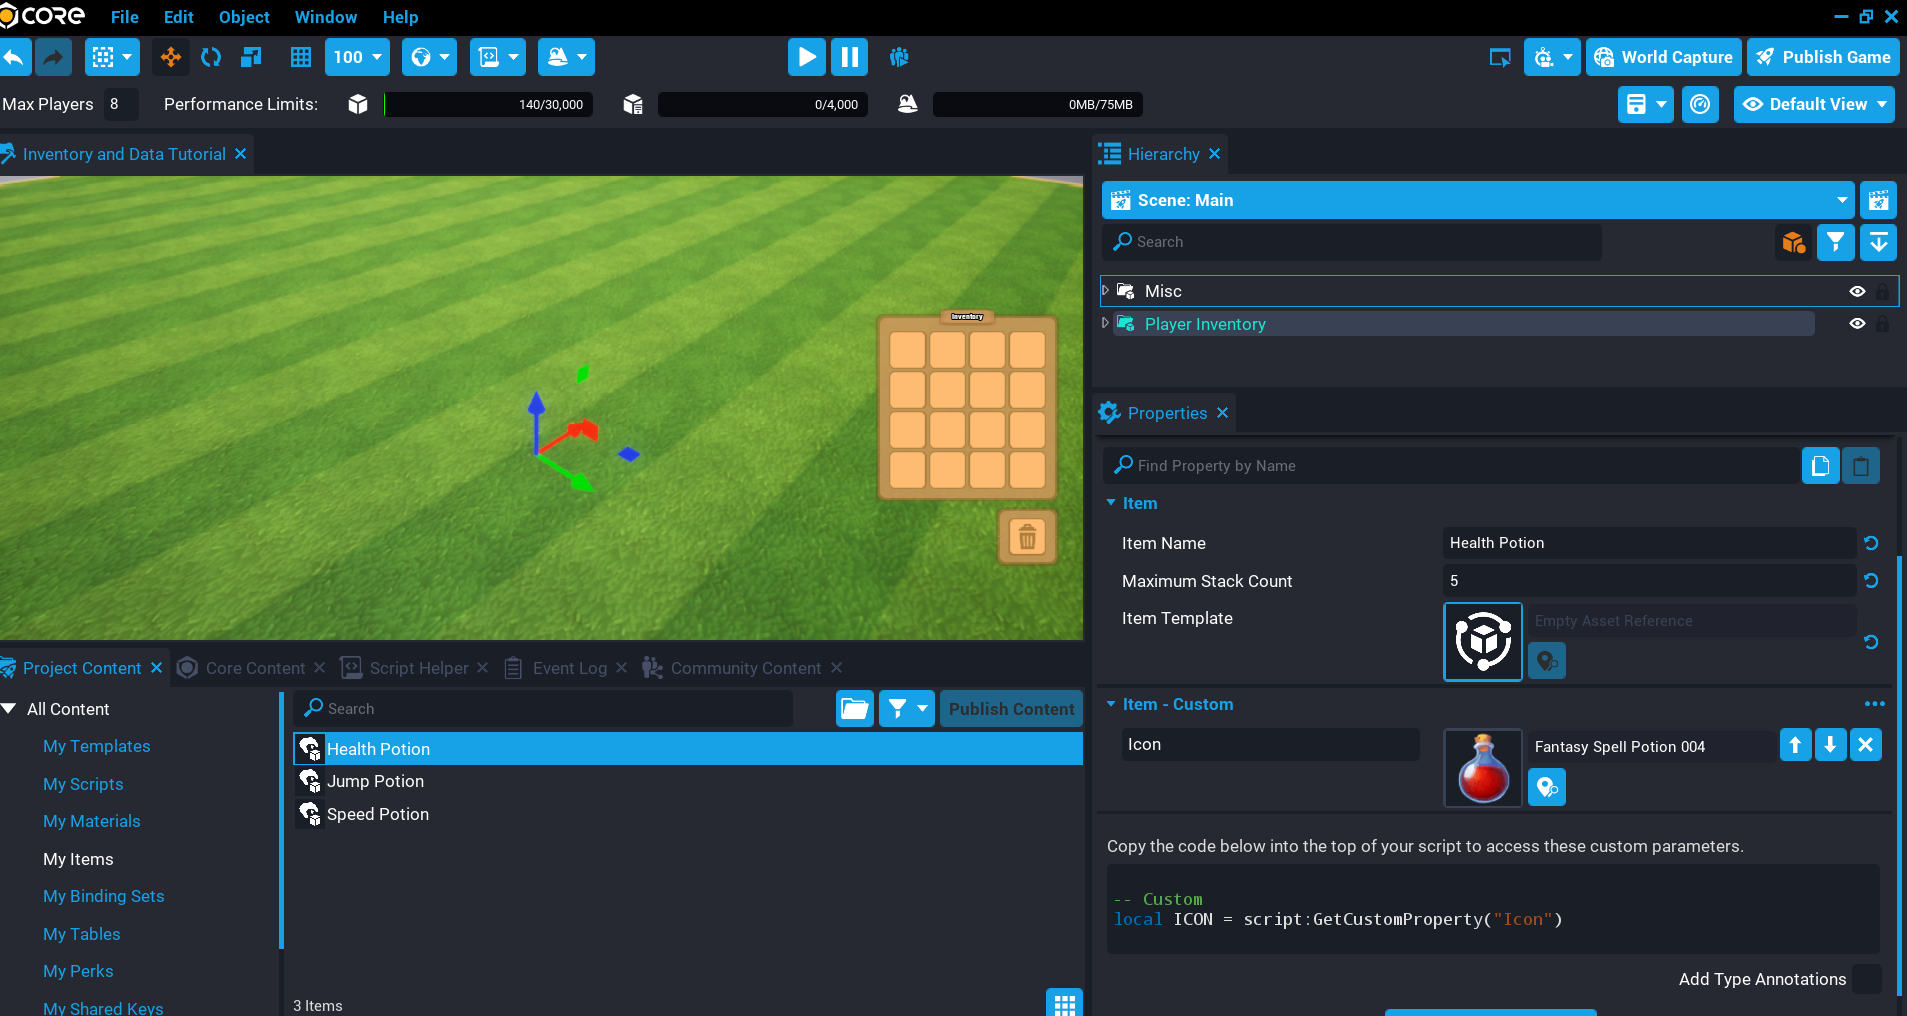
You will need to create a few item assets which are project-level definitions of items. With an item asset, you can create and manage them in the world or between inventories.
- In Project Content right-click and select Create Item Asset.
- Give the item asset a name (this example will use
Health Potion). - In the Properties window, set the Name of the item asset to
Health Potion. - Set the Maximum Stack Size to
5. - Add an Asset Reference called
Icon, and select an icon to use for this item. - Repeat this process so you have a few item assets that can be used.
Create Asset Data Table
You will be creating a Data Table that will have a row for each item asset you have created. This table will have 1 column for now, but in a later section, you will be modifying it.
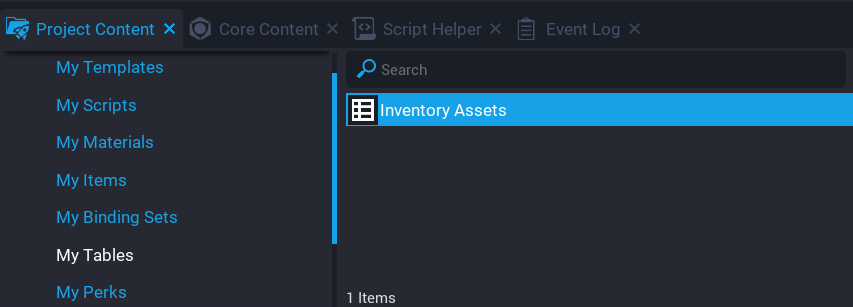
- In Project Content right-click and select Create Data Table.
- Name the data table
Inventory Assets. - Set the number of rows to how many item assets you have, and columns to 1.
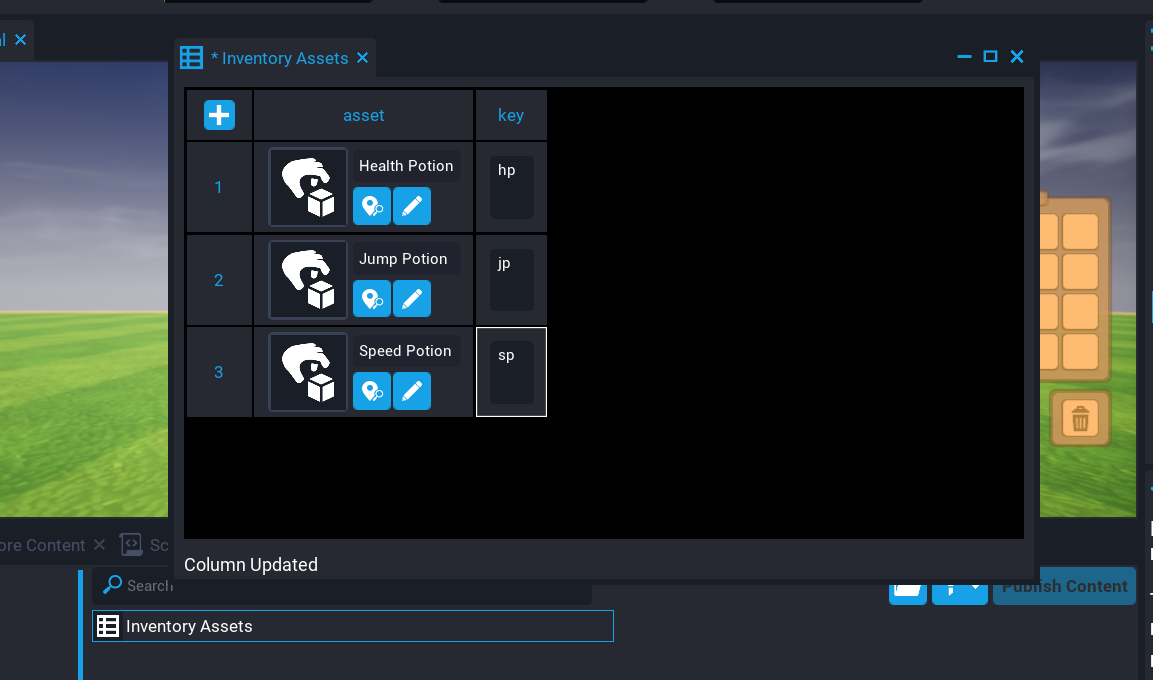
Edit Asset Data Table
The item assets you created will be added to the Inventory Assets data table.
Edit Column
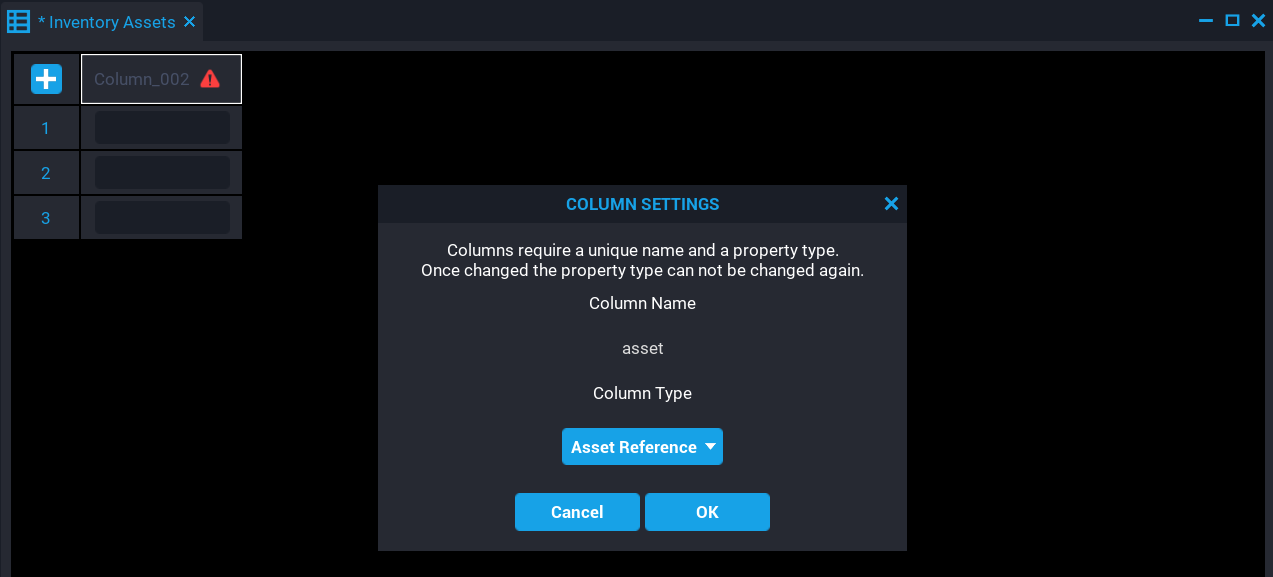
The data table created will only have one column for now, but will need to be edited so that it has a name and a type.
- From Project Content double click on the Inventory Assets data table to open it.
- Edit the single column by clicking on the warning icon.
- Set the Column Name to
asset. - Set the Column Type to Asset Reference.
Add Rows
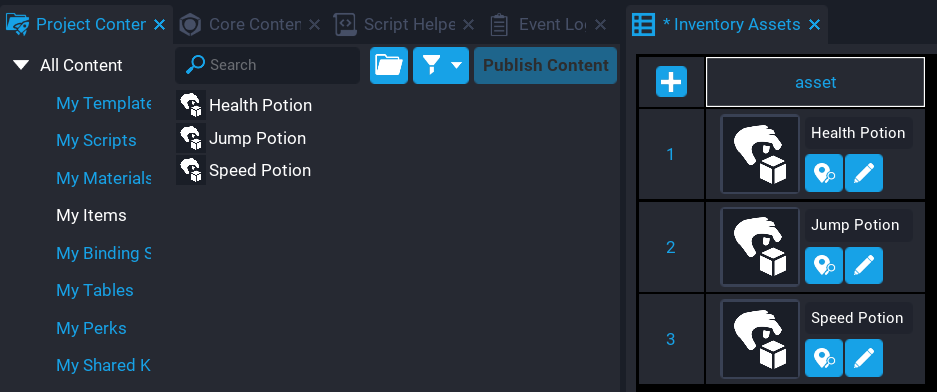
Now that the data table has been created and the column set, you can add all the item assets that were created earlier into the table.
- Open up the Inventory Assets data table by double-clicking on it from Project Content.
- In Project Content select My Items and add them to the data table.
Create Player Inventory
In this section, you will be creating the player inventory. You will be adding some templates to the Hierarchy and writing some Lua code to handle moving the items around.
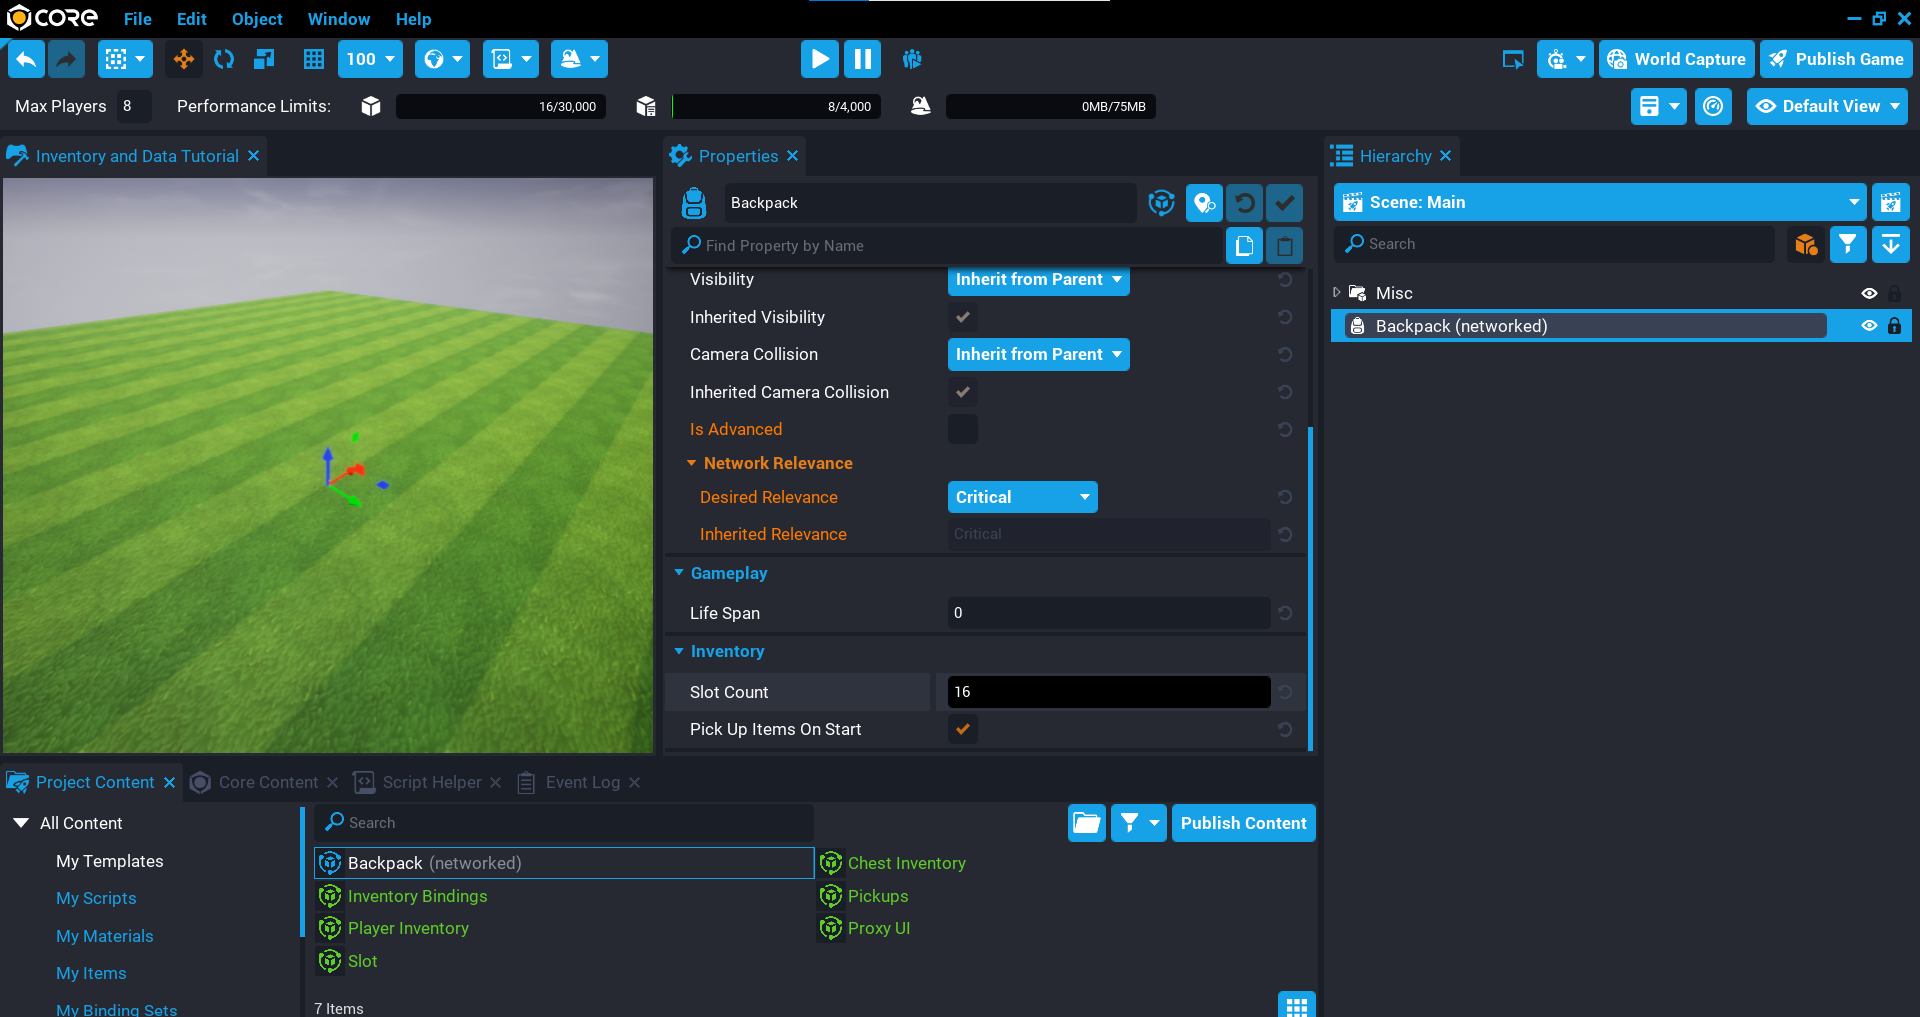
Create Inventory Backpack
Each player that joins the game will have a backpack with a size of 16 slots assigned to them. They will be allowed to view the items in their backpack and drag them around. Because the backpack needs to be created for each player when they join you will need to create a template.
- In Core Content search for
inventoryand add the Inventory object to the Hierarchy. - Rename the Inventory to
Backpack. - Set the Slot Count to
16in the Properties window. - Create a new template from the object in the Hierarchy.
- Delete the Backpack from the Hierarchy.
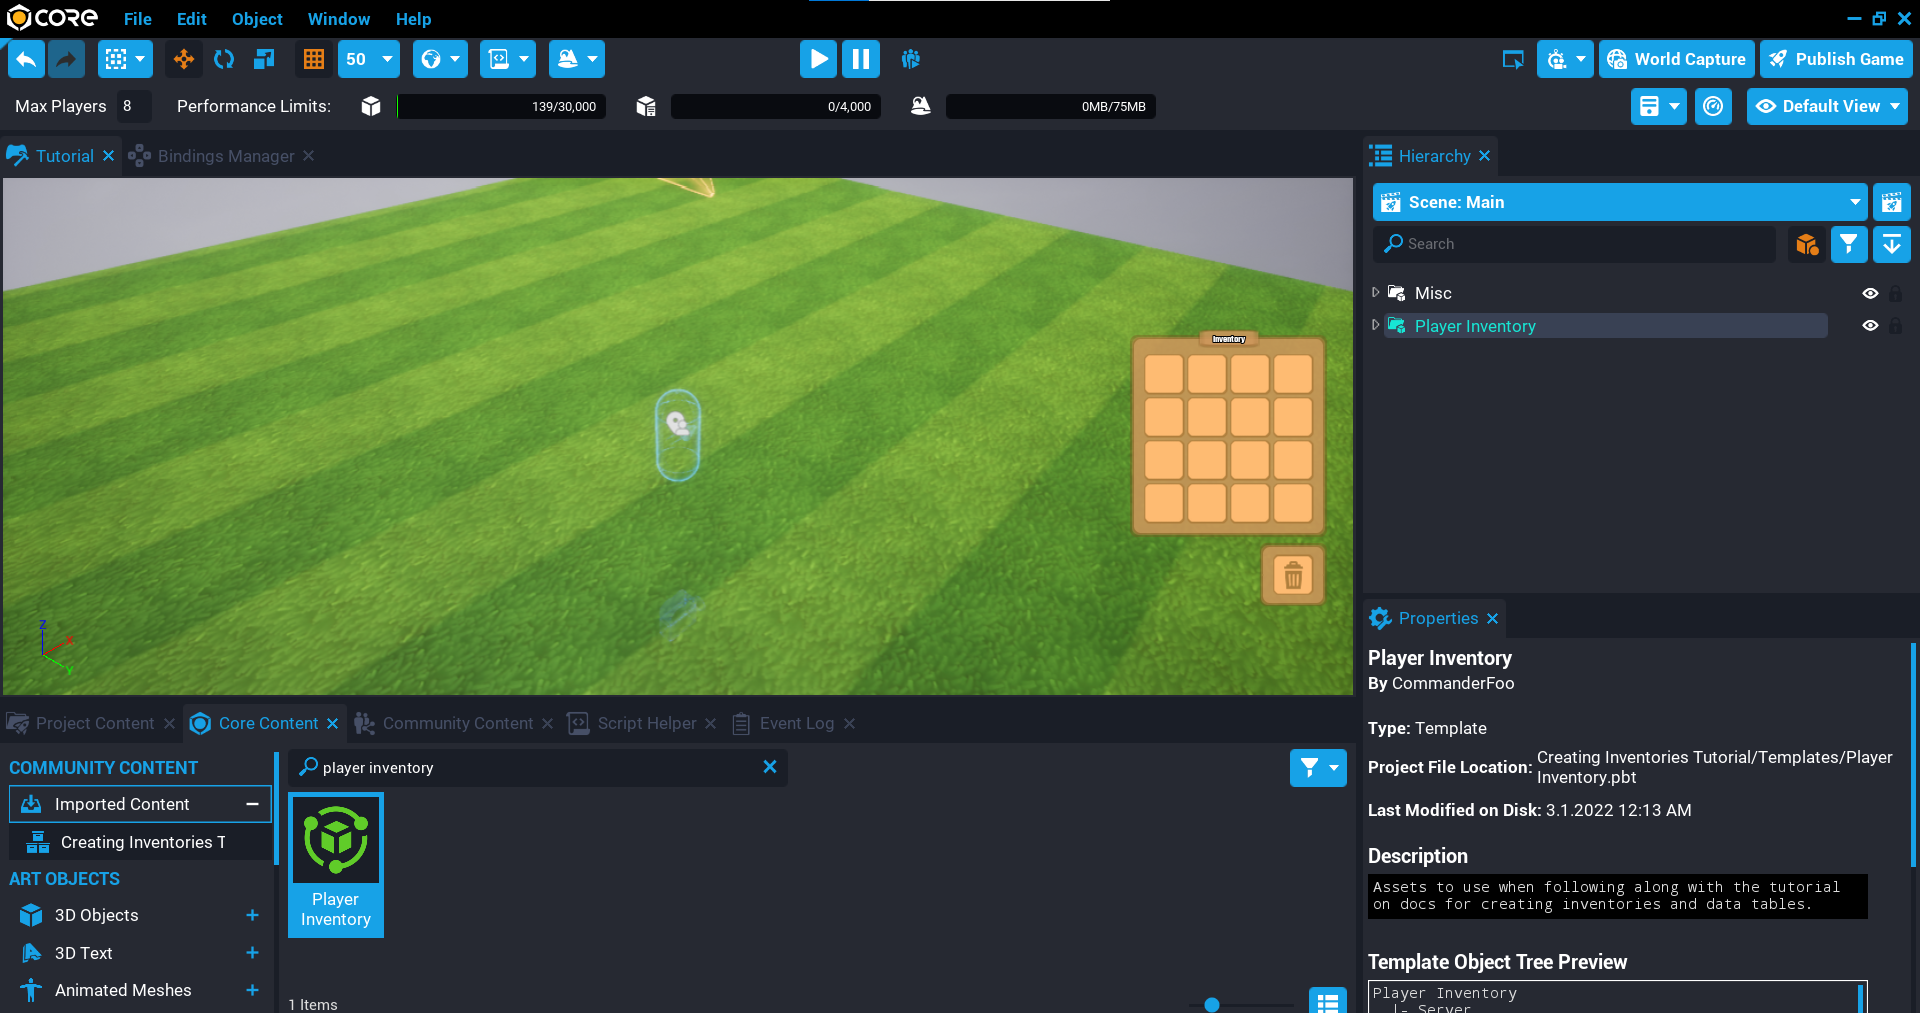
Add Player Inventory Template
The UI for the player inventory has been created already, this can be customized and more slots can be added if you like. If more slots are created, remember to update the slot count for the backpack.
- In Core Content search for
player inventoryto find the Player Inventory template, and add it to the Hierarchy. - Deinstance the template.
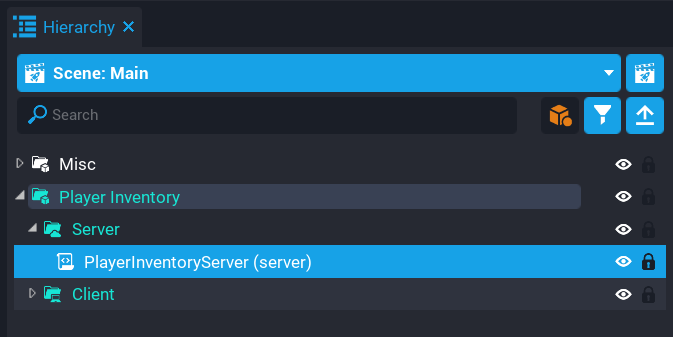
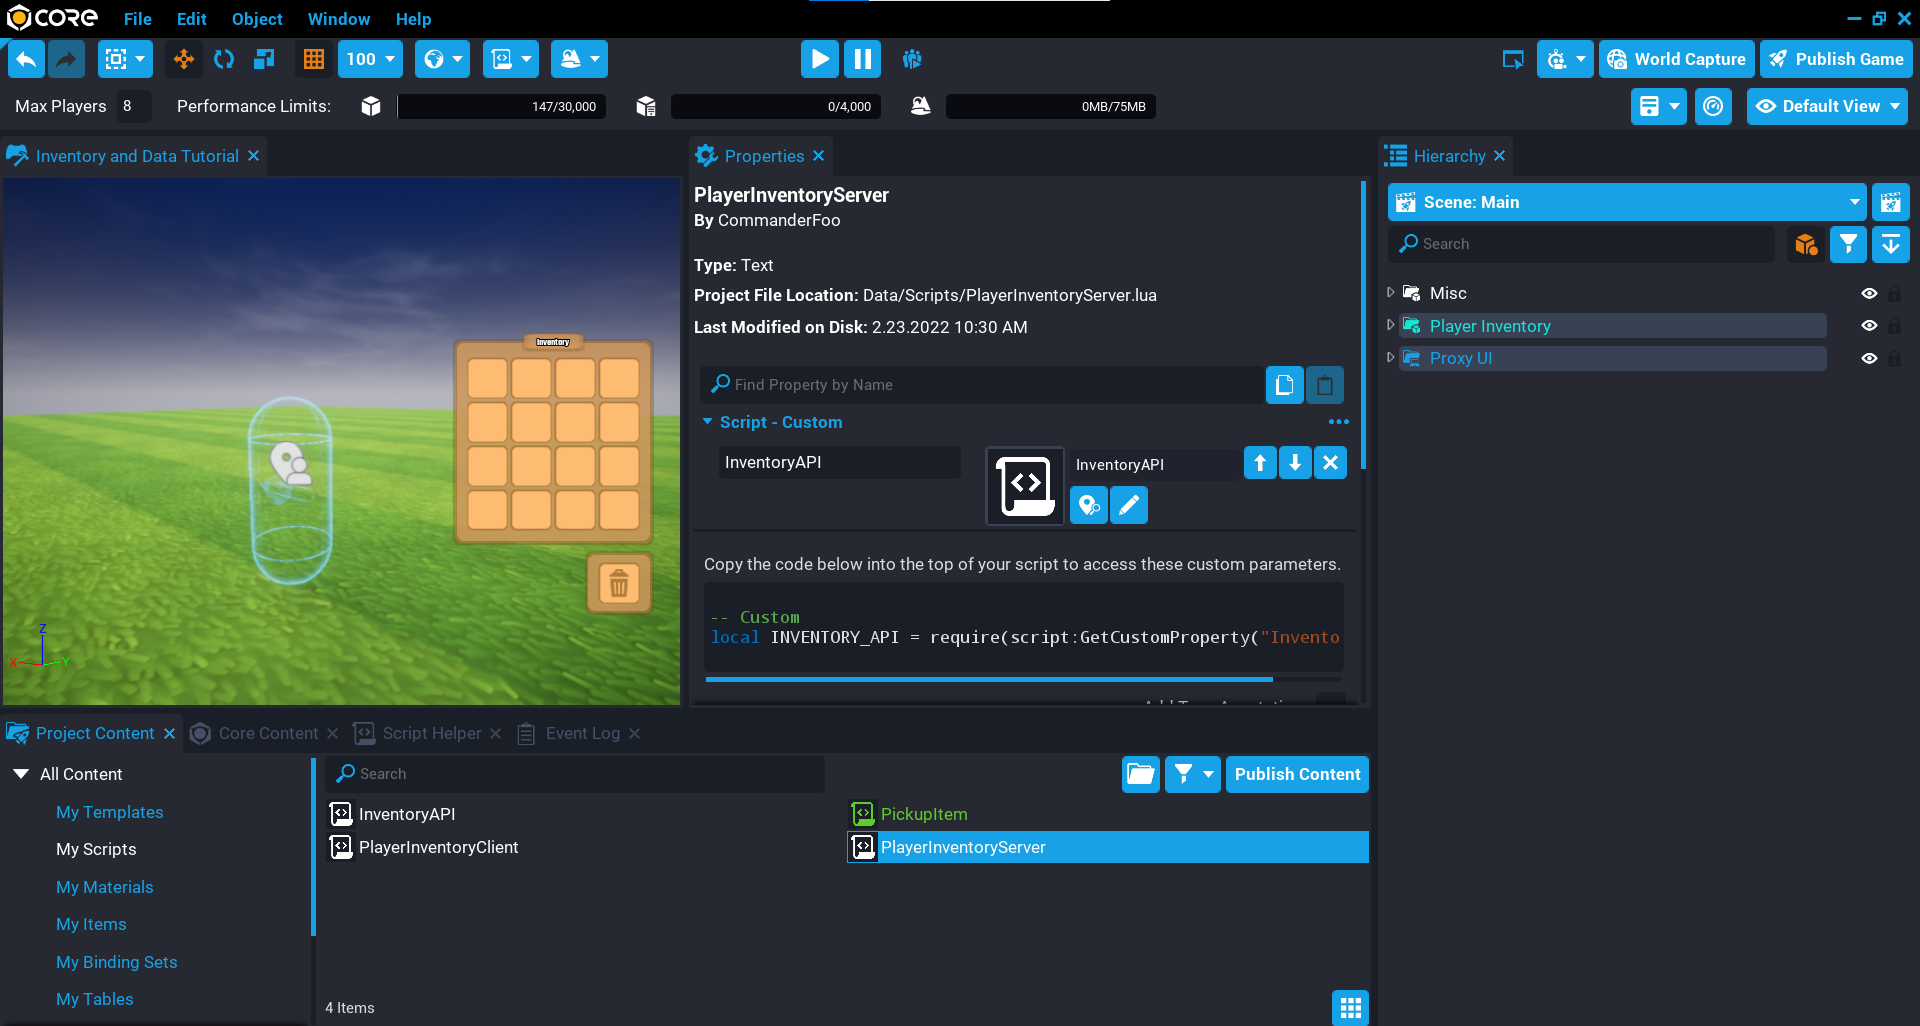
Create PlayerInventoryServer Script
Create a script called PlayerInventoryServer and place it inside the Server folder under the Player Inventory folder. This script will assign a backpack to the player that joined the game by spawning the asset into the world. At the same time, it will add some random items to the inventory.
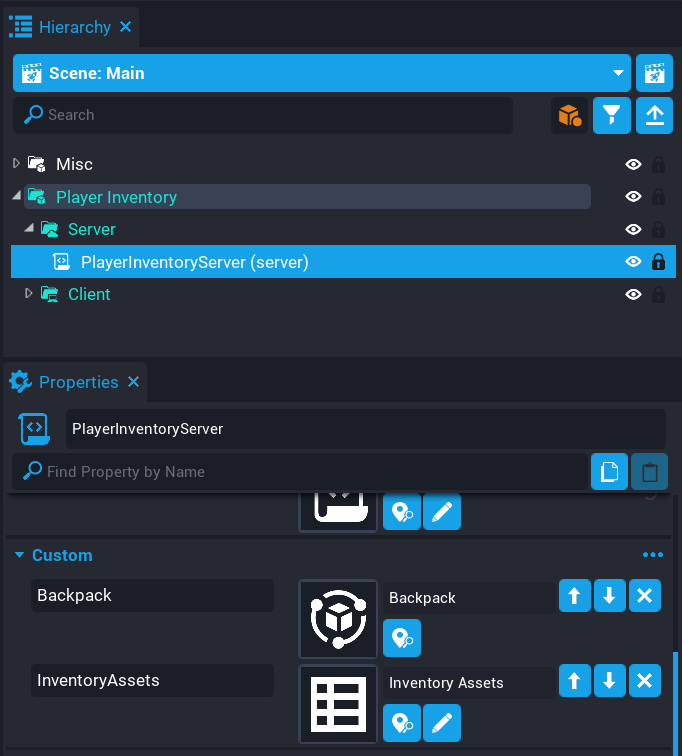
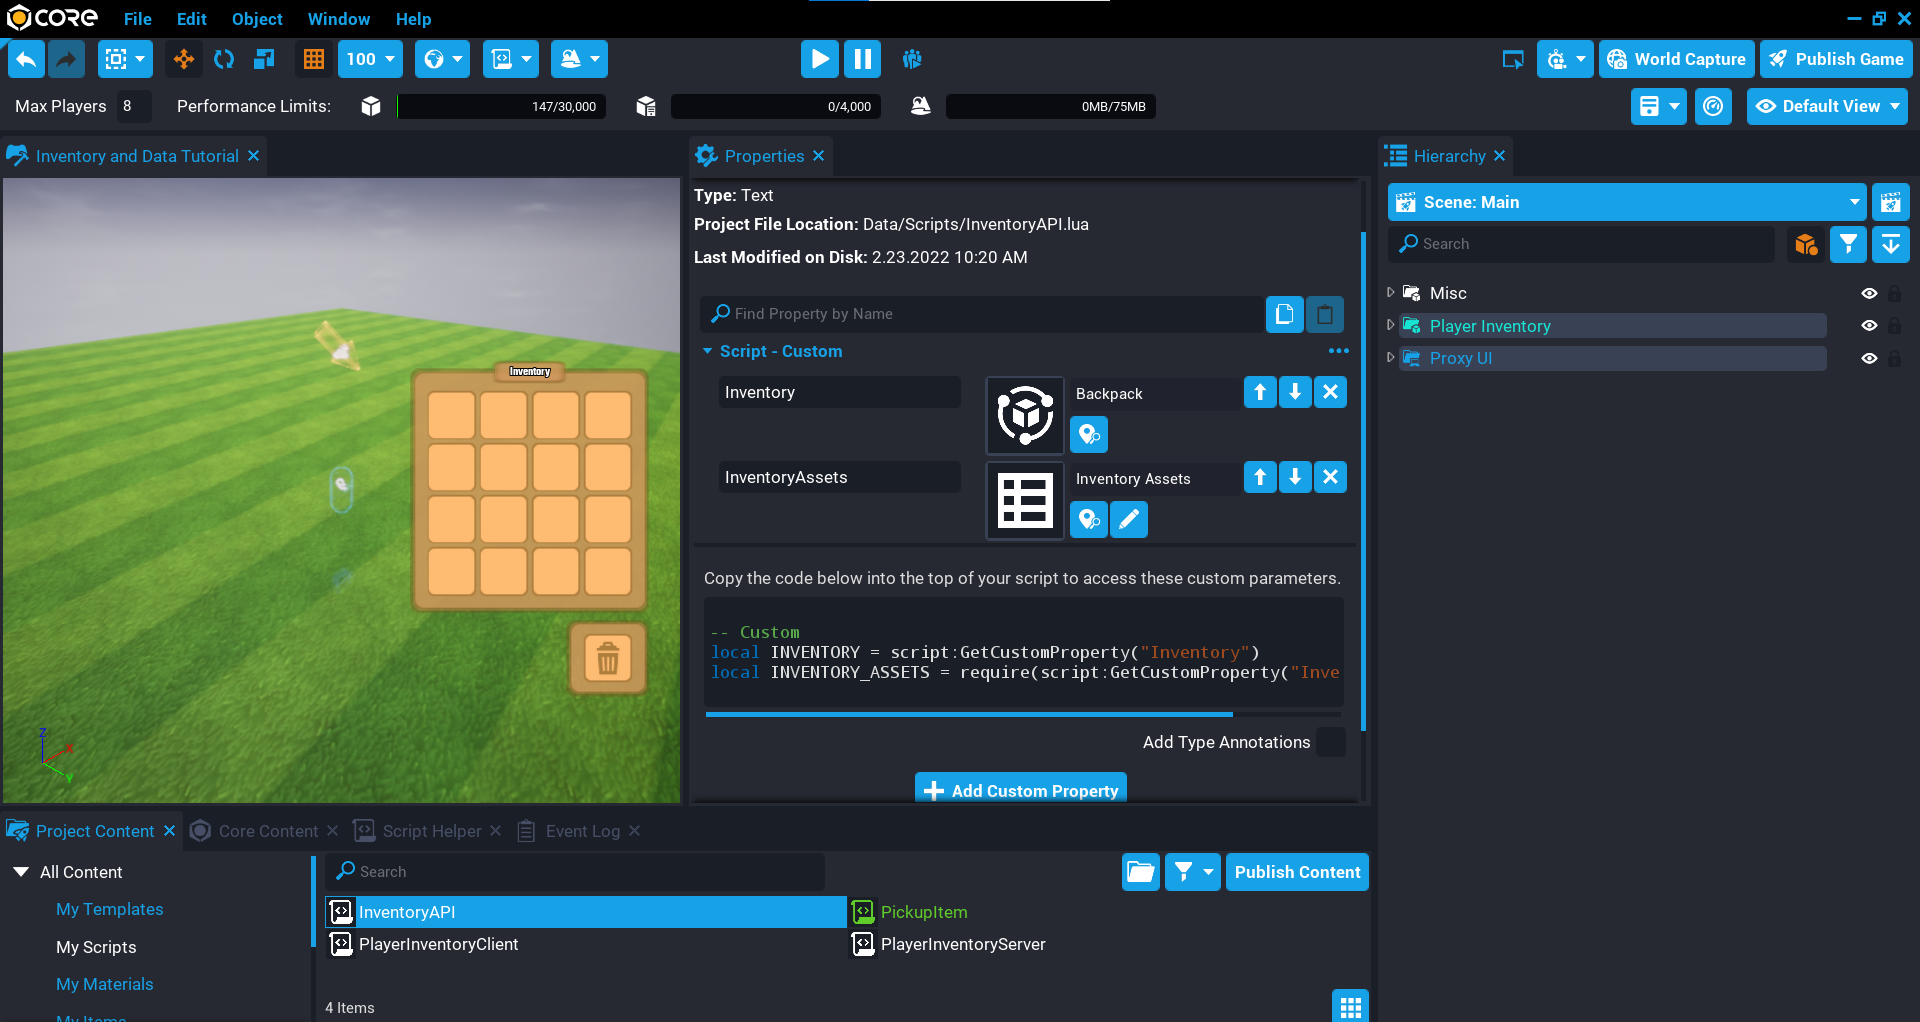
Add Custom Properties
The PlayerInventoryServer needs a reference to the Backpack template, and the Inventory Assets data table.
- Add the Backpack template as a custom property called
Backpack. - Add the Inventory Assets data table as a custom property called
InventoryAssets.
Edit PlayerInventoryServer Script
Open up the PlayerInventoryServer script and add the following code so you have references to the properties. The players table will keep track of each player's inventory so it can be removed when they leave the game.
local BACKPACK = script:GetCustomProperty("Backpack")
local INVENTORY_ASSETS = require(script:GetCustomProperty("InventoryAssets"))

local players = {}
Create AddRandomItems Function
Create a function called AddRandomItems. This function will be called when the player joins the game so random items are added to the inventory. It will loop over the total slotCount of the inventory, and pick a random slot for an item to be added.
When adding an item to an inventory, it is recommended to check that it can be added. The function CanAddItem will return true or false depending on if the item can be added to the inventory. The first argument of CanAddItem is the item asset that you would like to insert into the inventory. The optional second argument can be a table where you can specify the count and the slot to check.
If CanAddItem returns true, then you can use AddItem to add the item to the inventory.
local function AddRandomItems(inventory)
    for i = 1, inventory.slotCount do
        local slotIndex = math.random(inventory.slotCount)
        local asset = INVENTORY_ASSETS[math.random(#INVENTORY_ASSETS)].asset
        local amount = math.random(1, 10)

        if inventory:CanAddItem(asset, { count = amount, slot = slotIndex }) then
            inventory:AddItem(asset, { count = amount, slot = slotIndex })
        end
    end
end
Create OnPlayerJoined Function
Create a function called OnPlayerJoined that will be called when a player joins the game. This function will spawn a new instance of the BACKPACK inventory template. The options second argument of SpawnAsset allows you to specify the networkContext. This is needed in this case, because the script is in a server context.
When spawning an inventory, it can be assigned to a player using the Assign function. This will make the inventory be owned by the player. The name of the inventory is also set, but this is optional and is used to see the owner of the inventory in the Hierarchy when testing.
All inventories created for players are stored in the players table so they can be destroyed later when the player leaves the game.
Calling AddRandomItems and passing the inventory just created will spawn random items in this player's inventory.
local function OnPlayerJoined(player)
    local inventory = World.SpawnAsset(BACKPACK, { networkContext = NetworkContextType.NETWORKED })

    inventory:Assign(player)
    inventory.name = player.name

    players[player.id] = inventory

    AddRandomItems(inventory)
end
Create OnPlayerLeft Function
Create a function called OnPlayerLeft that will be called when the player leaves the game. When a player leaves the game, their inventory will be left behind, so it is a good idea to clean it up by destroying it.
local function OnPlayerLeft(player)
    players[player.id]:Destroy()
    players[player.id] = nil
end
Create MoveItemHandler Function
Create a function called MoveItemHandler that will fetch the player's inventory, and try to move it from one slot index to another slot index by using the MoveFromSlot function. It is recommended to always check if the action on an inventory can be done. In this case, a check is done using CanMoveFromSlot to make sure the item can be moved.
local function MoveItemHandler(player, fromSlotIndex, toSlotIndex)
    local inventory = players[player.id]

    if inventory ~= nil then
        if inventory:CanMoveFromSlot(fromSlotIndex, toSlotIndex) then
            inventory:MoveFromSlot(fromSlotIndex, toSlotIndex)
        end
    end
end
Connect Events
Connect up the events so the OnPlayerJoined function is called when the player joins the game, and the OnPlayerLeft function is called when the player leaves the game.
When the player moves an item in the UI, a broadcast to the server will be done and connected for the player which will call the MoveItemHandler function.
Game.playerJoinedEvent:Connect(OnPlayerJoined)
Game.playerLeftEvent:Connect(OnPlayerLeft)

Events.ConnectForPlayer("inventory.moveitem", MoveItemHandler)
The PlayerInventoryServer Script
PlayerInventoryServer
local BACKPACK = script:GetCustomProperty("Backpack")
local INVENTORY_ASSETS = require(script:GetCustomProperty("InventoryAssets"))

local players = {}

local function AddRandomItems(inventory)
    for i = 1, inventory.slotCount do
        local slotIndex = math.random(inventory.slotCount)
        local asset = INVENTORY_ASSETS[math.random(#INVENTORY_ASSETS)].asset
        local amount = math.random(1, 10)

        if inventory:CanAddItem(asset, { count = amount, slot = slotIndex }) then
            inventory:AddItem(asset, { count = amount, slot = slotIndex })
        end
    end
end

local function OnPlayerJoined(player)
    local inventory = World.SpawnAsset(BACKPACK, { networkContext = NetworkContextType.NETWORKED })

    inventory:Assign(player)
    inventory.name = player.name

    players[player.id] = inventory

    AddRandomItems(inventory)
end

local function OnPlayerLeft(player)
    players[player.id]:Destroy()
    players[player.id] = nil
end

local function MoveItemHandler(player, fromSlotIndex, toSlotIndex)
    local inventory = players[player.id]

    if inventory ~= nil then
        if inventory:CanMoveFromSlot(fromSlotIndex, toSlotIndex) then
            inventory:MoveFromSlot(fromSlotIndex, toSlotIndex)
        end
    end
end

Game.playerJoinedEvent:Connect(OnPlayerJoined)
Game.playerLeftEvent:Connect(OnPlayerLeft)

Events.ConnectForPlayer("inventory.moveitem", MoveItemHandler)
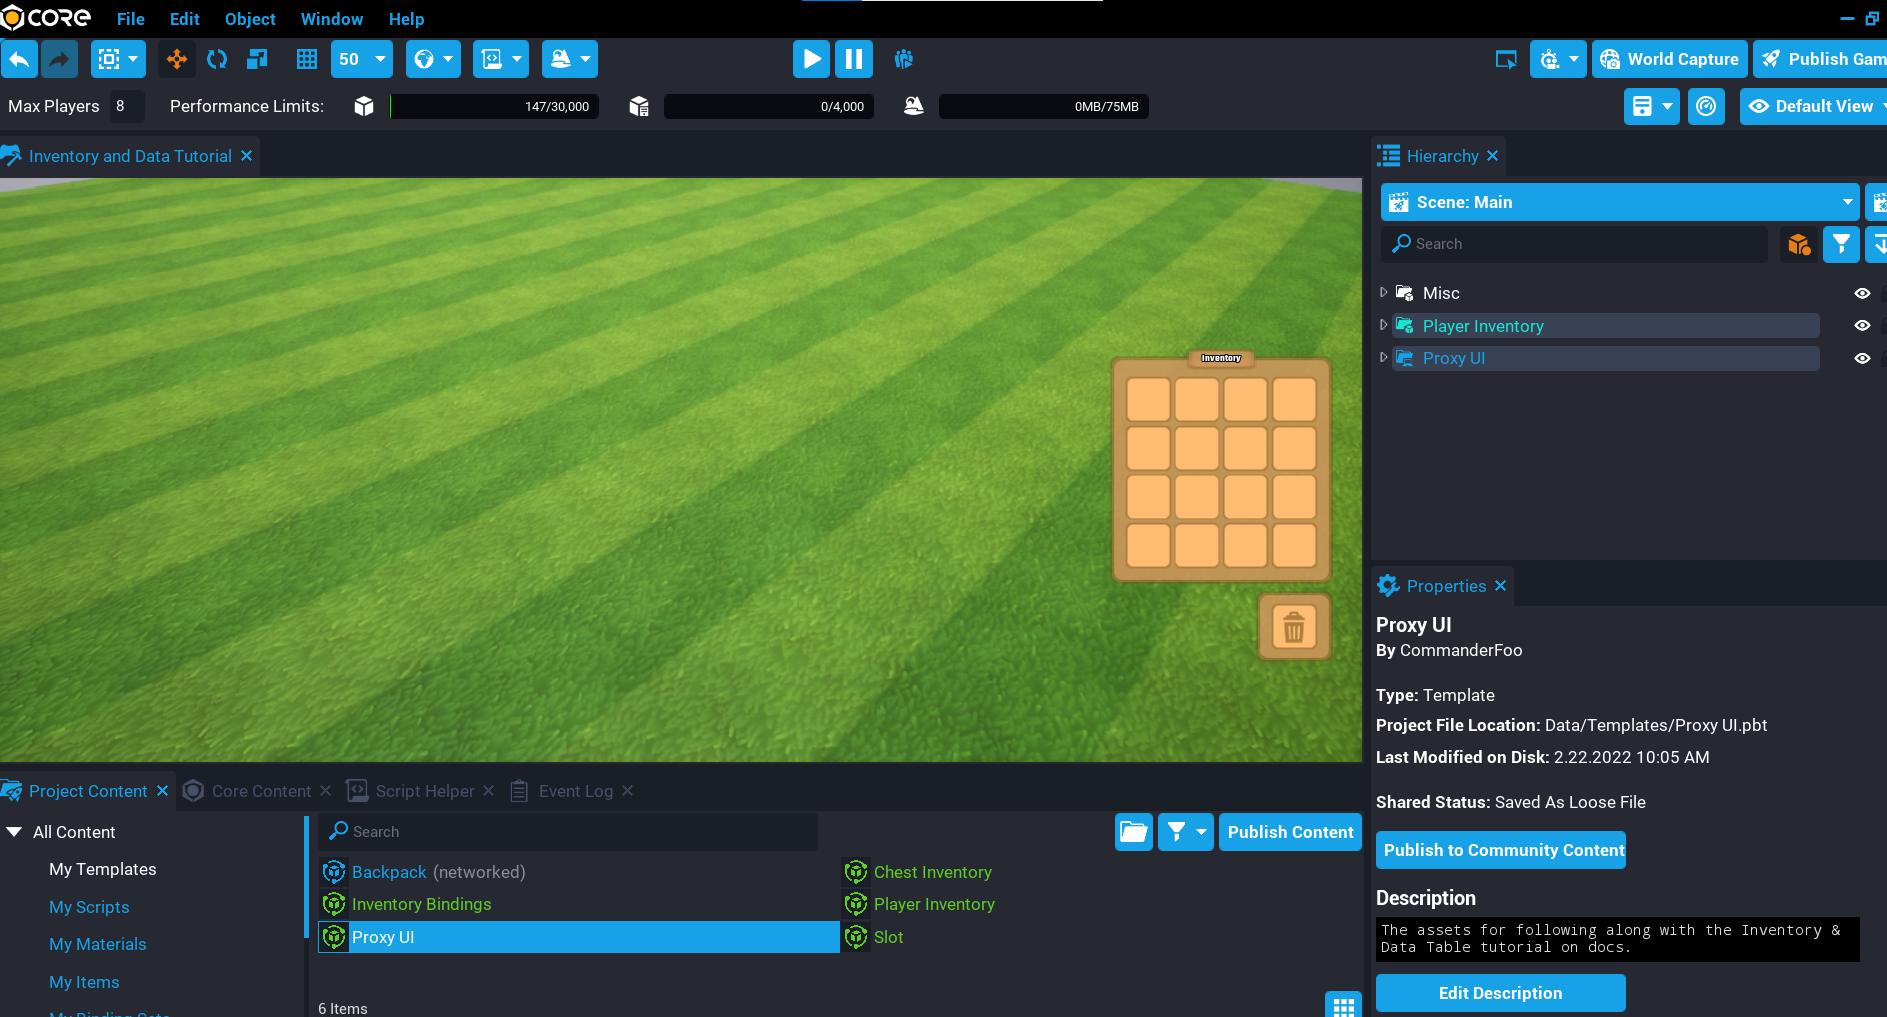
Add Drag Proxy Template
In Project Content find the Proxy UI template and add it to your Hierarchy. This will be used to represent the item from the inventory when it is moved around on the screen by the player.
The proxy UI should be the lowest item in the Hierarchy so icons appear in front of other UI. If there is UI lower down in the hierarchy, then any icon dragged around on the screen by the player will appear behind those UI objects that are lower.
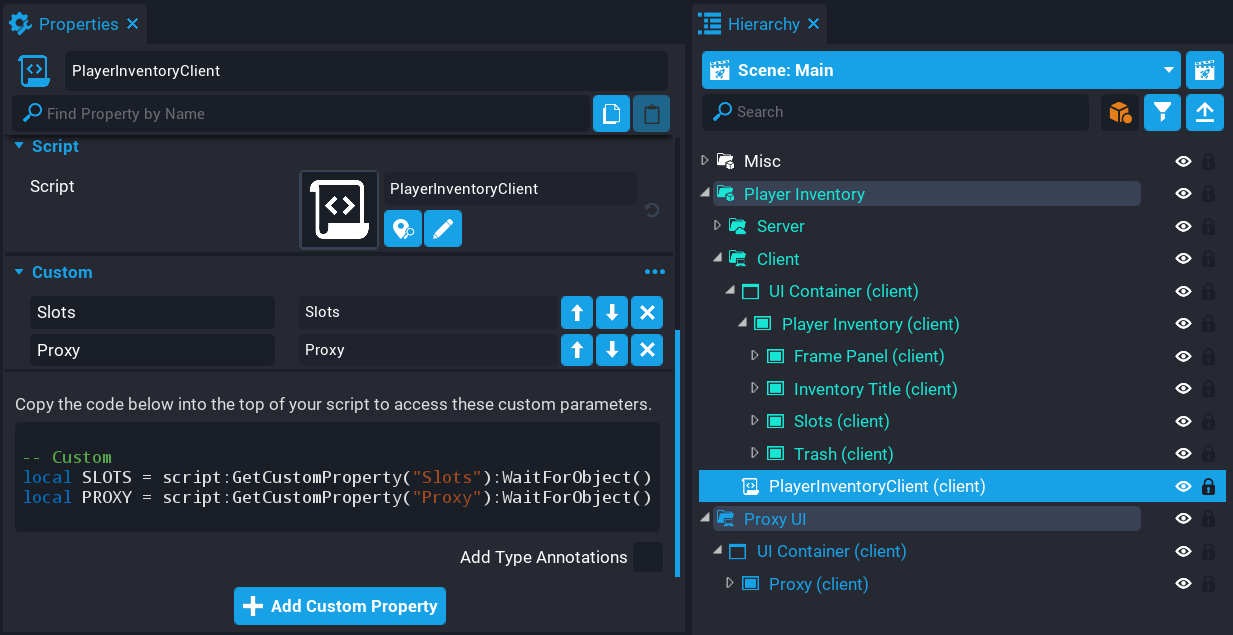
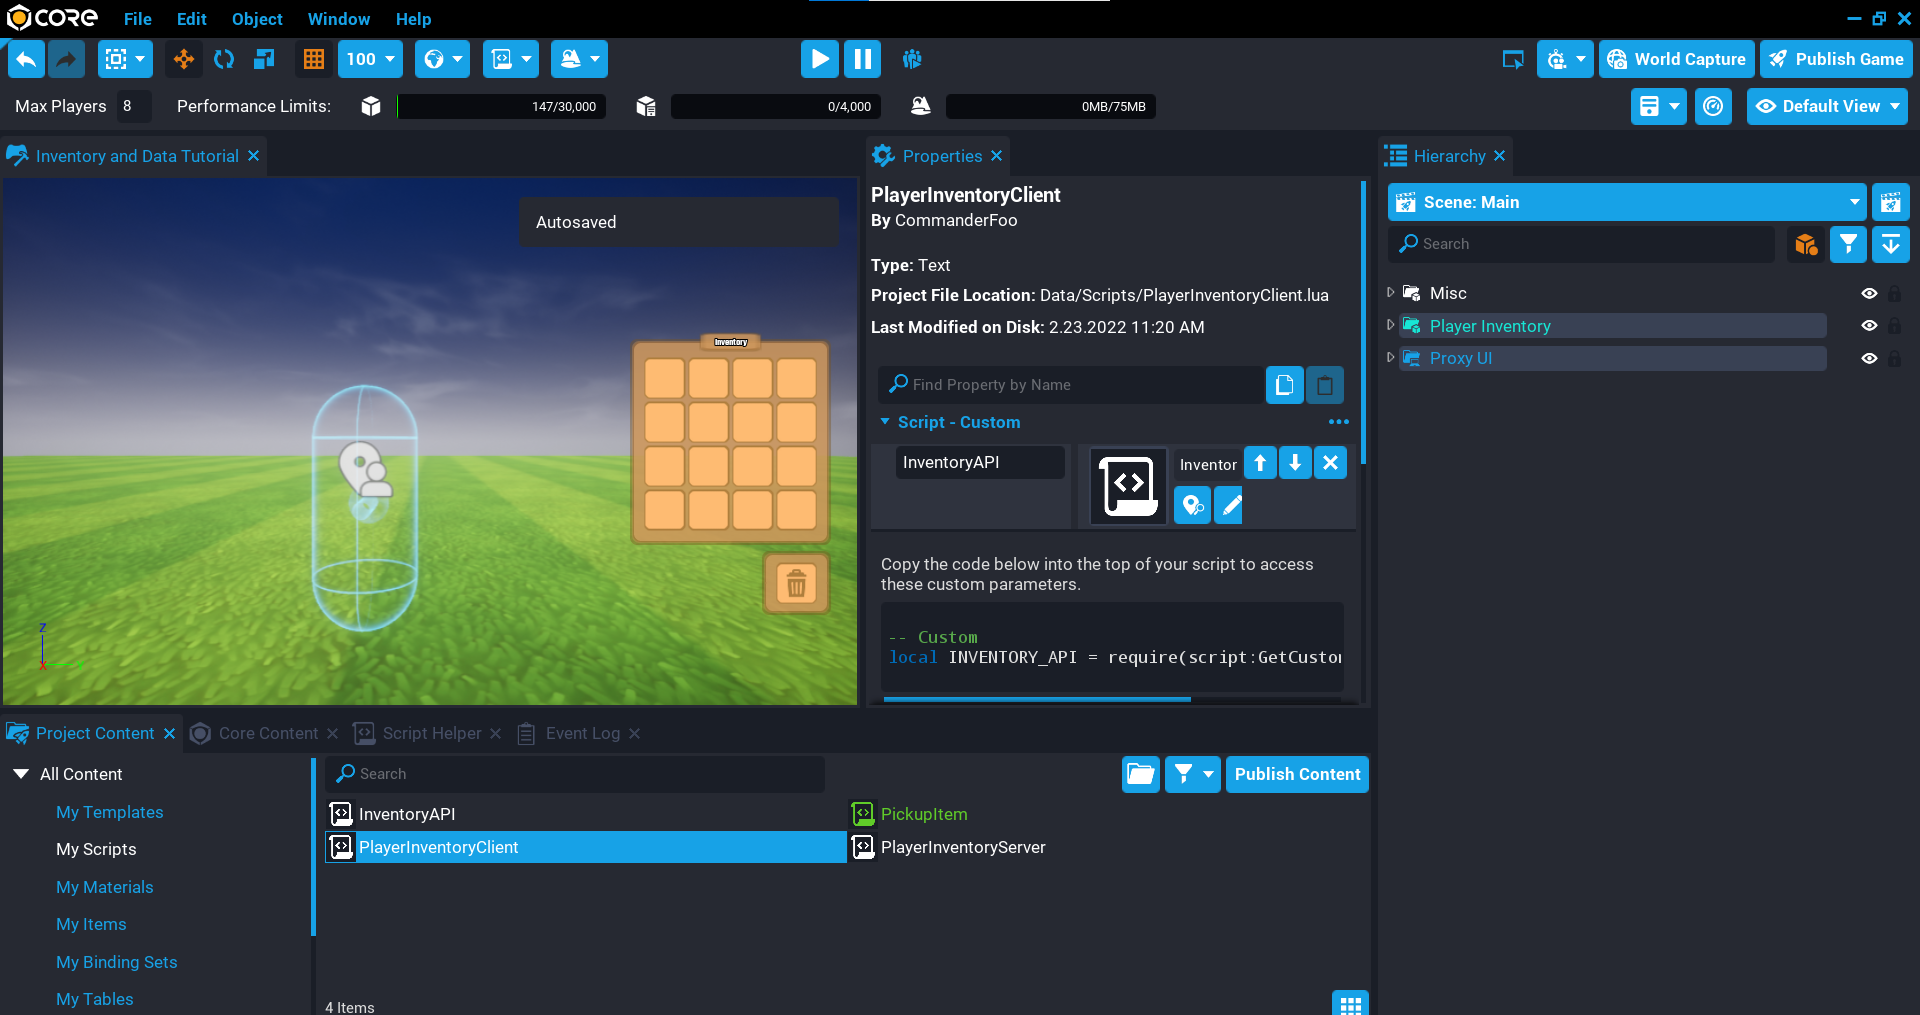
Create PlayerInventoryClient Script
Create a new script called PlayerInventoryClient and place it into the client folder in the Hierarchy. This script will be responsible for updating the UI so the items in the inventory are displayed to the player, and showing the item that is being dragged around on the screen.
Add Custom Properties
The script needs to know about the slots in the inventory and the proxy UI.
- Find the Slots UI panel inside the Player Inventory panel, and add it as a custom property called
Slots. - Add the Proxy UI panel inside the Proxy UI folder as a custom property called
Proxy.
Edit PlayerInventoryClient Script
Open up the PlayerInventoryClient script and add the variables for the properties.
local SLOTS = script:GetCustomProperty("Slots"):WaitForObject()
local PROXY = script:GetCustomProperty("Proxy"):WaitForObject()
Add Variables
Add the following variables to the script. Some of these variables are to help keep track of what slot is the active slot to handle various conditions with the swapping of items.
local PROXY_ICON = PROXY:FindChildByName("Icon") -- (1)
local PROXY_COUNT = PROXY_ICON:FindChildByName("Count") -- (2)

local localPlayer = Game.GetLocalPlayer()
local inventory = nil -- (3)
local hasItem = false -- (4)
local activeSlot = nil -- (5)
local activeSlotIcon = nil -- (6)
local activeSlotCount = nil -- (7)
local activeSlotIndex = nil -- (8)
- The child icon of the proxy will be updated when an icon is being moved around and placed.
- The count value of the item being moved around.
- The local player's inventory will be set later on.
- A boolean that will change based on if the player has an item they are moving around.
- The current active slot the player has clicked on.
- The current active icon of the active slot.
- The current active count of the active slot.
- The current active slot index of the active slot.
Set Cursor Visibility
Add the following code so that the player's cursor is visible when they play the game, and they can interact with the UI.
UI.SetCursorVisible(true)
UI.SetCanCursorInteractWithUI(true)
Create InventoryChanged Function
Create a function called InventoryChanged. This function will be called anytime the player's inventory slots change. This is handy as it allows you to react to those changes to update the UI for the player.
The function has 2 parameters:
invis the inventory that has been updated.slotis the slot index that has changed.
Using the GetItem function of the inventory, you can retrieve the item from a specific slot. This will allow you to find the item in the UI as the slot index will match the order in the hierarchy.
If the item doesn't exist, then the icon in the slot in the inventory can be set to invisible. Otherwise, the icon is updated by getting the custom property Icon that was added to the Item Asset created earlier.
local function InventoryChanged(inv, slot)
    local item = inv:GetItem(slot)
    local childIcon = SLOTS:GetChildren()[slot]:FindChildByName("Icon")
    local childCount = childIcon:FindChildByName("Count")

    if item ~= nil then
        local icon = item:GetCustomProperty("Icon")

        childIcon:SetImage(icon)
        childIcon.visibility = Visibility.FORCE_ON
        childCount.text = tostring(item.count) -- (1)
    else
        childIcon.visibility = Visibility.FORCE_OFF
        childCount.text = ""
    end
end
- Update the text of the slot with the item count in the inventory.
Create ClearDraggedItem Function
Create a function called ClearDraggedItem. This function will clear the variables at the top of the script by resetting them back to their original values. This function is called when the icon being dragged around has been placed into a slot without an existing item.
local function ClearDraggedItem()
    activeSlot = nil
    activeSlotIcon = nil
    activeSlotCount = nil
    activeSlotIndex = nil
    hasItem = false
end
Created OnSlotPressedEvent Function
Create a function called OnSlotPressedEvent. This function will handle the various conditions when the player moves around items.
There are 3 conditions to be checked:
- If the player has no existing item, then the slot they click on becomes the active slot, and the item is picked up.
- If the player clicks on an empty slot with an active item, then the empty slot is updated based on the active item.
- If the player clicks on an occupied slot with an active item, then it will either swap the items or add to the stack to increase the count.
For the last 2 conditions, a broadcast to the server will be done to update the player's inventory.
local function OnSlotPressedEvent(button, slot, slotIndex) -- (1)
    local icon = slot:FindChildByName("Icon")
    local isHidden = icon.visibility == Visibility.FORCE_OFF and true or false -- (2)
    local count = icon:FindChildByName("Count")

    -- Has item already.
    if hasItem then

        -- No icon, so this is an empty slot, and dropping it into it.
        if isHidden then
            icon.visibility = Visibility.FORCE_ON
            icon:SetImage(PROXY_ICON:GetImage())
            activeSlot.opacity = 1
            activeSlotIcon.visibility = Visibility.FORCE_OFF
            count.text = activeSlotCount.text
            activeSlotCount.text = "0"

        -- Slot contains existing item
        else
            local item = API.ACTIVE.inventory:GetItem(activeSlotIndex)
            local toItem = inventory:GetItem(slotIndex)

            if item ~= nil and toItem ~= nil and item.itemAssetId == toItem.itemAssetId and toItem.count == toItem.maximumStackCount then
                activeSlot.opacity = 1
            else
                local tmpImg = icon:GetImage()
                local tmpCount = count.text

                icon:SetImage(activeSlotIcon:GetImage())
                count.text = activeSlotCount.text
                activeSlotIcon:SetImage(tmpImg)
                activeSlotCount.text = tmpCount
                activeSlot.opacity = 1

                tmpCount = nil
                tmpImg = nil
            end
        end

        Events.BroadcastToServer("inventory.moveitem", activeSlotIndex, slotIndex) -- (3)
        ClearDraggedItem() -- (4)
        PROXY.visibility = Visibility.FORCE_OFF

    -- No item, pick up from clicked slot.
    elseif not isHidden then
        PROXY.visibility = Visibility.FORCE_ON
        hasItem = true -- (5)
        PROXY_ICON:SetImage(icon:GetImage())
        PROXY_COUNT.text = tostring(inventory:GetItem(slotIndex).count) -- (6)
        slot.opacity = .6
        activeSlot = slot
        activeSlotIcon = icon
        activeSlotCount = count
        activeSlotIndex = slotIndex
    end
end
- The parameters are:
buttonis the button clicked on by the player in the slot.slotis the panel that contains everything.slotIndexis the index of the child in the slots panel.
- Check to see if the slot being clicked on contains an icon that is visible or not. This can be used to determine if the slot has an active item in it already.
- Broadcast to the server to move the items between the
activeSlotIndexand the current clicked onslotIndex. - Clear the dragged item as it is no longer needed because the item has been placed into a slot.
- Set
hasItemto true so that the proxy icon is moved around on the screen by the player. - Update the count of the proxy text to the amount that is in the slot the player clicked on.
Create ConnectSlotEvents Function
Create a function called ConnectSlotEvents. This function will loop over all the slots in the UI and set up the pressedEvent that will listen for when the player clicks on a slot. When clicked on, the OnSlotPressedEvent will be called. The slot and index values are passed into the function to update the active slot and index variables.
local function ConnectSlotEvents()
    for index, slot in ipairs(SLOTS:GetChildren()) do
        local button = slot:FindChildByName("Button")
        local icon = slot:FindChildByName("Icon")

        if button ~= nil and icon ~= nil and button.isInteractable then
            button.pressedEvent:Connect(OnSlotPressedEvent, slot, index)
        end
    end
end
Wait for Player's Inventory
Because the player's inventory is created when they join the game, there is a chance that it may not have initialized for the player. Using the code below, you can check if inventory is nil, and if so, wait. The GetInventories function returns a list of all the inventories the player will have. Since we know the player will only have one inventory, then we can directly access the inventory at index 1.
If you decide to support multiple inventories for each player, then it would be recommended to name your inventories and loop over them to find the one you need to modify.
while inventory == nil do
    inventory = localPlayer:GetInventories()[1]
    Task.Wait()
end
Update Inventory UI
When the player joins the game, they may already have items in their inventory and the changedEvent may not have connected in time to receive the inventory data. By looping over all the items in the inventory using GetItems, you can do a manual update of the inventory by calling the function InventoryChanged.
for i, item in pairs(inventory:GetItems()) do
    InventoryChanged(inventory, i)
end
Create Tick Function
Create a function called Tick that will handle moving the proxy around on the screen if the player has an item. The SetAbsolutePosition sets the absolute screen position of the pivot for the proxy UI panel. This function reduces the complexity of needing to find the absolute position of a UI element.
function Tick()
    if hasItem then
        PROXY:SetAbsolutePosition(Input.GetCursorPosition())
    end
end
Connect Changed Event
Inventories have a changedEvent that is fired when the contents of a slot have changed. This is useful as it allows you to respond to these changes so the UI can be updated for the player.
inventory.changedEvent:Connect(InventoryChanged)
Call Connect Slots Function
Call the ConnectSlotEvents to connect up the events for the slots in the UI.
ConnectSlotEvents()
The PlayerInventoryClient Script
PlayerInventoryClient
local SLOTS = script:GetCustomProperty("Slots"):WaitForObject()
local PROXY = script:GetCustomProperty("Proxy"):WaitForObject()

local PROXY_ICON = PROXY:FindChildByName("Icon")
local PROXY_COUNT = PROXY_ICON:FindChildByName("Count")

local localPlayer = Game.GetLocalPlayer()
local inventory = nil
local hasItem = false
local activeSlot = nil
local activeSlotIcon = nil
local activeSlotCount = nil
local activeSlotIndex = nil

UI.SetCursorVisible(true)
UI.SetCanCursorInteractWithUI(true)

local function InventoryChanged(inv, slot)
    local item = inv:GetItem(slot)
    local childIcon = SLOTS:GetChildren()[slot]:FindChildByName("Icon")
    local childCount = childIcon:FindChildByName("Count")

    if item ~= nil then
        local icon = item:GetCustomProperty("Icon")

        childIcon:SetImage(icon)
        childIcon.visibility = Visibility.FORCE_ON
        childCount.text = tostring(item.count)
    else
        childIcon.visibility = Visibility.FORCE_OFF
        childCount.text = ""
    end
end

local function ClearDraggedItem()
    activeSlot = nil
    activeSlotIcon = nil
    activeSlotCount = nil
    activeSlotIndex = nil
    hasItem = false
end

local function OnSlotPressedEvent(button, slot, slotIndex)
    local icon = slot:FindChildByName("Icon")
    local isHidden = icon.visibility == Visibility.FORCE_OFF and true or false
    local count = icon:FindChildByName("Count")

    -- Has item already.
    if hasItem then

        -- No icon, so this is an empty slot, and dropping it into it.
        if isHidden then
            icon.visibility = Visibility.FORCE_ON
            icon:SetImage(PROXY_ICON:GetImage())
            activeSlot.opacity = 1
            activeSlotIcon.visibility = Visibility.FORCE_OFF
            count.text = activeSlotCount.text
            activeSlotCount.text = "0"

        -- Slot contains existing item
        else
            local item = inventory:GetItem(activeSlotIndex)
            local toItem = inventory:GetItem(slotIndex)

            if item ~= nil and toItem ~= nil and item.itemAssetId == toItem.itemAssetId and toItem.count == toItem.maximumStackCount then
                activeSlot.opacity = 1
            else
                local tmpImg = icon:GetImage()
                local tmpCount = count.text

                icon:SetImage(activeSlotIcon:GetImage())
                count.text = activeSlotCount.text
                activeSlotIcon:SetImage(tmpImg)
                activeSlotCount.text = tmpCount
                activeSlot.opacity = 1

                tmpCount = nil
                tmpImg = nil
            end
        end

        Events.BroadcastToServer("inventory.moveitem", activeSlotIndex, slotIndex)
        ClearDraggedItem()
        PROXY.visibility = Visibility.FORCE_OFF

    -- No item, pick up from clicked slot.
    elseif not isHidden then
        PROXY.visibility = Visibility.FORCE_ON
        hasItem = true
        PROXY_ICON:SetImage(icon:GetImage())
        PROXY_COUNT.text = tostring(inventory:GetItem(slotIndex).count)
        slot.opacity = .6
        activeSlot = slot
        activeSlotIcon = icon
        activeSlotCount = count
        activeSlotIndex = slotIndex
    end
end

local function ConnectSlotEvents()
    for index, slot in ipairs(SLOTS:GetChildren()) do
        local button = slot:FindChildByName("Button")
        local icon = slot:FindChildByName("Icon")

        if button ~= nil and icon ~= nil and button.isInteractable then
            button.pressedEvent:Connect(OnSlotPressedEvent, slot, index)
        end
    end
end

while inventory == nil do
    inventory = localPlayer:GetInventories()[1]
    Task.Wait()
end

for i, item in pairs(inventory:GetItems()) do
    InventoryChanged(inventory, i)
end

function Tick()
    if hasItem then
        PROXY:SetAbsolutePosition(Input.GetCursorPosition())
    end
end

inventory.changedEvent:Connect(InventoryChanged)

ConnectSlotEvents()
Test the Game
Test the game to make sure the following work:
- Player receives an inventory when joining the game.
- Random items are added to the player's inventory.
Saving and Loading Inventory
At the moment every time the player joins the game they are given random items in their inventory. In this section, you will be creating some functions that will save the player's inventory when they leave the game and load the player's inventory when they join the game.
Enable Player Storage
Player storage will need to be enabled so you can use the Storage API to save data for the player. This can be found in the properties window when clicking on the Game Settings object in the Hierarchy.
Edit Data Table
The data table for the inventory assets will have a new column added that will hold the unique key for each item that will be used when saving the data to storage. A key is used because it is smaller than using the item asset id, meaning you can store more things in player storage.
Open up the Inventory Assets data table by finding it in Project Content under My Tables. Double click on the table to open it up for editing.
- Add a new column called
key. - Set the column type to
string. - Go through each row and set the value of the key to a small string.
Edit PlayerInventoryServer Script
Open up the PlayerInventoryServer script. You will need to modify this script to add support for loading and saving.
Create FindLookupItemByKey Function
Create a function called FindLookupItemByKey. This is a helper function that will take in a key that will be compared against the key column in the data table. If a key matches, then the row from the data table is returned.
local function FindLookupItemByKey(key)
    for i, dataItem in pairs(INVENTORY_ASSETS) do
        if key == dataItem.key then
            return dataItem
        end
    end
end
Create FindLookupItemByAssetId Function
Create a function called FindLookupItemByAssetId. This is a helper function that will take in an item that will be compared against the asset column in the data table. If the itemAssetId matches the first part of the asset, then the row from the data table is returned.
local function FindLookupItemByAssetId(item)
    for i, dataItem in pairs(INVENTORY_ASSETS) do
        local id = CoreString.Split(dataItem.asset, ":") -- (1)

        if id == item.itemAssetId then
            return dataItem
        end
    end
end
- Split the asset string so you only get the asset id.
Create SavePlayerInventory Function
Create a function called SavePlayerInventory. This function will be called when the player leaves the game. It will create a table called inv and store all the items in the player's inventory in the table.
The loop in the function will iterate based on the total slots in the inventory. The reason slotCount is used, is that the order and slot position of each item will be retained.
Each slot item is added to the inv table that contains the key and count for that item.
Inventory Slot Count
The SavePlayerInventory function is looping over the slotCount of an inventory. For this tutorial it was set to 16, however, beware that if you leave the Slot Count property of an inventory at 0, then the loop will take some time to complete and will lock up the game while it is looping through all the slots.
local function SavePlayerInventory(player)
    local data = Storage.GetPlayerData(player)

    data.inv = {} -- (1)

    for i = 1, players[player.id].slotCount do -- (2)
        local item = players[player.id]:GetItem(i) -- (3)
        local entry = {}

        if item then
            local lookupItem = FindLookupItemByAssetId(item) -- (4)

            if lookupItem ~= nil then
                entry = { lookupItem.key, item.count } -- (5)
            end
        end

        table.insert(data.inv, entry)
    end

    Storage.SetPlayerData(player, data)
end
- Create an empty table for the inventory data.
- Loop over the total slots in this inventory, empty or not.
- Get the item that is in this slot.
- Fetch the item that matches the
assetItemIdfrom the data table. - Create a new entry table with the key and item count.
Create LoadPlayerInventory Function
Create a function called LoadPlayerInventory. This function will load the player's inventory items from player storage and add them to that player's inventory at specific slot indexes.
When adding items to an inventory, it is recommended to check the item can be added by using the CanAddItem function. This function takes in an item asset id and an optional table with the count and slot index set. If the function returns true, then calling AddItem on the inventory will add that specific item.
If the player has an empty inventory, then AddRandomItems is called while passing in the player's inventory. This is for testing to make sure there are items in the inventory to move around.
local function LoadPlayerInventory(player)
    local data = Storage.GetPlayerData(player)

    if data.inv ~= nil then
        for i, entry in ipairs(data.inv) do
            local item = FindLookupItemByKey(entry[1])

            if item ~= nil and players[player.id]:CanAddItem(item.asset, { count = entry[2], slot = i }) then
                players[player.id]:AddItem(item.asset, { count = entry[2], slot = i })
            end
        end
    else
        AddRandomItems(players[player.id])
    end
end
Edit OnPlayerJoined Function
Edit the OnPlayerJoined function so that a call to load the player's inventory is done.
local function OnPlayerJoined(player)
    local inventory = World.SpawnAsset(BACKPACK, { networkContext = NetworkContextType.NETWORKED })

    inventory:Assign(player)
    inventory.name = player.name

    players[player.id] = inventory
    LoadPlayerInventory(player)
end
Edit OnPlayerLeft Function
Edit the OnPlayerLeft function so that when the player leaves, the SavePlayerInventory function is called. This will then save all the items in the player's inventory to their storage.
local function OnPlayerLeft(player)
    SavePlayerInventory(player)
    players[player.id]:Destroy()
    players[player.id] = nil
end
The PlayerInventoryServer Script
PlayerInventoryServer
local BACKPACK = script:GetCustomProperty("Backpack")
local INVENTORY_ASSETS = require(script:GetCustomProperty("InventoryAssets"))

local players = {}

local function AddRandomItems(inventory)
    for i = 1, inventory.slotCount do
        local slotIndex = math.random(inventory.slotCount)
        local asset = INVENTORY_ASSETS[math.random(#INVENTORY_ASSETS)].asset
        local amount = math.random(1, 10)

        if inventory:CanAddItem(asset, { count = amount, slot = slotIndex }) then
            inventory:AddItem(asset, { count = amount, slot = slotIndex })
        end
    end
end

local function FindLookupItemByKey(key)
    for i, dataItem in pairs(INVENTORY_ASSETS) do
        if key == dataItem.key then
            return dataItem
        end
    end
end

local function FindLookupItemByAssetId(item)
    for i, dataItem in pairs(INVENTORY_ASSETS) do
        local id = CoreString.Split(dataItem.asset, ":")

        if id == item.itemAssetId then
            return dataItem
        end
    end
end

local function SavePlayerInventory(player)
    local data = Storage.GetPlayerData(player)

    data.inv = {}

    for i = 1, players[player.id].slotCount do
        local item = players[player.id]:GetItem(i)
        local entry = {}

        if item then
            local lookupItem = FindLookupItemByAssetId(item)

            if lookupItem ~= nil then
                entry = { lookupItem.key, item.count }
            end
        end

        table.insert(data.inv, entry)
    end

    Storage.SetPlayerData(player, data)
end

local function LoadPlayerInventory(player)
    local data = Storage.GetPlayerData(player)

    if data.inv ~= nil then
        for i, entry in ipairs(data.inv) do
            local item = FindLookupItemByKey(entry[1])

            if item ~= nil and players[player.id]:CanAddItem(item.asset, { count = entry[2], slot = i }) then
                players[player.id]:AddItem(item.asset, { count = entry[2], slot = i })
            end
        end
    else
        AddRandomItems(players[player.id])
    end
end

local function OnPlayerJoined(player)
    local inventory = World.SpawnAsset(BACKPACK, { networkContext = NetworkContextType.NETWORKED })

    inventory:Assign(player)
    inventory.name = player.name

    players[player.id] = inventory
    LoadPlayerInventory(player)
end

local function OnPlayerLeft(player)
    SavePlayerInventory(player)
    players[player.id]:Destroy()
    players[player.id] = nil
end

local function MoveItemHandler(player, fromSlotIndex, toSlotIndex)
    local inventory = players[player.id]

    if inventory ~= nil then
        if inventory:CanMoveFromSlot(fromSlotIndex, toSlotIndex) then
            inventory:MoveFromSlot(fromSlotIndex, toSlotIndex)
        end
    end
end

Game.playerJoinedEvent:Connect(OnPlayerJoined)
Game.playerLeftEvent:Connect(OnPlayerLeft)

Events.ConnectForPlayer("inventory.moveitem", MoveItemHandler)
Test the Game
Test the game and make sure the following work:
- Items are saved and loaded when joining and leaving the game.
- The position of items in the inventory is remembered when loading.
Summary
At this point in the tutorial, you have learned to create an inventory, assign it to the player, save the player's items, and allow the player to move items around. This is a good stopping point to get a basic inventory implemented in your game.
Creating an API
At the moment the code is not organized in a way that makes it easy to reuse. If you were to add an in-world inventory that players can open to take loot out of, then this would require duplicating a lot of the existing code each time.
An API (Application Programming Interface) will contain the bulk of the code that would usually be duplicated across files. This allows you to have a set of functions that are shared between your scripts.
You will create the API first, and then you will need to modify existing scripts to use the API.
Create a new script called InventoryAPI. This script will not be added to the Hierarchy, it will be required into a script using the require function.
Add Custom Properties
The API will need references to the inventory template, and the inventory asset data table.
- In Project Content select the InventoryAPI and then drag the Backpack template onto the script as a custom property. Name the custom property
Inventory. - Add the Inventory Assets data table as a custom property, and name the custom property
InventoryAssets.
Edit InventoryAPI Script
Open up the InventoryAPI script and create the references to the properties that will be used in the API.
local ASSETS = require(script:GetCustomProperty("InventoryAssets"))
local INVENTORY = script:GetCustomProperty("Inventory")
Create Variables and Properties
Create the following variables. The API variable is a table that will hold all the properties and functions for this API that will be accessible to other scripts when the API is required.
The API will keep track of player-created inventories in the PLAYERS table, this is because player inventories need to be destroyed when they leave the game.
The INVENTORIES variable is a table that will hold a reference to all inventories that are registered with the API. These are tracked so players can move items between different inventories. For example, move an item from their inventory to a chest in the world.
The ACTIVE variable is a table that contains various properties to keep track of certain objects when the player clicks a slot.
local API = {}

API.PLAYERS = {}
API.INVENTORIES = {}
API.ACTIVE = {

    slot = nil, -- (1)
    slotIcon = nil, -- (2)
    slotCount = nil, -- (3)
    slotIndex = nil, -- (4)
    inventory = nil, -- (5)
    hasItem = false -- (6)

}
- The slot the player has clicked on in the inventory UI.
- The slot icon object of the slot clicked.
- The slot count object of the slot clicked.
- The slot index of the slot in the UI.
- The inventory that the slot belongs to.
- Updates based on if the player is moving an item around or not.
Server Functions
You will first create all the functions that will be used on the server. This is a good way to organize the code of the API.
Prefix all functions with API so they are added to the API table.
Create RegisterInventory Function
Create a function called RegisterInventory. This function will be used to add an inventory to the INVENTORIES table for quick access later on.
function API.RegisterInventory(inventory)
    API.INVENTORIES[inventory.id] = inventory
end
Create CreatePlayerInventory Function
Create a function called CreatePlayerInventory. This function is used to create a player's inventory. It will spawn the INVENTORY template into the world, assign it to the player.
Each inventory that is created for a player is added to the PLAYERS table to keep track of it for later use. The inventory is also registered to the INVENTORY table by calling RegisterInventory and passing the inventory to be registered.
function API.CreatePlayerInventory(player)
    local inventory = World.SpawnAsset(INVENTORY, { networkContext = NetworkContextType.NETWORKED })

    inventory:Assign(player)
    inventory.name = player.name

    API.PLAYERS[player.id] = inventory
    API.RegisterInventory(inventory)
end
Create LoadPlayerInventory Function
Create a function called LoadPlayerInventory. This function is very similar to what you created in the PlayerInventoryServer script, the difference is the table PLAYERS is used instead.
The player's inventory can be accessed by passing the player's id as the key to the PLAYERS table.
function API.LoadPlayerInventory(player)
    local data = Storage.GetPlayerData(player)

    if data.inv ~= nil then
        for i, entry in ipairs(data.inv) do
            local item = API.FindLookupItemByKey(entry[1])

            if item ~= nil and API.PLAYERS[player.id]:CanAddItem(item.asset, { count = entry[2], slot = i }) then
                API.PLAYERS[player.id]:AddItem(item.asset, { count = entry[2], slot = i })
            end
        end
    end
end
Create SavePlayerInventory Function
Create a function called SavePlayerInventory. This function is very similar to the SavePlayerInventory function in the PlayerInventoryServer script. The difference is that the inventory variable has been replaced with the PLAYERS table.
The player's inventory can be accessed by passing the player's id as the key to the PLAYERS table.
function API.SavePlayerInventory(player)
    local data = Storage.GetPlayerData(player)

    data.inv = {}

    for i = 1, API.PLAYERS[player.id].slotCount do
        local item = API.PLAYERS[player.id]:GetItem(i)
        local entry = {}

        if item then
            local lookupItem = API.FindLookupItemByAssetId(item)

            if lookupItem ~= nil then
                entry = { lookupItem.key, item.count }
            end
        end

        table.insert(data.inv, entry)
    end

    Storage.SetPlayerData(player, data)
end
Create RemovePlayerInventory Function
Create a function called RemovePlayerInventory. This function will remove the entry from the INVENTORIES table, and also destroy the player's inventory from the PLAYERS table. You could ignore destroying a player's inventory and have it drop in the world as an object that other players could scavenge from.
function API.RemovePlayerInventory(player)
    API.INVENTORIES[API.PLAYERS[player.id].id] = nil
    API.PLAYERS[player.id]:Destroy()
    API.PLAYERS[player.id] = nil
end
Create MoveItemHandler Function
Create a function called MoveItemHandler. This function will need to do more checks compared to the function created in the PlayerInventoryServer script. It needs to support moving items between different inventories.
The parameters of the function will receive the inventory the item is being moved from, and where it is being moved to. The fromSlotIndex and toSlotIndex will allow you to remove or swap the item from one inventory to another inventory.
Each inventory can be pulled from the INVENTORIES table which will allow for each transfer between different inventories (including player to player).
When doing any inventory action, always check if the action can be done. A lot of the inventory API functions will have a Can version of it, which is used to check if something can be done.
The function below contains annotations that explain important parts of it. It tries to cover most edge cases to handle swapping, count stacking, cross inventory swapping, and more.
function API.MoveItemHandler(fromInventoryId, toInventoryId, fromSlotIndex, toSlotIndex)
    local fromInventory = API.INVENTORIES[fromInventoryId]
    local toInventory = API.INVENTORIES[toInventoryId]

    if fromInventory ~= nil and toInventory ~= nil then -- (1)
        if fromInventory == toInventory then -- (2)
            if fromInventory:CanMoveFromSlot(fromSlotIndex, toSlotIndex) then -- (3)
                fromInventory:MoveFromSlot(fromSlotIndex, toSlotIndex) -- (4)
            end
        else
            local fromItem = fromInventory:GetItem(fromSlotIndex) -- (5)
            local toItem = toInventory:GetItem(toSlotIndex) -- (6)

            local fromItemAssetId = fromItem.itemAssetId
            local fromItemCount = fromItem.count

            if toItem ~= nil then
                local toItemAssetId = toItem.itemAssetId
                local toItemCount = toItem.count
                local skipFromItem = false

                if toItemAssetId == fromItemAssetId then -- (7)
                    local total = toItemCount + fromItemCount

                    if total > toItem.maximumStackCount then
                        if toItemCount == toItem.maximumStackCount then
                            toItemCount = toItem.maximumStackCount
                            fromItemCount = total - toItem.maximumStackCount
                        else
                            toItemCount = total - toItem.maximumStackCount
                            fromItemCount = toItem.maximumStackCount
                        end
                    else
                        skipFromItem = true
                        fromItemCount = total
                    end
                end

                fromInventory:RemoveFromSlot(fromSlotIndex) -- (8)
                toInventory:RemoveFromSlot(toSlotIndex) -- (9)

                if not skipFromItem then -- (10)
                    fromInventory:AddItem(toItemAssetId, { count = toItemCount, slot = fromSlotIndex })
                end
            else
                fromInventory:RemoveFromSlot(fromSlotIndex)
            end

            toInventory:AddItem(fromItemAssetId, { count = fromItemCount, slot = toSlotIndex }) -- (11)
        end
    end
end
- Check if both inventories exist. These variables can be the same inventory if it is an item being moved to a different slot in the same inventory.
- Check if they are both the same.
- Check if the item can be moved to the
toSlotIndexplace. - Swap the items in the slots by using the
MoveFromSlotfunction. - Get the item that is in the inventory slot where it is coming from.
- Get the item that is in the inventory slot where it is going too.
- If the item asset id is the same, then a simple count change can be done on the stacks.
- Remove the item from the inventory coming from.
- Remove the item from the inventory going too.
- If the item clicked on is already at the max stack count, then skip adding the item.
- Add the item to the inventory where it is going too.
Create RemoveItemHandler Function
Create a function called RemoveItemHandler. This function will be used later to remove an item from an inventory. This is useful when players need a way to throw away items they no longer need. A discard slot will be used that allows the player to drop an item onto that slot to discard it.
function API.RemoveItemHandler(inventoryId, slotIndex)
    local inventory = API.INVENTORIES[inventoryId]

    if inventory ~= nil then
        if inventory:CanRemoveFromSlot(slotIndex) then
            inventory:RemoveFromSlot(slotIndex)
        end
    end
end
Create Client Functions
The client functions that will be used by scripts in a client context.
Create ClearDraggedItem Function
Create a function called ClearDraggedItem. This is a helper function that will clear out all information from the ACTIVE table. For example, this would be called when an item has been placed in a slot by the player.
function API.ClearDraggedItem()
    API.ACTIVE.slot = nil
    API.ACTIVE.slotIcon = nil
    API.ACTIVE.slotCount = nil
    API.ACTIVE.slotIndex = nil
    API.ACTIVE.inventory = nil
    API.ACTIVE.hasItem = false
end
Create SetDragProxy Function
Create a function called SetDragProxy. This function will be used to set the proxy for when the player moves an item around on the screen.
function API.SetDragProxy(proxy)
    API.PROXY = proxy
    API.PROXY_ICON = proxy:FindChildByName("Icon")
    API.PROXY_COUNT = API.PROXY_ICON:FindChildByName("Count")
end
Create EnableCursor Function
Create a function called EnableCursor. To use the inventories, the player needs to be able to use their mouse cursor to interact with the inventory UI. This function will make the cursor visible and enable UI interaction.
function API.EnableCursor()
    UI.SetCanCursorInteractWithUI(true)
    UI.SetCursorVisible(true)
end
Create DisableCursor Function
Create a function called DisableCursor. This will hide the cursor for the UI and turn off UI interaction.
function API.DisableCursor()
    UI.SetCanCursorInteractWithUI(false)
    UI.SetCursorVisible(false)
end
Create OnSlotPressedEvent Function
Create a function called OnSlotPressedEvent. This function will handle updating the proxy icon and the slot that was clicked on. It will check to see if a slot already has an item, and if so, pick it up. Otherwise, it will be ignored. If the player has an item already, then it will also check to see if it should stack or swap. This has a minor element of client prediction to it so that it feels responsive to the player. The inventory would update automatically when the changedEvent is fired, but it would not feel as responsive.
When an item is placed into a slot, a broadcast to the server is done which will handle the actual inventory changes.
function API.OnSlotPressedEvent(button, inventory, slot, slotIndex)
    local icon = slot:FindChildByName("Icon")
    local isHidden = icon.visibility == Visibility.FORCE_OFF and true or false
    local count = icon:FindChildByName("Count")

    -- Has item already.
    if API.ACTIVE.hasItem then

        -- No icon, so this is an empty slot, and dropping it into it.
        if isHidden then
            icon.visibility = Visibility.FORCE_ON
            icon:SetImage(API.PROXY_ICON:GetImage())
            API.ACTIVE.slot.opacity = 1
            API.ACTIVE.slotIcon.visibility = Visibility.FORCE_OFF
            count.text = API.ACTIVE.slotCount.text
            API.ACTIVE.slotCount.text = "0"

        -- Slot contains existing item
        else
            local item = API.ACTIVE.inventory:GetItem(API.ACTIVE.slotIndex)
            local toItem = inventory:GetItem(slotIndex)

            if item ~= nil and toItem ~= nil and item.itemAssetId == toItem.itemAssetId and toItem.count == toItem.maximumStackCount then
                API.ACTIVE.slot.opacity = 1
            else
                local tmpImg = icon:GetImage()
                local tmpCount = count.text

                icon:SetImage(API.ACTIVE.slotIcon:GetImage())
                count.text = API.ACTIVE.slotCount.text
                API.ACTIVE.slotIcon:SetImage(tmpImg)
                API.ACTIVE.slotCount.text = tmpCount
                API.ACTIVE.slot.opacity = 1

                tmpCount = nil
                tmpImg = nil
            end
        end

        Events.BroadcastToServer("inventory.moveitem", API.ACTIVE.inventory.id, inventory.id, API.ACTIVE.slotIndex, slotIndex)

        API.ClearDraggedItem()
        API.PROXY.visibility = Visibility.FORCE_OFF

    -- No item, pick up from clicked slot.
    elseif not isHidden then
        API.PROXY.visibility = Visibility.FORCE_ON
        API.ACTIVE.hasItem = true
        API.PROXY_ICON:SetImage(icon:GetImage())
        API.PROXY_COUNT.text = tostring(inventory:GetItem(slotIndex).count)
        slot.opacity = .6
        API.ACTIVE.slot = slot
        API.ACTIVE.slotIcon = icon
        API.ACTIVE.slotCount = count
        API.ACTIVE.slotIndex = slotIndex
        API.ACTIVE.inventory = inventory
    end
end
Create Shared Functions
The shared functions will be helper functions that are used by the server and client functions.
Create FindLookupItemByKey Function
Create a function called FindLookupItemByKey. This is a helper function that will take in a key that will be compared against the key column in the data table. If a key matches, then the row from the data table is returned.
function API.FindLookupItemByKey(key)
    for i, dataItem in pairs(ASSETS) do
        if key == dataItem.key then
            return dataItem
        end
    end
end
Create FindLookupItemByAssetId Function
Create a function called FindLookupItemByAssetId. This is a helper function that will take in an item that will be compared against the asset column in the data table. If the itemAssetId matches the first part of the asset, then the row from the data table is returned.
function API.FindLookupItemByAssetId(item)
    for i, dataItem in pairs(ASSETS) do
        local id = CoreString.Split(dataItem.asset, ":")

        if id == item.itemAssetId then
            return dataItem
        end
    end
end
Connect Events
Connect up the event that will be received from the client. Because the API can be required into any script, it is good to use the Environment namespace to check if the environment the script is running in is the server by calling the IsServer function.
if Environment.IsServer() then
    Events.Connect("inventory.moveitem", API.MoveItemHandler)
end
Return the API
The API table needs to be returned so that scripts that require it can use the properties and functions inside the API.
return API
The InventoryAPI Script
InventoryAPI
local ASSETS = require(script:GetCustomProperty("InventoryAssets"))
local INVENTORY = script:GetCustomProperty("Inventory")

local API = {}

API.PLAYERS = {}
API.INVENTORIES = {}
API.ACTIVE = {

    slot = nil,
    slotIcon = nil,
    slotCount = nil,
    slotIndex = nil,
    inventory = nil,
    hasItem = false

}

-- Server

function API.RegisterInventory(inventory)
    API.INVENTORIES[inventory.id] = inventory
end

function API.CreatePlayerInventory(player)
    local inventory = World.SpawnAsset(INVENTORY, { networkContext = NetworkContextType.NETWORKED })

    inventory:Assign(player)
    inventory.name = player.name

    API.PLAYERS[player.id] = inventory
    API.RegisterInventory(inventory)
end

function API.LoadPlayerInventory(player)
    local data = Storage.GetPlayerData(player)

    if data.inv ~= nil then
        for i, entry in ipairs(data.inv) do
            local item = API.FindLookupItemByKey(entry[1])

            if item ~= nil and API.PLAYERS[player.id]:CanAddItem(item.asset, { count = entry[2], slot = i }) then
                API.PLAYERS[player.id]:AddItem(item.asset, { count = entry[2], slot = i })
            end
        end
    end
end

function API.SavePlayerInventory(player)
    local data = Storage.GetPlayerData(player)

    data.inv = {}

    for i = 1, API.PLAYERS[player.id].slotCount do
        local item = API.PLAYERS[player.id]:GetItem(i)
        local entry = {}

        if item then
            local lookupItem = API.FindLookupItemByAssetId(item)

            if lookupItem ~= nil then
                entry = { lookupItem.key, item.count }
            end
        end

        table.insert(data.inv, entry)
    end

    Storage.SetPlayerData(player, data)
end

function API.RemovePlayerInventory(player)
    API.INVENTORIES[API.PLAYERS[player.id].id] = nil
    API.PLAYERS[player.id]:Destroy()
    API.PLAYERS[player.id] = nil
end

function API.MoveItemHandler(fromInventoryId, toInventoryId, fromSlotIndex, toSlotIndex)
    local fromInventory = API.INVENTORIES[fromInventoryId]
    local toInventory = API.INVENTORIES[toInventoryId]

    if fromInventory ~= nil and toInventory ~= nil then
        if fromInventory == toInventory then
            if fromInventory:CanMoveFromSlot(fromSlotIndex, toSlotIndex) then
                fromInventory:MoveFromSlot(fromSlotIndex, toSlotIndex)
            end
        else
            local fromItem = fromInventory:GetItem(fromSlotIndex)
            local toItem = toInventory:GetItem(toSlotIndex)

            local fromItemAssetId = fromItem.itemAssetId
            local fromItemCount = fromItem.count

            if toItem ~= nil then
                local toItemAssetId = toItem.itemAssetId
                local toItemCount = toItem.count
                local skipFromItem = false

                if toItemAssetId == fromItemAssetId then
                    local total = toItemCount + fromItemCount

                    if total > toItem.maximumStackCount then
                        if toItemCount == toItem.maximumStackCount then
                            toItemCount = toItem.maximumStackCount
                            fromItemCount = total - toItem.maximumStackCount
                        else
                            toItemCount = total - toItem.maximumStackCount
                            fromItemCount = toItem.maximumStackCount
                        end
                    else
                        skipFromItem = true
                        fromItemCount = total
                    end
                end

                fromInventory:RemoveFromSlot(fromSlotIndex)
                toInventory:RemoveFromSlot(toSlotIndex)

                if not skipFromItem then
                    fromInventory:AddItem(toItemAssetId, { count = toItemCount, slot = fromSlotIndex })
                end
            else
                fromInventory:RemoveFromSlot(fromSlotIndex)
            end

            toInventory:AddItem(fromItemAssetId, { count = fromItemCount, slot = toSlotIndex })
        end
    end
end

function API.RemoveItemHandler(inventoryId, slotIndex)
    local inventory = API.INVENTORIES[inventoryId]

    if inventory ~= nil then
        if inventory:CanRemoveFromSlot(slotIndex) then
            inventory:RemoveFromSlot(slotIndex)
        end
    end
end

-- Client

function API.ClearDraggedItem()
    API.ACTIVE.slot = nil
    API.ACTIVE.slotIcon = nil
    API.ACTIVE.slotCount = nil
    API.ACTIVE.slotIndex = nil
    API.ACTIVE.inventory = nil
    API.ACTIVE.hasItem = false
end

function API.SetDragProxy(proxy)
    API.PROXY = proxy
    API.PROXY_ICON = proxy:FindChildByName("Icon")
    API.PROXY_COUNT = API.PROXY_ICON:FindChildByName("Count")
end

function API.EnableCursor()
    UI.SetCanCursorInteractWithUI(true)
    UI.SetCursorVisible(true)
end

function API.DisableCursor()
    UI.SetCanCursorInteractWithUI(false)
    UI.SetCursorVisible(false)
end

function API.OnSlotPressedEvent(button, inventory, slot, slotIndex)
    local icon = slot:FindChildByName("Icon")
    local isHidden = icon.visibility == Visibility.FORCE_OFF and true or false
    local count = icon:FindChildByName("Count")

    -- Has item already.
    if API.ACTIVE.hasItem then

        -- No icon, so this is an empty slot, and dropping it into it.
        if isHidden then
            icon.visibility = Visibility.FORCE_ON
            icon:SetImage(API.PROXY_ICON:GetImage())
            API.ACTIVE.slot.opacity = 1
            API.ACTIVE.slotIcon.visibility = Visibility.FORCE_OFF
            count.text = API.ACTIVE.slotCount.text
            API.ACTIVE.slotCount.text = "0"

        -- Slot contains existing item
        else
            local item = API.ACTIVE.inventory:GetItem(API.ACTIVE.slotIndex)
            local toItem = inventory:GetItem(slotIndex)

            if item ~= nil and toItem ~= nil and item.itemAssetId == toItem.itemAssetId and toItem.count == toItem.maximumStackCount then
                API.ACTIVE.slot.opacity = 1
            else
                local tmpImg = icon:GetImage()
                local tmpCount = count.text

                icon:SetImage(API.ACTIVE.slotIcon:GetImage())
                count.text = API.ACTIVE.slotCount.text
                API.ACTIVE.slotIcon:SetImage(tmpImg)
                API.ACTIVE.slotCount.text = tmpCount
                API.ACTIVE.slot.opacity = 1

                tmpCount = nil
                tmpImg = nil
            end
        end

        Events.BroadcastToServer("inventory.moveitem", API.ACTIVE.inventory.id, inventory.id, API.ACTIVE.slotIndex, slotIndex)

        API.ClearDraggedItem()
        API.PROXY.visibility = Visibility.FORCE_OFF

    -- No item, pick up from clicked slot.
    elseif not isHidden then
        API.PROXY.visibility = Visibility.FORCE_ON
        API.ACTIVE.hasItem = true
        API.PROXY_ICON:SetImage(icon:GetImage())
        API.PROXY_COUNT.text = tostring(inventory:GetItem(slotIndex).count)
        slot.opacity = .6
        API.ACTIVE.slot = slot
        API.ACTIVE.slotIcon = icon
        API.ACTIVE.slotCount = count
        API.ACTIVE.slotIndex = slotIndex
        API.ACTIVE.inventory = inventory
    end
end

-- Shared

function API.FindLookupItemByKey(key)
    for i, dataItem in pairs(ASSETS) do
        if key == dataItem.key then
            return dataItem
        end
    end
end

function API.FindLookupItemByAssetId(item)
    for i, dataItem in pairs(ASSETS) do
        local id = CoreString.Split(dataItem.asset, ":")

        if id == item.itemAssetId then
            return dataItem
        end
    end
end

-- Events

if Environment.IsServer() then
    Events.Connect("inventory.moveitem", API.MoveItemHandler)
end

return API
Update PlayerInventoryServer Script
The PlayerInventoryServer script needs to be updated so that it requires the API and uses the functions from the API instead.
Add Custom Property
Find the PlayerInventoryServer script in Project Content and add the InventoryAPI script as a custom property.
Edit PlayerInventoryServer Script
Open up the PlayerInventoryServer script and clear out all the code that is currently in there so you have an empty script. All of the code that was previously in there is now in the API can be shared amongst other scripts.
Require the API
Require the API at the top of the script by using the require function. With the API required, it will allow you to access any property or function from it.
local API = require(script:GetCustomProperty("InventoryAPI"))
Create OnPlayerJoined Function
Create a function called OnPlayerJoined. This function will be called when the player joins. It will contain 2 API calls to create the player's inventory and to load the player's inventory.
local function OnPlayerJoined(player)
    API.CreatePlayerInventory(player)
    API.LoadPlayerInventory(player)
end
Create OnPlayerLeft Function
Create a function called OnPlayerLeft. This function will be called when the player leaves the game. It will contain 2 API calls to save the player's inventory and to remove the player's inventory from the world.
local function OnPlayerLeft(player)
    API.SavePlayerInventory(player)
    API.RemovePlayerInventory(player)
end
Connect Events
Connect up the playerJoinedEvent and playerLeftEvent which will be called when the player joins or leaves the game.
Game.playerJoinedEvent:Connect(OnPlayerJoined)
Game.playerLeftEvent:Connect(OnPlayerLeft)
The PlayerInventoryServer Script
PlayerInventoryServer
local API = require(script:GetCustomProperty("InventoryAPI"))

local function OnPlayerJoined(player)
    API.CreatePlayerInventory(player)
    API.LoadPlayerInventory(player)
end

local function OnPlayerLeft(player)
    API.SavePlayerInventory(player)
    API.RemovePlayerInventory(player)
end

Game.playerJoinedEvent:Connect(OnPlayerJoined)
Game.playerLeftEvent:Connect(OnPlayerLeft)
Update PlayerInventoryClient Script
The PlayerInventoryClient script needs to be updated so that it requires the API and uses the functions from the API instead.
Add Custom Property
Find the PlayerInventoryClient script in Project Content and add the InventoryAPI script as a custom property.
Edit PlayerInventoryClient Script
Open up the PlayerInventoryClient script. A big amount of code will be removed from the script, so it might be easier to clear it all out first and follow along.
Require the API
Require the API at the top of the script by using the require function. With the API required, it will allow you to access any property or function from it.
local API = require(script:GetCustomProperty("InventoryAPI"))
Add Variables
Add in the variables that were previously in the script. The SLOTS variable contains a reference to the Slots UI panel.
The inventory variable will hold a reference to the local player's inventory once it has been initialized.
local SLOTS = script:GetCustomProperty("Slots"):WaitForObject()

local localPlayer = Game.GetLocalPlayer()
local inventory = nil
Enable the Cursor
To allow the player to interact with the UI, the cursor needs to be visible. This is a common thing that is needed, and for the tutorial, the player will always have the cursor visible when they join. This could be changed for your game, for example, maybe the player needs to press a certain action that opens up the inventory UI.
API.EnableCursor()
Create InventoryChanged Function
Create a function called InventoryChanged. This function is identical to what was in the script before. The function will be called when a change has happened in the inventory. For example, the item count has increased, so the UI will be updated to reflect that change.
local function InventoryChanged(inv, slot)
    local item = inv:GetItem(slot)
    local childIcon = SLOTS:GetChildren()[slot]:FindChildByName("Icon")
    local childCount = childIcon:FindChildByName("Count")

    if item ~= nil then
        local icon = item:GetCustomProperty("Icon")

        childIcon:SetImage(icon)
        childIcon.visibility = Visibility.FORCE_ON
        childCount.text = tostring(item.count)
    else
        childIcon.visibility = Visibility.FORCE_OFF
        childCount.text = ""
    end
end
Create ConnectSlotEvents Function
Create a function called ConnectSlotEvents. This function is mostly the same as before, the difference is the OnSlotPressedEvent is now inside the API. This API function can be used on different inventories to respond to slots being pressed by the player.
local function ConnectSlotEvents()
    for index, slot in ipairs(SLOTS:GetChildren()) do
        local button = slot:FindChildByName("Button")
        local icon = slot:FindChildByName("Icon")

        if button ~= nil and icon ~= nil and button.isInteractable then
            button.pressedEvent:Connect(API.OnSlotPressedEvent, inventory, slot, index)
        end
    end
end
Wait for Player's Inventory
Because the player's inventory is created when they join the game, there is a chance that it may not have initialized for the player. Using the code below, you can check if inventory is nil, and if so, wait. The GetInventories function returns a list of all the inventories the player will have. Since we know the player will only have one inventory, then we can directly access the inventory at index 1.
If you decide to support multiple inventories for each player, then it would be recommended to name your inventories and loop over them to find the one you need to modify.
while inventory == nil do
    inventory = localPlayer:GetInventories()[1]
    Task.Wait()
end
Update Inventory UI
When the player joins the game, they may already have items in their inventory and the changedEvent may not have connected in time to receive the inventory data. By looping over all the items in the inventory using GetItems, you can do a manual update of the inventory by calling the function InventoryChanged.
for i, item in pairs(inventory:GetItems()) do
    InventoryChanged(inventory, i)
end
Connect Changed Event
Inventories have a changedEvent that is fired when the contents of a slot have changed. This is useful as it allows you to respond to these changes so the UI can be updated for the player.
inventory.changedEvent:Connect(InventoryChanged)
Call Connect Slots Function
Call the ConnectSlotEvents to connect up the events for the slots in the UI.
ConnectSlotEvents()
The PlayerInventoryClient Script
PlayerInventoryClient
local API = require(script:GetCustomProperty("InventoryAPI"))

local SLOTS = script:GetCustomProperty("Slots"):WaitForObject()

local localPlayer = Game.GetLocalPlayer()
local inventory = nil

API.EnableCursor()

local function InventoryChanged(inv, slot)
    local item = inv:GetItem(slot)
    local childIcon = SLOTS:GetChildren()[slot]:FindChildByName("Icon")
    local childCount = childIcon:FindChildByName("Count")

    if item ~= nil then
        local icon = item:GetCustomProperty("Icon")

        childIcon:SetImage(icon)
        childIcon.visibility = Visibility.FORCE_ON
        childCount.text = tostring(item.count)
    else
        childIcon.visibility = Visibility.FORCE_OFF
        childCount.text = ""
    end
end

local function ConnectSlotEvents()
    for index, slot in ipairs(SLOTS:GetChildren()) do
        local button = slot:FindChildByName("Button")
        local icon = slot:FindChildByName("Icon")

        if button ~= nil and icon ~= nil and button.isInteractable then
            button.pressedEvent:Connect(API.OnSlotPressedEvent, inventory, slot, index)
        end
    end
end

while inventory == nil do
    inventory = localPlayer:GetInventories()[1]
    Task.Wait()
end

for i, item in pairs(inventory:GetItems()) do
    InventoryChanged(inventory, i)
end

inventory.changedEvent:Connect(InventoryChanged)

ConnectSlotEvents()
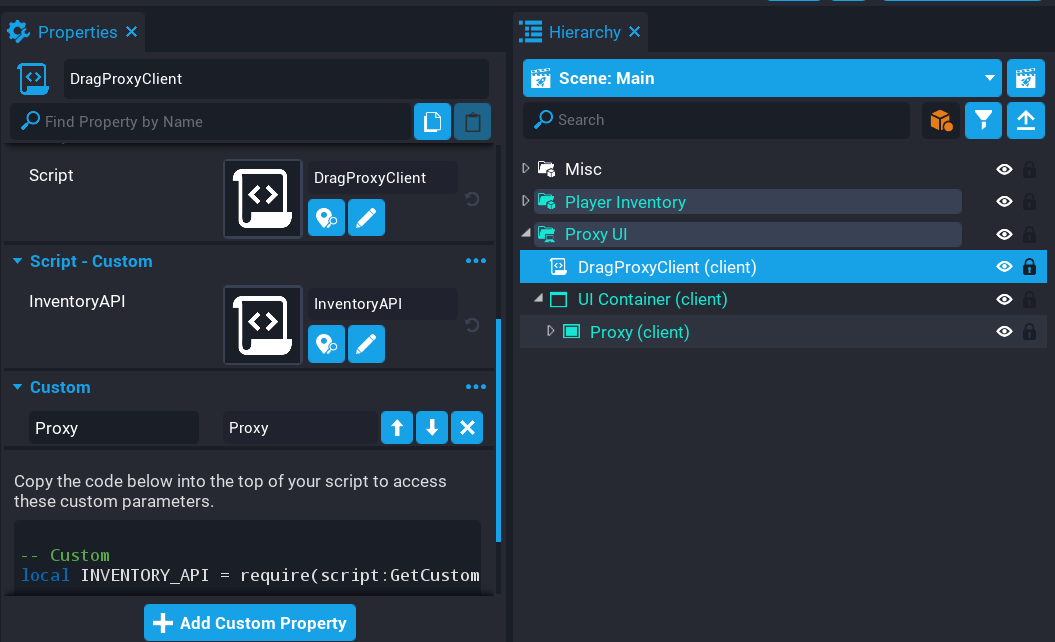
Create DragProxyClient Script
Previously the PlayerInventoryClient would handle the screen position of the proxy UI when a player had picked up an inventory item from a slot. Moving this to a new script will make it universal for all scripts because the API will be responsible for updating the proxy icon.
Create a new script called DragProxyClient.
- Add the InventoryAPI script as a custom property called
API. - Add the Proxy panel in the Proxy folder as a custom property called
Proxy.
Edit DragProxyClient Script
Open up the DragProxyClient Script and add require the API.
local API = require(script:GetCustomProperty("InventoryAPI"))
Set API Proxy
The API needs to know about the proxy so it can be updated when the player clicks on a slot.
Calling the SetDragProxy and passing in the property for the Proxy will allow the API to keep a reference to the object.
API.SetDragProxy(script:GetCustomProperty("Proxy"):WaitForObject())
Create Tick Function
Create a function called Tick. The Tick function will check to see if the API has an active item that the player is moving around, and if so, set the position of the proxy panel based on the absolute position of the mouse position.
function Tick()
    if API.ACTIVE.hasItem then
        local mousePos = Input.GetCursorPosition()

        API.PROXY:SetAbsolutePosition(Vector2.New(mousePos.x, mousePos.y))
    end
end
The DragProxyClient Script
DragProxyClient
local API = require(script:GetCustomProperty("InventoryAPI"))

API.SetDragProxy(script:GetCustomProperty("Proxy"):WaitForObject())

function Tick()
    if API.ACTIVE.hasItem then
        local mousePos = Input.GetCursorPosition()

        API.PROXY:SetAbsolutePosition(Vector2.New(mousePos.x, mousePos.y))
    end
end
Test the Game
Test the game to make sure the following work:
- Player can move items around.
- Player can place an item in an empty slot.
- Player can swap with an existing item.
- Player can increase the count of an item with the same item.
- Saving and loading works.
Summary
With the above section completed, you should have a good system in place that can now be used for multiple inventories. The Inventory API is something that can be improved on in one place rather than modifying the same duplicate code in multiple scripts. This makes finding bugs easier as they will be contained inside one script.
Transfer Items Between Inventories
With the way the API has now been set up, moving items between inventories should just work with minimal changes to the code. In this section, you will add a Chest template into the world that allows players to move items between inventories. The items of the chest inventory will not be saved, this will be a challenge for you to do.
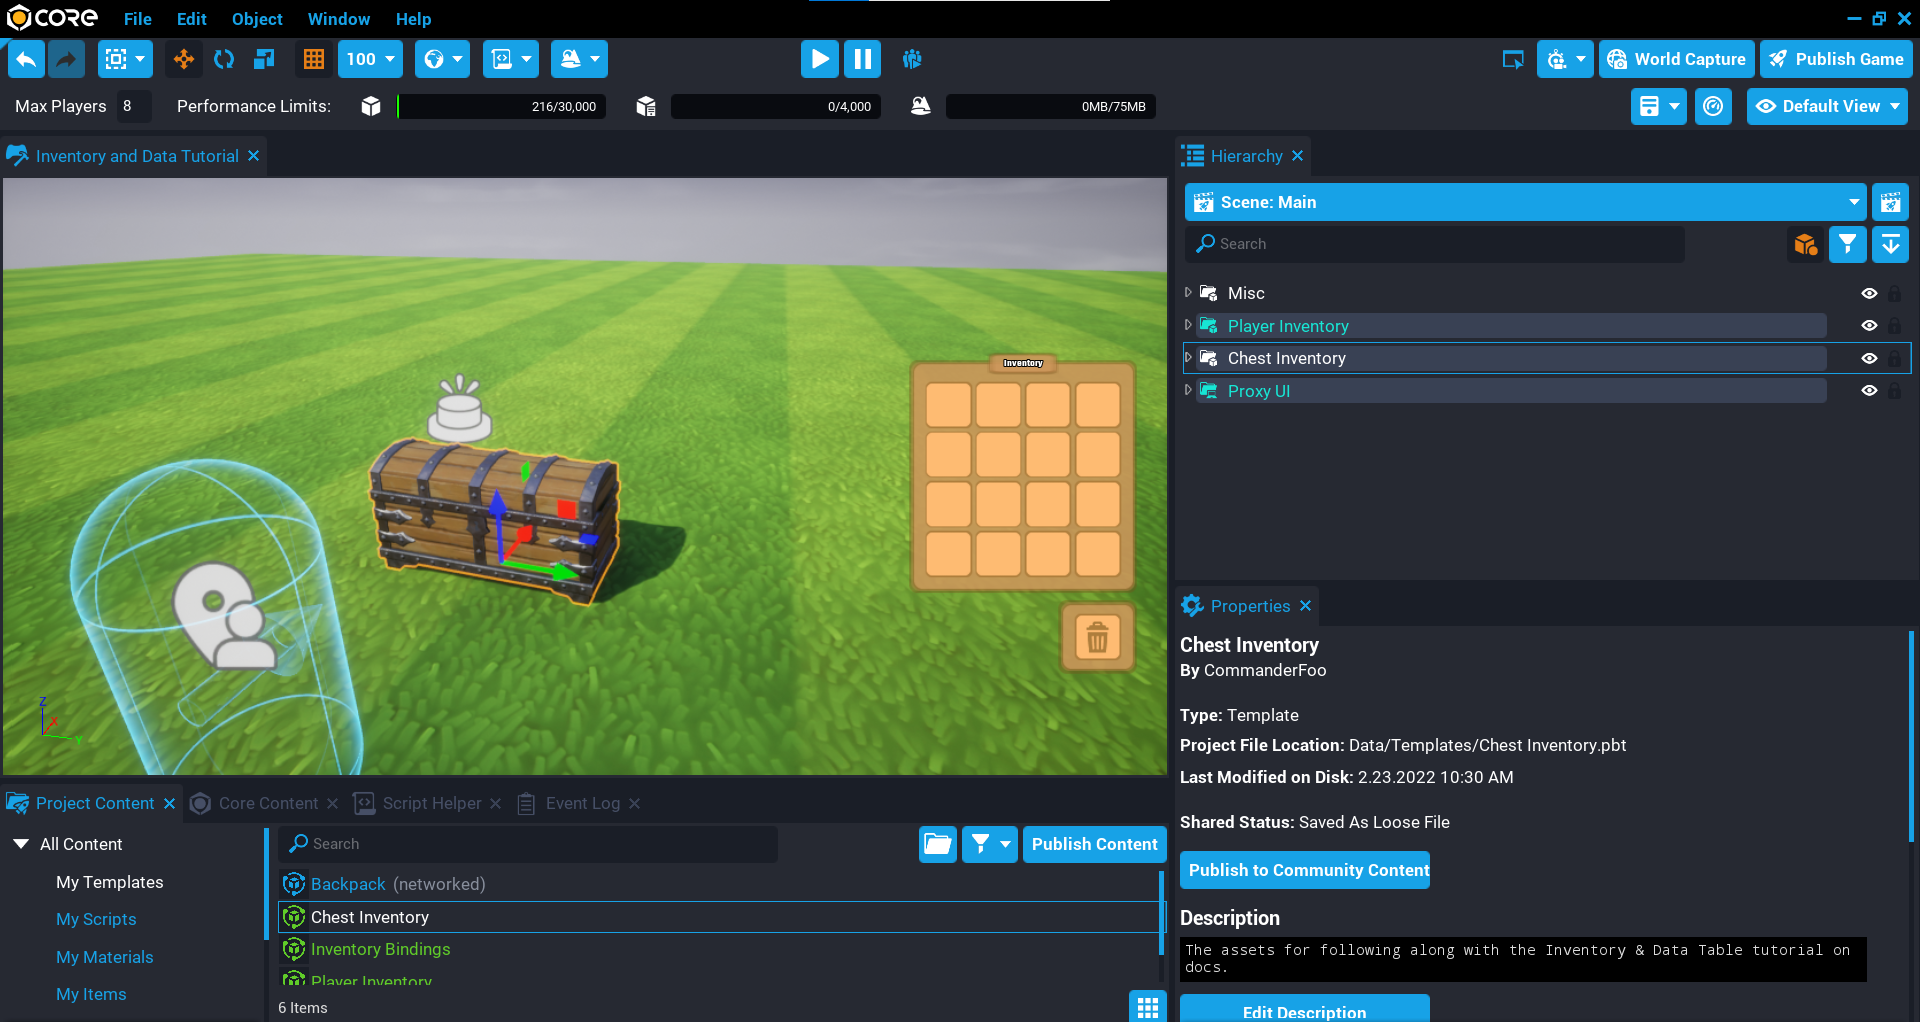
Add Chest Inventory Template
A chest template has already been created for you with the inventory UI set up. It also contains a trigger that will allow the player to interact with the chest to open up the UI to display the contents of the inventory.
- In Project Content find the
Chest Inventorytemplate and add it to the Hierarchy. - Deinstance the template in the Hierarchy so it can be edited later.
- Move the Chest Inventory above the Proxy folder, otherwise the UI will appear behind the UI for the Chest.
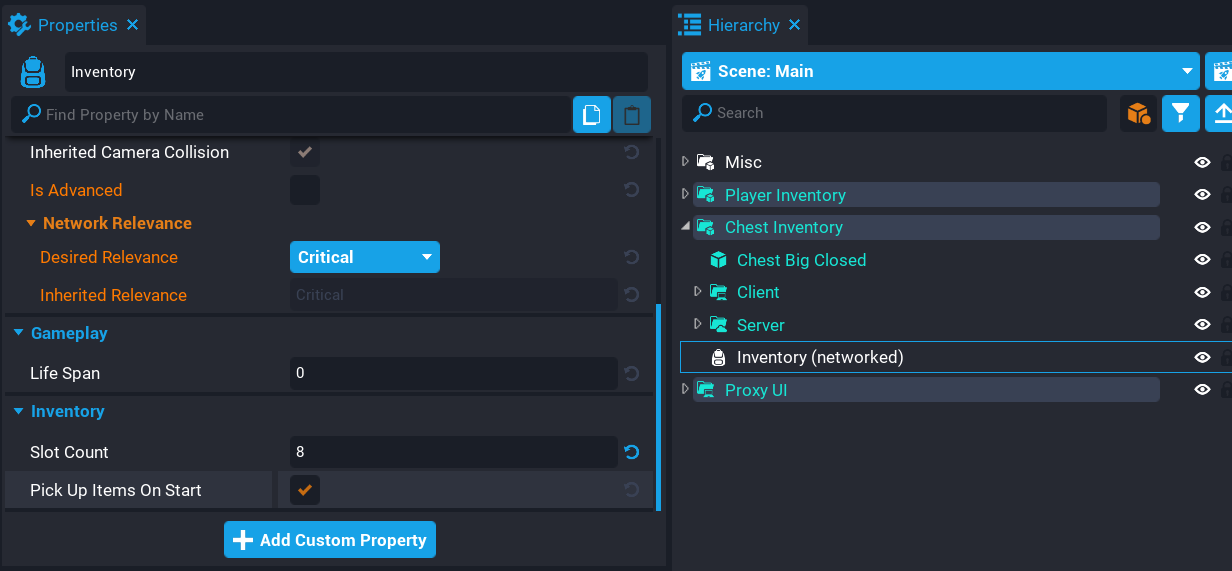
Create Chest Inventory
The chest needs an inventory in the world so it can keep track of items separate from other chests you may add.
- Add a new Inventory object to the Hierarchy as a child of the Chest Inventory.
- Set the Slot Count in the properties window for the inventory to
8.
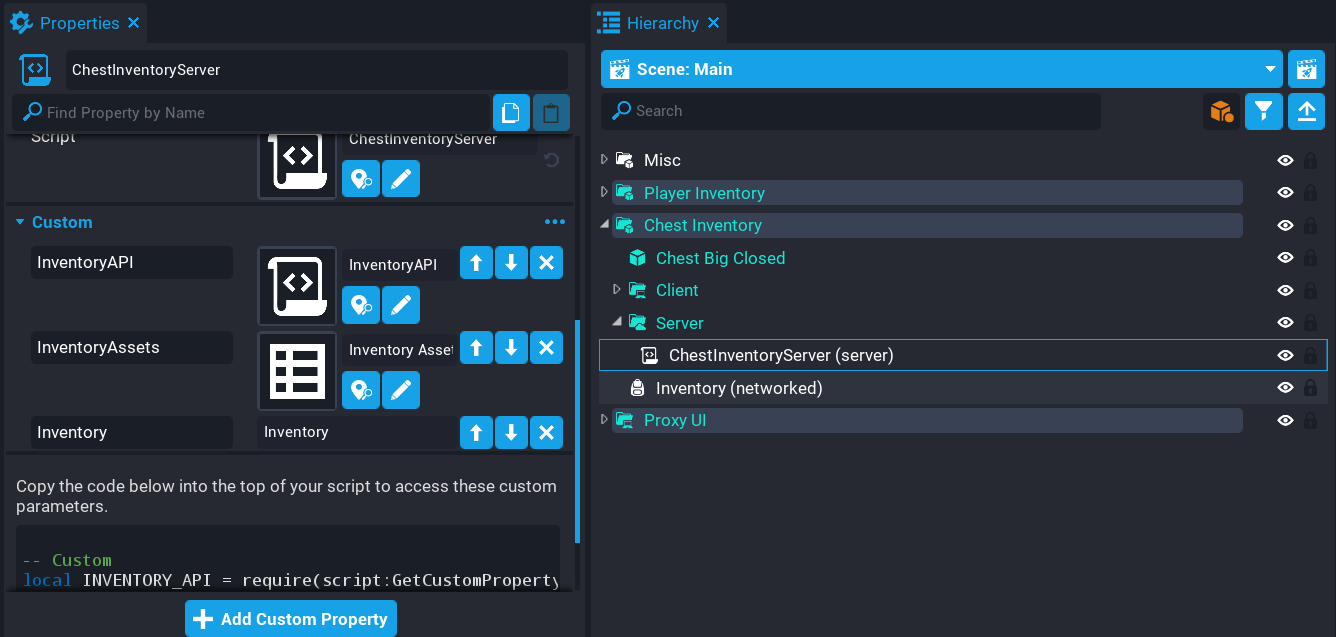
Create ChestInventoryServer Script
Create a new script called ChestInventoryServer and place it into the Server folder inside the Chest Inventory folder. This script will add random items to the chest each time the player joins the game.
Add Custom properties
The ChestInventoryServer script needs references to the InventoryAPI, Inventory Assets data table, and the Inventory object created earlier in the Hierarchy.
- Add the InventoryAPI script as a custom property called
InventoryAPI. - Add the Inventory Assets data table from Project Content as a custom property called
InventoryAssets. - Add the Inventory as a custom property called
Inventory.
Edit ChestInventoryServer Script
Open up the ChestInventoryServer script and require the inventory API, and add references to the properties on the script.
local API = require(script:GetCustomProperty("InventoryAPI"))

local INVENTORY_ASSETS = require(script:GetCustomProperty("InventoryAssets"))
local INVENTORY = script:GetCustomProperty("Inventory"):WaitForObject()
Add Random Items
Create a for loop that will create add a random item with a random count to the chest inventory. If the amount value is greater than the maximum count for the slot, then no item will be added to the inventory. This is a good way to get a bit of random distribution.
Use CanAddItem to make sure the item can be added with the amount at the specific slot index.
for i = 1, INVENTORY.slotCount do
    local slotIndex = math.random(INVENTORY.slotCount)
    local asset = INVENTORY_ASSETS[math.random(#INVENTORY_ASSETS)].asset
    local amount = math.random(1, 10)

    if INVENTORY:CanAddItem(asset, { count = amount, slot = slotIndex }) then
        INVENTORY:AddItem(asset, { count = amount, slot = slotIndex })
    end
end
Register Inventory
Register the inventory with the API so that it allows the player to transfer items between their inventory, and the chest inventory.
API.RegisterInventory(INVENTORY)
The ChestInventoryServer Script
ChestInventoryServer
local API = require(script:GetCustomProperty("InventoryAPI"))

local INVENTORY_ASSETS = require(script:GetCustomProperty("InventoryAssets"))
local INVENTORY = script:GetCustomProperty("Inventory"):WaitForObject()

for i = 1, INVENTORY.slotCount do
    local slotIndex = math.random(INVENTORY.slotCount)
    local asset = INVENTORY_ASSETS[math.random(#INVENTORY_ASSETS)].asset
    local amount = math.random(1, 10 )

    if INVENTORY:CanAddItem(asset, { count = amount, slot = slotIndex }) then
        INVENTORY:AddItem(asset, { count = amount, slot = slotIndex })
    end
end

API.RegisterInventory(INVENTORY)
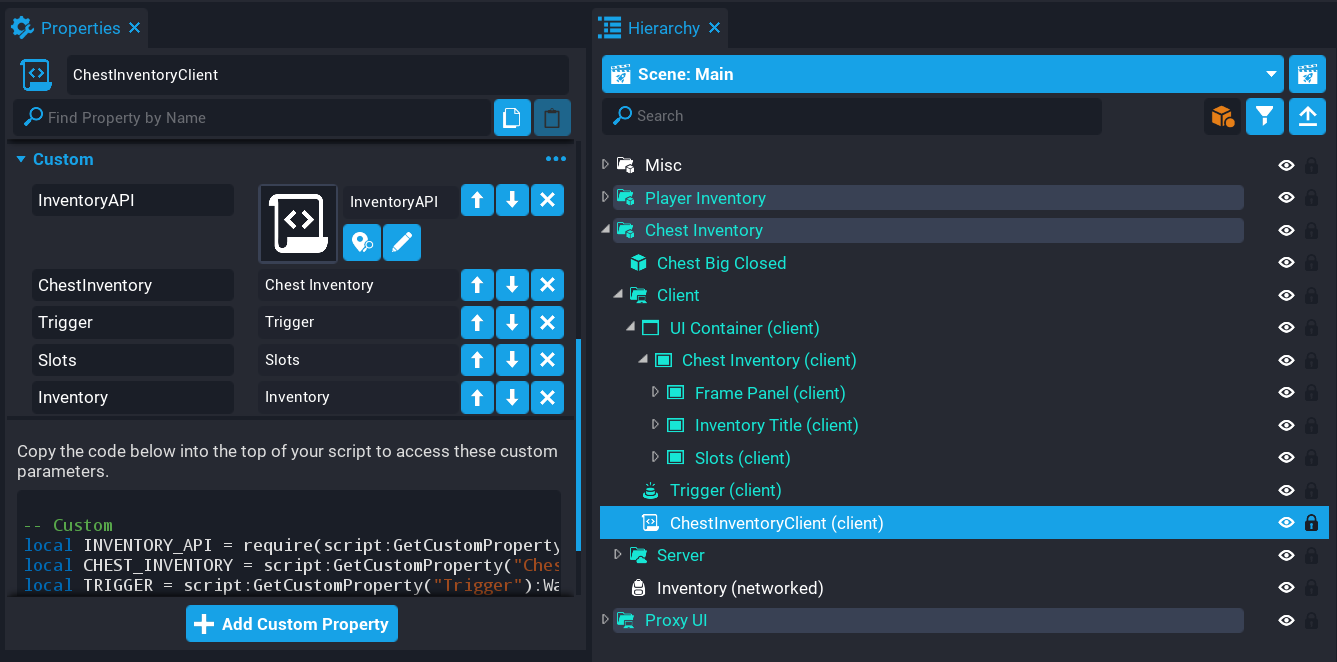
Create ChestInventoryClient Script
The chest inventory needs a way for the player to interact with it so it can be opened and closed. A trigger has already been set up in the template so you can focus on the code. When the player approaches the chest, a trigger interaction label will appear that allows them to open the chest inventory and interact with it.
Create a new script called ChestInventoryClient and place it into the Client folder inside the Chest Inventory folder.
Add Custom Properties
The ChestInventoryClient needs properties for the various components.
- Add the InventoryAPI as a custom property called
InventoryAPI. - Add the Chest Inventory UI from the Hierarchy as a custom property called
ChestInventory. - Add the Trigger from the Hierarchy as a custom property called
Trigger. - Add the Slots UI panel from the Hierarchy that contains all the Slots as a custom property called
Slots. - Add the Inventory object from the Hierarchy as a custom property called Inventory.
Edit ChestInventoryClient Script
Open up the ChestInventoryClient script and add require the inventory API, and create the references for the properties.
local API = require(script:GetCustomProperty("InventoryAPI"))

local CHEST_INVENTORY = script:GetCustomProperty("ChestInventory"):WaitForObject()
local TRIGGER = script:GetCustomProperty("Trigger"):WaitForObject()
local SLOTS = script:GetCustomProperty("Slots"):WaitForObject()
local INVENTORY = script:GetCustomProperty("Inventory"):WaitForObject()
Create Variables
Create the variables below so you have a reference to the local player. The inTrigger variable will change from false to true depending on if the player is inside the trigger or not.
local localPlayer = Game.GetLocalPlayer()
local inTrigger = false
Create CloseUI Function
Create a function called CloseUI that will set the chest inventory UI to be hidden, and disable the trigger so it is not interactable.
local function CloseUI()
    CHEST_INVENTORY.visibility = Visibility.FORCE_OFF

    if inTrigger then
        TRIGGER.isInteractable = true
    else
        TRIGGER.isInteractable = false
    end
end
Create OnInteracted Function
Create a function called OnInteracted. This function will be called when the player has interacted with the trigger. It will check to make sure the obj is a Player type, and if the obj is the localPlayer so the UI only shows for this player that interacted with the trigger.
The trigger has the isInteractable property set to false so the interactable label doesn't show while the inventory UI is open.
local function OnInteracted(trigger, obj)
    if inTrigger and Object.IsValid(obj) and obj:IsA("Player") and obj == localPlayer then
        CHEST_INVENTORY.visibility = Visibility.FORCE_ON
        TRIGGER.isInteractable = false
    end
end
Create OnExitTrigger
Create a function called OnExitTrigger. This function will be called when the player leaves the trigger so the UI automatically closes.
local function OnExitTrigger(trigger, obj)
    if Object.IsValid(obj) and obj:IsA("Player") and obj == localPlayer then
        inTrigger = false
        CloseUI()
    end
end
Create OnEnterTrigger
Create a function called OnEnterTrigger. This function will be called when the player enters the trigger volume so the trigger can become interactable, allowing the player to open up the chest inventory UI.
local function OnEnterTrigger(trigger, obj)
    if Object.IsValid(obj) and obj:IsA("Player") and obj == localPlayer then
        TRIGGER.isInteractable = true
        inTrigger = true
    end
end
Create InventoryChanged Function
Create a function called InventoryChanged. This function will be called anytime the chest's inventory slots change. This is handy as it allows you to react to those changes to update the UI for the player.
The function has 2 parameters:
invis the inventory that has been updated.slotis the slot index that has changed.
Using the GetItem function of the inventory, you can retrieve the item from a specific slot. This will allow you to find the item in the UI as the slot index will match the order in the hierarchy.
If the item doesn't exist, then the icon in the slot in the inventory can be set to invisible. Otherwise, the icon is updated by getting the custom property Icon that was added to the Item Asset created earlier.
local function InventoryChanged(inv, slot)
    local item = inv:GetItem(slot)
    local childIcon = SLOTS:GetChildren()[slot]:FindChildByName("Icon")
    local childCount = childIcon:FindChildByName("Count")

    if item ~= nil then
        local icon = item:GetCustomProperty("Icon")

        childIcon:SetImage(icon)
        childIcon.visibility = Visibility.FORCE_ON
        childCount.text = tostring(item.count)
    else
        childIcon.visibility = Visibility.FORCE_OFF
        childCount.text = ""
    end
end
Create ConnectSlotEvents Function
Create a function called ConnectSlotEvents. This function will loop over all the slots in the UI and set up the pressedEvent that will listen for when the player clicks on a slot. When clicked on, the OnSlotPressedEvent will be called. The slot and index values are passed into the function to update the active slot and index variables.
local function ConnectSlotEvents()
    for index, slot in ipairs(SLOTS:GetChildren()) do
        local button = slot:FindChildByName("Button")
        local icon = slot:FindChildByName("Icon")

        if button ~= nil and icon ~= nil and button.isInteractable then
            button.pressedEvent:Connect(API.OnSlotPressedEvent, INVENTORY, slot, index)
        end
    end
end
Update Inventory UI
When the player joins the game, the chest inventory may already have items in and the changedEvent may not have connected in time to receive the inventory data. By looping over all the items in the inventory using GetItems, you can do a manual update of the inventory by calling the function InventoryChanged.
for i, item in pairs(INVENTORY:GetItems()) do
    InventoryChanged(INVENTORY, i)
end
Connect Events
Inventories have a changedEvent that is fired when the contents of a slot have changed. This is useful as it allows you to respond to these changes so the UI can be updated for the player.
Connect up the events for the TRIGGER that allow the player to interact with the chest.
INVENTORY.changedEvent:Connect(InventoryChanged)

TRIGGER.interactedEvent:Connect(OnInteracted)
TRIGGER.endOverlapEvent:Connect(OnExitTrigger)
TRIGGER.beginOverlapEvent:Connect(OnEnterTrigger)
Call Connect Slots Function
Call the ConnectSlotEvents to connect up the events for the slots in the UI.
ConnectSlotEvents()
The ChestInventoryClient Script
ChestInventoryClient
local API = require(script:GetCustomProperty("InventoryAPI"))

local CHEST_INVENTORY = script:GetCustomProperty("ChestInventory"):WaitForObject()
local TRIGGER = script:GetCustomProperty("Trigger"):WaitForObject()
local SLOTS = script:GetCustomProperty("Slots"):WaitForObject()
local INVENTORY = script:GetCustomProperty("Inventory"):WaitForObject()

local localPlayer = Game.GetLocalPlayer()
local inTrigger = false

local function CloseUI()
    CHEST_INVENTORY.visibility = Visibility.FORCE_OFF

    if inTrigger then
        TRIGGER.isInteractable = true
    else
        TRIGGER.isInteractable = false
    end
end

local function OnInteracted(trigger, obj)
    if inTrigger and Object.IsValid(obj) and obj:IsA("Player") and obj == localPlayer then
        CHEST_INVENTORY.visibility = Visibility.FORCE_ON
        TRIGGER.isInteractable = false
    end
end

local function OnExitTrigger(trigger, obj)
    if Object.IsValid(obj) and obj:IsA("Player") and obj == localPlayer then
        inTrigger = false
        CloseUI()
    end
end

local function OnEnterTrigger(trigger, obj)
    if Object.IsValid(obj) and obj:IsA("Player") and obj == localPlayer then
        TRIGGER.isInteractable = true
        inTrigger = true
    end
end

local function InventoryChanged(inv, slot)
    local item = inv:GetItem(slot)
    local childIcon = SLOTS:GetChildren()[slot]:FindChildByName("Icon")
    local childCount = childIcon:FindChildByName("Count")

    if item ~= nil then
        local icon = item:GetCustomProperty("Icon")

        childIcon:SetImage(icon)
        childIcon.visibility = Visibility.FORCE_ON
        childCount.text = tostring(item.count)
    else
        childIcon.visibility = Visibility.FORCE_OFF
        childCount.text = ""
    end
end

local function ConnectSlotEvents()
    for index, slot in ipairs(SLOTS:GetChildren()) do
        local button = slot:FindChildByName("Button")
        local icon = slot:FindChildByName("Icon")

        if button ~= nil and icon ~= nil and button.isInteractable then
            button.pressedEvent:Connect(API.OnSlotPressedEvent, INVENTORY, slot, index)
        end
    end
end

for i, item in pairs(INVENTORY:GetItems()) do
    InventoryChanged(INVENTORY, i)
end

INVENTORY.changedEvent:Connect(InventoryChanged)

TRIGGER.interactedEvent:Connect(OnInteracted)
TRIGGER.endOverlapEvent:Connect(OnExitTrigger)
TRIGGER.beginOverlapEvent:Connect(OnEnterTrigger)

ConnectSlotEvents()
Test the Game
Test the game and make sure the following work:
- Items can be moved around in the player's inventory.
- The chest inventory can be opened.
- The chest inventory closes when the player moves away.
- The chest items can be moved around.
- Items from the player's inventory and the chest inventory can be swapped.
Summary
Allowing the ability for the player to move items into other inventories is useful and opens up more options for the player. Using an API to manage all this from a central point allows for multiple in-world inventories with no extra scripting.
Discarding Items
In this section, you will be creating a feature for the player's inventory that will give them the option to discard items they no longer wish to keep. It will allow them to move an item over the top of a special slot that will destroy the item.
The UI for the special slot has already been created and is a part of the Player Inventory folder.
Create DiscardItemClient Script
Create a new script called DiscardItemClient and place it inside the Discard folder inside the Player Inventory folder in the Hierarchy.
The script will need a couple of custom properties.
- Add the Inventory API script as a custom property called
InventoryAPI. - Find the Button inside the Discard folder that is for the slot and add it as a custom property called
Button.
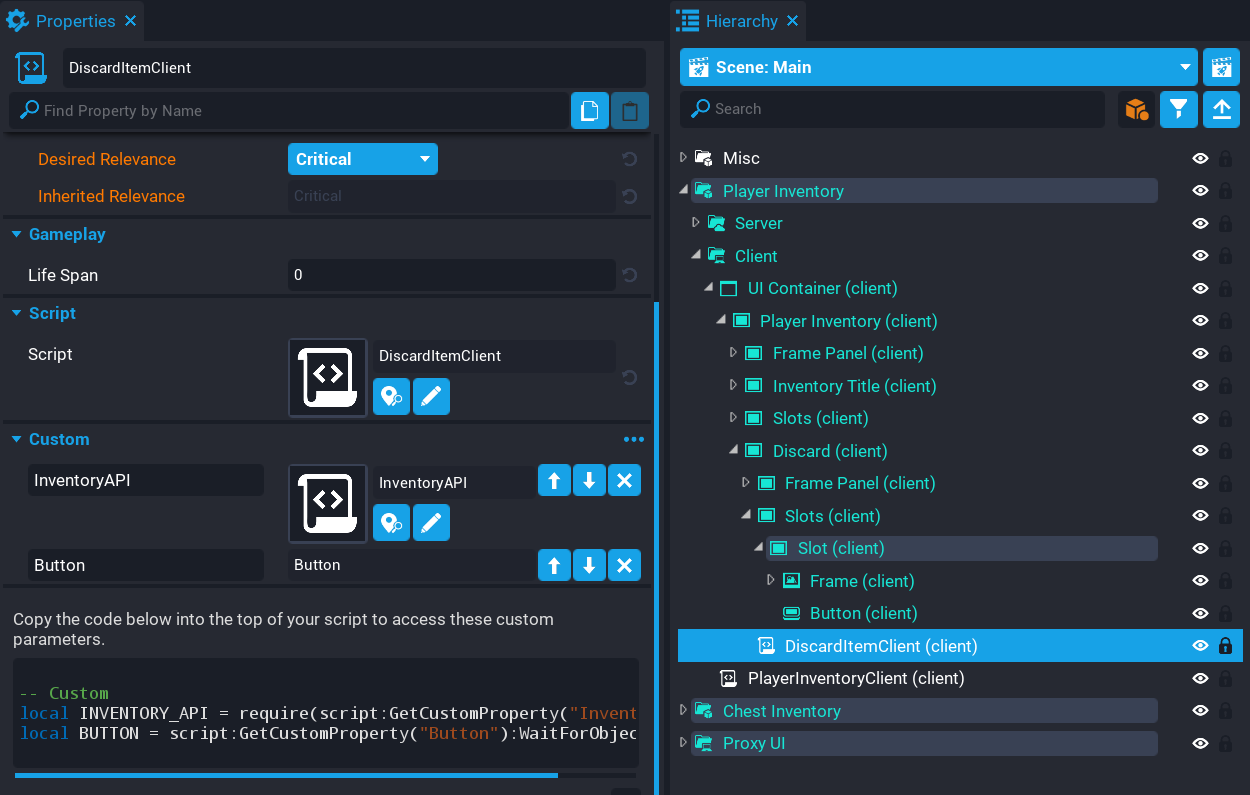
Edit DiscardItemClient Script
Open up the DiscardItemClient script and require the inventory API and add a reference to the button property.
local API = require(script:GetCustomProperty("InventoryAPI"))

local BUTTON = script:GetCustomProperty("Button"):WaitForObject()
Connect Button Event
The button needs a clickedEvent so that when the button is clicked by the player, the item will be removed. At the moment there is no API function to do this, so you will need to create one in the next section.
BUTTON.clickedEvent:Connect(API.RemoveItemSlotPressed)
The DiscardItemClient Script
DiscardItemClient
local API = require(script:GetCustomProperty("InventoryAPI"))

local BUTTON = script:GetCustomProperty("Button"):WaitForObject()

BUTTON.clickedEvent:Connect(API.RemoveItemSlotPressed)
Edit InventoryAPI Script
Open up the InventoryAPI script so you can add 2 new functions for the client and server to handle discarding items.
Create RemoveItemHandler Function
Create a new function called RemoveItemHandler. This is a client-side function that will be called when the player clicks on the discard item slot.
The function takes in the current inventory id and the slot index that will have the item removed. If the CanRemoveFromSlot returns true, then the inventory item will be removed from that player's inventory.
function API.RemoveItemHandler(inventoryId, slotIndex)
    local inventory = API.INVENTORIES[inventoryId]

    if inventory ~= nil then
        if inventory:CanRemoveFromSlot(slotIndex) then
            inventory:RemoveFromSlot(slotIndex)
        end
    end
end
Create RemoveItemSlotPressed Function
Create a new function called RemoveItemSlotPressed. This is a client-side function that will be called when the player clicks on the discard item slot.
If the player has an active item, then it will broadcast to the server to remove the item from the player's inventory. At the same time, it will reset the current active inventory slot and turn off the proxy.
function API.RemoveItemSlotPressed()
    if API.ACTIVE.hasItem and API.ACTIVE.inventory ~= nil then
        Events.BroadcastToServer("inventory.removeitem", API.ACTIVE.inventory.id, API.ACTIVE.slotIndex)
        API.ACTIVE.slot.opacity = 1
        API.ACTIVE.slotIcon.visibility = Visibility.FORCE_OFF
        API.ClearDraggedItem()
        API.PROXY.visibility = Visibility.FORCE_OFF
    end
end
Connect Broadcast Event
The client will send a broadcast to the server to perform the remove action on the inventory, so it needs to be connected up.
Update the events in the script to include a new one for the event.
if Environment.IsServer() then
    Events.Connect("inventory.moveitem", API.MoveItemHandler)
    Events.Connect("inventory.removeitem", API.RemoveItemHandler)
end
The InventoryAPI Script
InventoryAPI
local ASSETS = require(script:GetCustomProperty("InventoryAssets"))
local INVENTORY = script:GetCustomProperty("Inventory")

local API = {}

API.PLAYERS = {}
API.INVENTORIES = {}
API.ACTIVE = {

    slot = nil,
    slotIcon = nil,
    slotCount = nil,
    slotIndex = nil,
    inventory = nil,
    hasItem = false

}

-- Server

function API.RegisterInventory(inventory)
    API.INVENTORIES[inventory.id] = inventory
end

function API.CreatePlayerInventory(player)
    local inventory = World.SpawnAsset(INVENTORY, { networkContext = NetworkContextType.NETWORKED })

    inventory:Assign(player)
    inventory.name = player.name

    API.PLAYERS[player.id] = inventory
    API.RegisterInventory(inventory)
end

function API.LoadPlayerInventory(player)
    local data = Storage.GetPlayerData(player)

    if data.inv ~= nil then
        for i, entry in ipairs(data.inv) do
            local item = API.FindLookupItemByKey(entry[1])

            if item ~= nil and API.PLAYERS[player.id]:CanAddItem(item.asset, { count = entry[2], slot = i }) then
                API.PLAYERS[player.id]:AddItem(item.asset, { count = entry[2], slot = i })
            end
        end
    end
end

function API.SavePlayerInventory(player)
    local data = Storage.GetPlayerData(player)

    data.inv = {}

    for i = 1, API.PLAYERS[player.id].slotCount do
        local item = API.PLAYERS[player.id]:GetItem(i)
        local entry = {}

        if item then
            local lookupItem = API.FindLookupItemByAssetId(item)

            if lookupItem ~= nil then
                entry = { lookupItem.key, item.count }
            end
        end

        table.insert(data.inv, entry)
    end

    Storage.SetPlayerData(player, data)
end

function API.RemovePlayerInventory(player)
    API.INVENTORIES[API.PLAYERS[player.id].id] = nil
    API.PLAYERS[player.id]:Destroy()
    API.PLAYERS[player.id] = nil
end

function API.MoveItemHandler(fromInventoryId, toInventoryId, fromSlotIndex, toSlotIndex)
    local fromInventory = API.INVENTORIES[fromInventoryId]
    local toInventory = API.INVENTORIES[toInventoryId]

    if fromInventory ~= nil and toInventory ~= nil then
        if fromInventory == toInventory then
            if fromInventory:CanMoveFromSlot(fromSlotIndex, toSlotIndex) then
                fromInventory:MoveFromSlot(fromSlotIndex, toSlotIndex)
            end
        else
            local fromItem = fromInventory:GetItem(fromSlotIndex)
            local toItem = toInventory:GetItem(toSlotIndex)

            local fromItemAssetId = fromItem.itemAssetId
            local fromItemCount = fromItem.count

            if toItem ~= nil then
                local toItemAssetId = toItem.itemAssetId
                local toItemCount = toItem.count
                local skipFromItem = false

                if toItemAssetId == fromItemAssetId then
                    local total = toItemCount + fromItemCount

                    if total > toItem.maximumStackCount then
                        if toItemCount == toItem.maximumStackCount then
                            toItemCount = toItem.maximumStackCount
                            fromItemCount = total - toItem.maximumStackCount
                        else
                            toItemCount = total - toItem.maximumStackCount
                            fromItemCount = toItem.maximumStackCount
                        end
                    else
                        skipFromItem = true
                        fromItemCount = total
                    end
                end

                fromInventory:RemoveFromSlot(fromSlotIndex)
                toInventory:RemoveFromSlot(toSlotIndex)

                if not skipFromItem then
                    fromInventory:AddItem(toItemAssetId, { count = toItemCount, slot = fromSlotIndex })
                end
            else
                fromInventory:RemoveFromSlot(fromSlotIndex)
            end

            toInventory:AddItem(fromItemAssetId, { count = fromItemCount, slot = toSlotIndex })
        end
    end
end

function API.RemoveItemHandler(inventoryId, slotIndex)
    local inventory = API.INVENTORIES[inventoryId]

    if inventory ~= nil then
        if inventory:CanRemoveFromSlot(slotIndex) then
            inventory:RemoveFromSlot(slotIndex)
        end
    end
end

-- Client

function API.ClearDraggedItem()
    API.ACTIVE.slot = nil
    API.ACTIVE.slotIcon = nil
    API.ACTIVE.slotCount = nil
    API.ACTIVE.slotIndex = nil
    API.ACTIVE.inventory = nil
    API.ACTIVE.hasItem = false
end

function API.SetDragProxy(proxy)
    API.PROXY = proxy
    API.PROXY_ICON = proxy:FindChildByName("Icon")
    API.PROXY_COUNT = API.PROXY_ICON:FindChildByName("Count")
end

function API.EnableCursor()
    UI.SetCanCursorInteractWithUI(true)
    UI.SetCursorVisible(true)
end

function API.DisableCursor()
    UI.SetCanCursorInteractWithUI(false)
    UI.SetCursorVisible(false)
end

function API.OnSlotPressedEvent(button, inventory, slot, slotIndex)
    local icon = slot:FindChildByName("Icon")
    local isHidden = icon.visibility == Visibility.FORCE_OFF and true or false
    local count = icon:FindChildByName("Count")

    -- Has item already.
    if API.ACTIVE.hasItem then

        -- No icon, so this is an empty slot, and dropping it into it.
        if isHidden then
            icon.visibility = Visibility.FORCE_ON
            icon:SetImage(API.PROXY_ICON:GetImage())
            API.ACTIVE.slot.opacity = 1
            API.ACTIVE.slotIcon.visibility = Visibility.FORCE_OFF
            count.text = API.ACTIVE.slotCount.text
            API.ACTIVE.slotCount.text = "0"

        -- Slot contains existing item
        else
            local item = API.ACTIVE.inventory:GetItem(API.ACTIVE.slotIndex)
            local toItem = inventory:GetItem(slotIndex)

            if item ~= nil and toItem ~= nil and item.itemAssetId == toItem.itemAssetId and toItem.count == toItem.maximumStackCount then
                API.ACTIVE.slot.opacity = 1
            else
                local tmpImg = icon:GetImage()
                local tmpCount = count.text

                icon:SetImage(API.ACTIVE.slotIcon:GetImage())
                count.text = API.ACTIVE.slotCount.text
                API.ACTIVE.slotIcon:SetImage(tmpImg)
                API.ACTIVE.slotCount.text = tmpCount
                API.ACTIVE.slot.opacity = 1

                tmpCount = nil
                tmpImg = nil
            end
        end

        Events.BroadcastToServer("inventory.moveitem", API.ACTIVE.inventory.id, inventory.id, API.ACTIVE.slotIndex, slotIndex)

        API.ClearDraggedItem()
        API.PROXY.visibility = Visibility.FORCE_OFF

    -- No item, pick up from clicked slot.
    elseif not isHidden then
        API.PROXY.visibility = Visibility.FORCE_ON
        API.ACTIVE.hasItem = true
        API.PROXY_ICON:SetImage(icon:GetImage())
        API.PROXY_COUNT.text = tostring(inventory:GetItem(slotIndex).count)
        slot.opacity = .6
        API.ACTIVE.slot = slot
        API.ACTIVE.slotIcon = icon
        API.ACTIVE.slotCount = count
        API.ACTIVE.slotIndex = slotIndex
        API.ACTIVE.inventory = inventory
    end
end

-- Shared

function API.FindLookupItemByKey(key)
    for i, dataItem in pairs(ASSETS) do
        if key == dataItem.key then
            return dataItem
        end
    end
end

function API.FindLookupItemByAssetId(item)
    for i, dataItem in pairs(ASSETS) do
        local id = CoreString.Split(dataItem.asset, ":")

        if id == item.itemAssetId then
            return dataItem
        end
    end
end

function API.RemoveItemSlotPressed()
    if API.ACTIVE.hasItem and API.ACTIVE.inventory ~= nil then
        Events.BroadcastToServer("inventory.removeitem", API.ACTIVE.inventory.id, API.ACTIVE.slotIndex)
        API.ACTIVE.slot.opacity = 1
        API.ACTIVE.slotIcon.visibility = Visibility.FORCE_OFF
        API.ClearDraggedItem()
        API.PROXY.visibility = Visibility.FORCE_OFF
    end
end

-- Events

if Environment.IsServer() then
    Events.Connect("inventory.moveitem", API.MoveItemHandler)
    Events.Connect("inventory.removeitem", API.RemoveItemHandler)
end

return API
Test the Game
Test the game to make sure items can be discarded.
Summary
Inventories are a great feature for players to use, it allows them to see how much they have collected, order them in a specific way, and stash rare items they wish to never discard.
There are lots of use cases for using an inventory, because all that is being stored is data, and that data can be many things. For example, storing information where a block has been spawned in the world that will update for all players and those that join late.
Here are some improvements that could be added to the inventory created in this tutorial:
- Add hover and unhover effects to the slots.
- Add stack splitting, so that pressing a key will add 1 to a slot.
- Allow the player to drop items into the world which can be picked up again.
- Added sorting options to the inventory.
- Save the items in the chest inventory so they persist between sessions.
Learn More
Data Tables Reference | Inventories Reference | Inventory API | Inventory Item API | Inventory Item Object API | Persistent Storage Reference